¶ Settings
¶ General
- The General page in the Setting section is the area where the general features of the application are set.
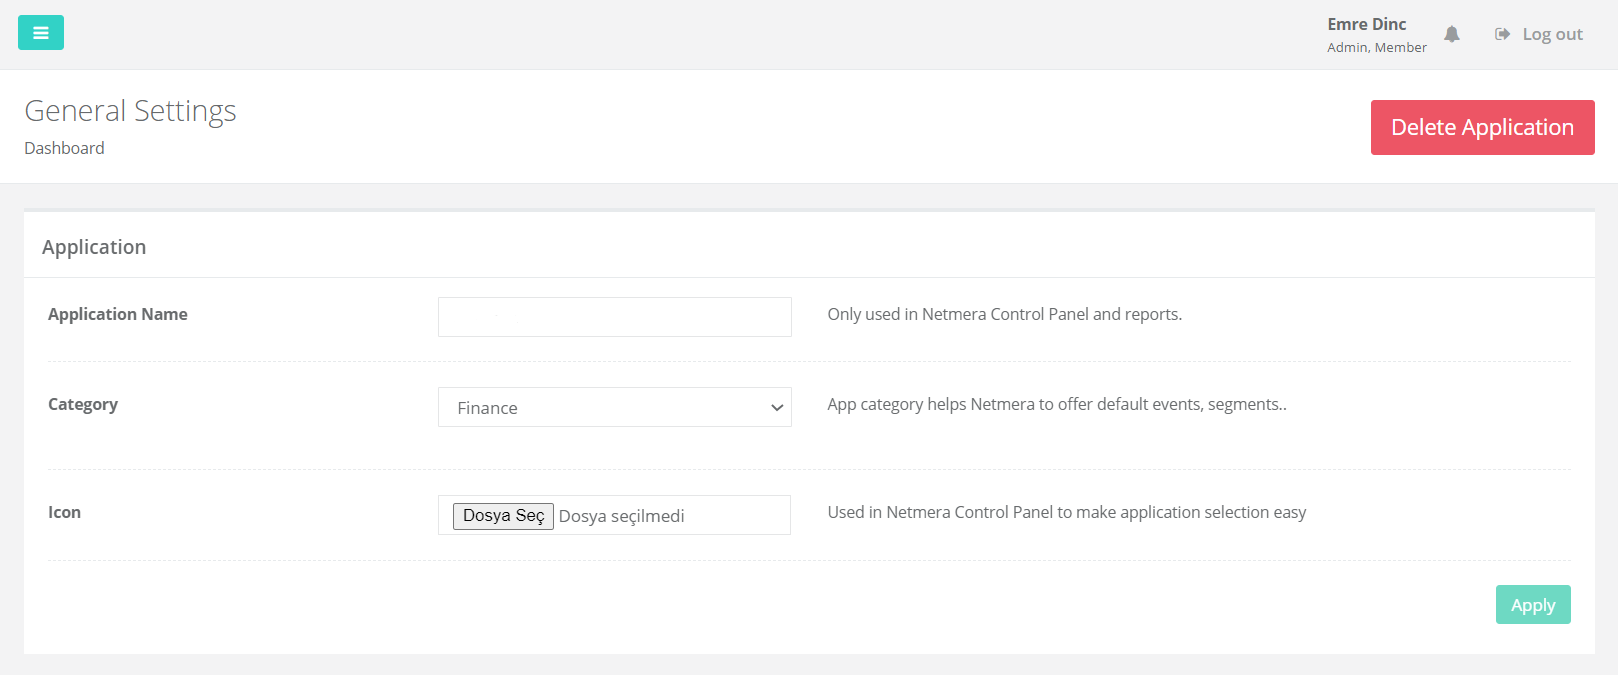
¶ Application
- In the Application field, a name and category are specified for the Application panel. The selected name is used in the Netmera control panel and reports. The selected category allows Netmera to provide panel users with default events and segments.
- In the icon area, an image is selected for the application. This icon makes it easier to choose between applications in the Netmera control panel.
- The application can be removed from the panel with the Delete Application button.
¶ Messaging
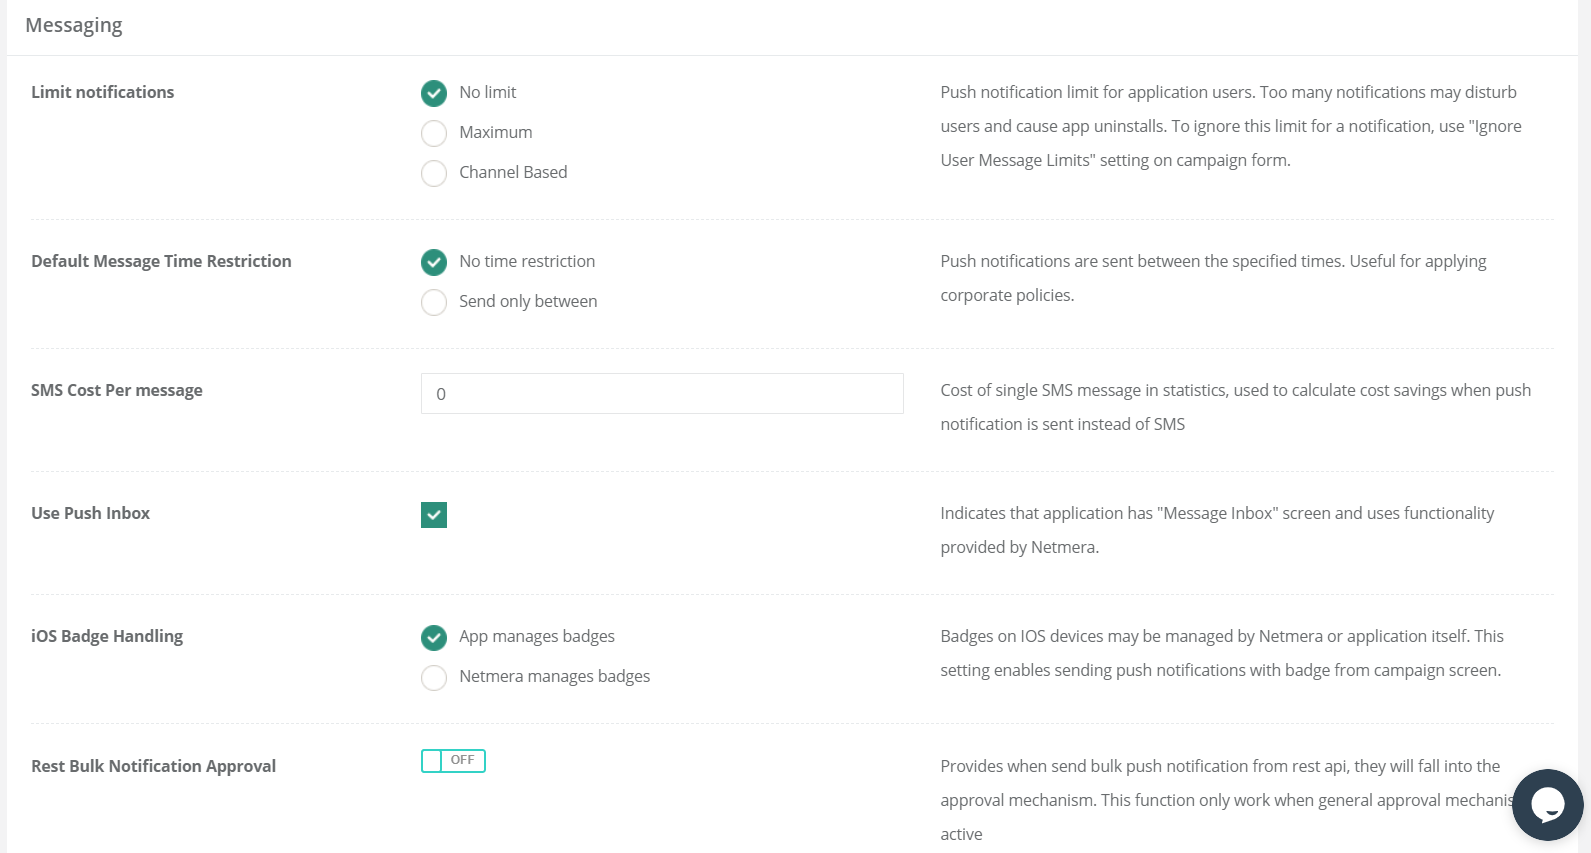
- Limit Notification: Push notification limit for application users. Too many notifications may disturb users and cause app uninstalls. To ignore this limit for a notification, use "Ignore User Message Limits" setting on campaign form.For this reason, it may be necessary to set daily, weekly and monthly limits for pushes to be sent to users. When creating a new campaign, these limits can be ignored with the “Ignore User Message Limits” option in the “Who” section.
- SMS Cost Per Message: Cost of single SMS message in statistics, used to calculate cost savings when the push notification is sent instead of SMS.
- Use Push Inbox: Indicates that the application has a "Message Inbox" screen and uses functionality provided by Netmera.
- iOS Badge Handling: Badges on IOS devices may be managed by Netmera or the application itself. This setting enables sending push notifications with a badge from the campaign screen.
- Rest Bulk Notification Approval: Provides when sending bulk push notification from rest API, they will fall into the approval mechanism. This function only works when the general approval mechanism is active.
¶ Control Panel
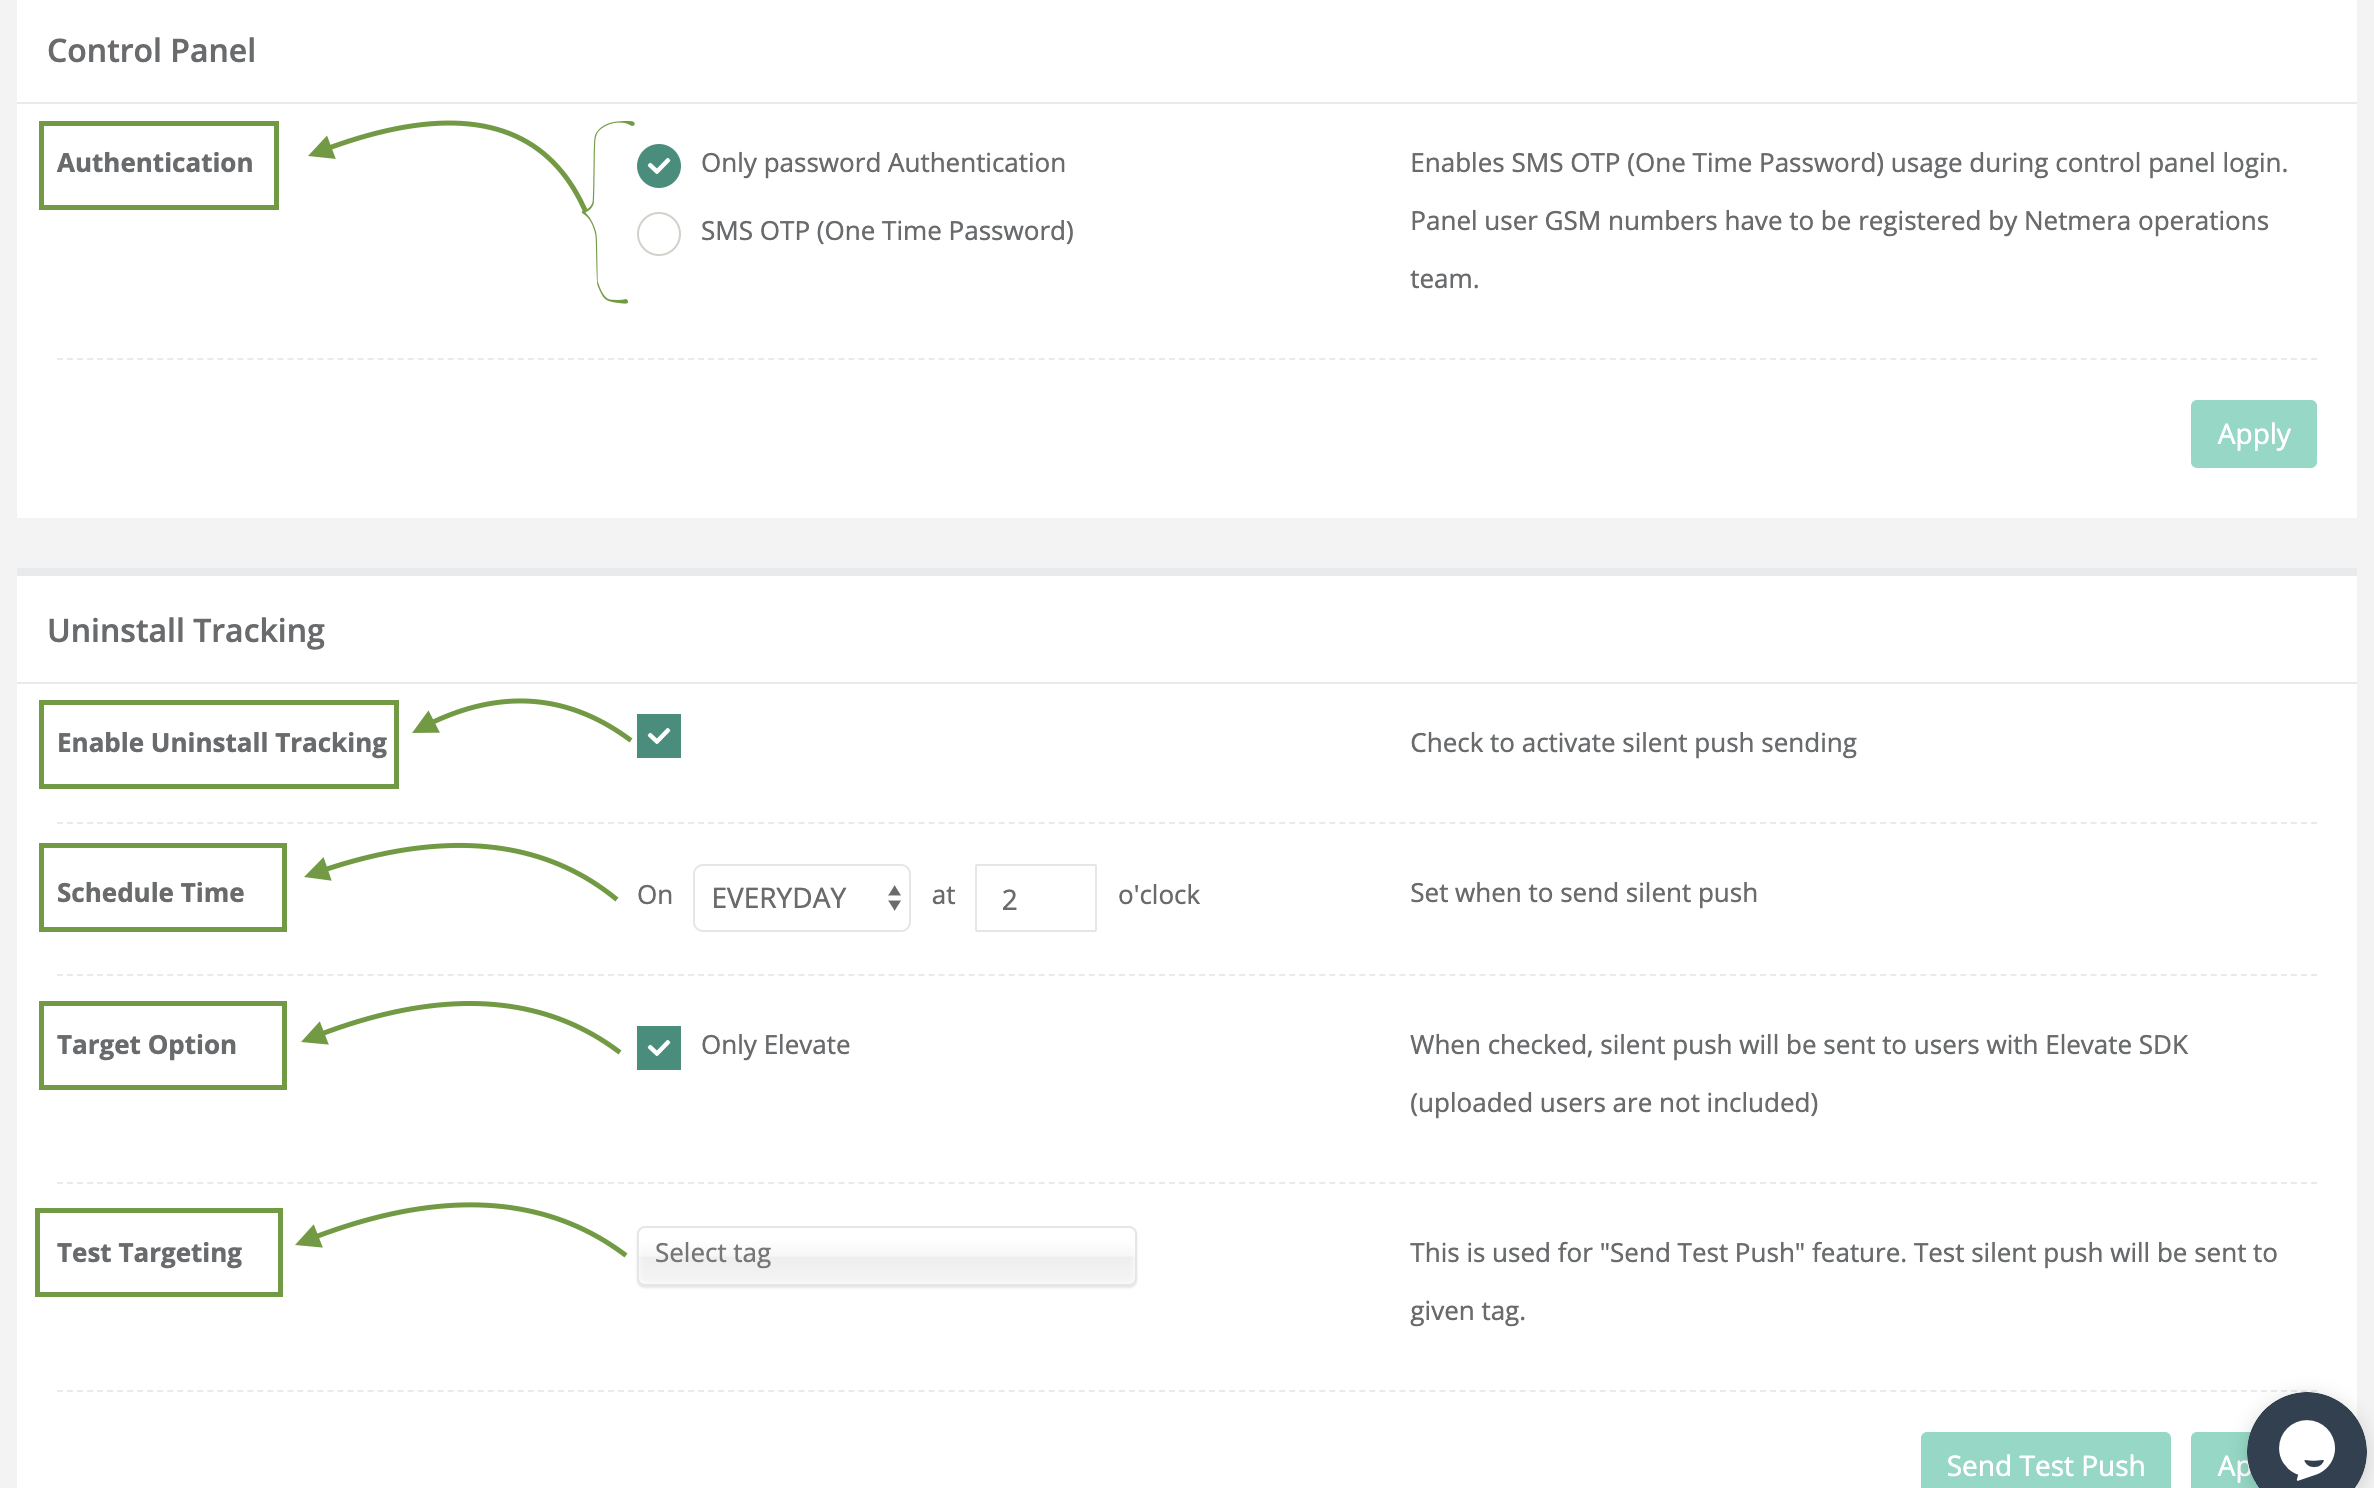
- Authentication: Enables SMS OTP (One Time Password) usage during the control panel login. Panel user GSM numbers have to be registered by the Netmera operations team.
¶ Uninstall Tracking
- Enable Uninstall Tracking: Uninstall Tracking method is applied to check the status of Uninstall by sending Silent Push to the user periodically. Silent Pushes do not appear in the notification panel of the user. If Push is successfully sent, it is understood that the user does not remove the application from their phone. When this field is selected, Silent Push sending is allowed.
- In the Schedule Time field, it is decided at what interval and when to send Silent Push.
- Target Option: is the device ID assigned by "Token Google FCM" or "Apple APNS". Push notifications are made via Token. The users in the system are divided into those who come with the SDK and those who come with the Token. This option allows silent pushes to be sent only to the users who come with the SDK.
- Test Targeting: This option is used to send a test push. Test pushes are sent to the users in the selected Tag.
¶ Test Devices
- Test Devices are used for testing purposes before a push is sent to users.
- There are Test Devices available in the Settings >> Test Devices section. Information about users of devices such as external ID, installation ID, e-mail, device platform, device model, app version and current status can be accessed.Also, the existing test device can be removed from the system with the "delete" button in the "Actions" field.
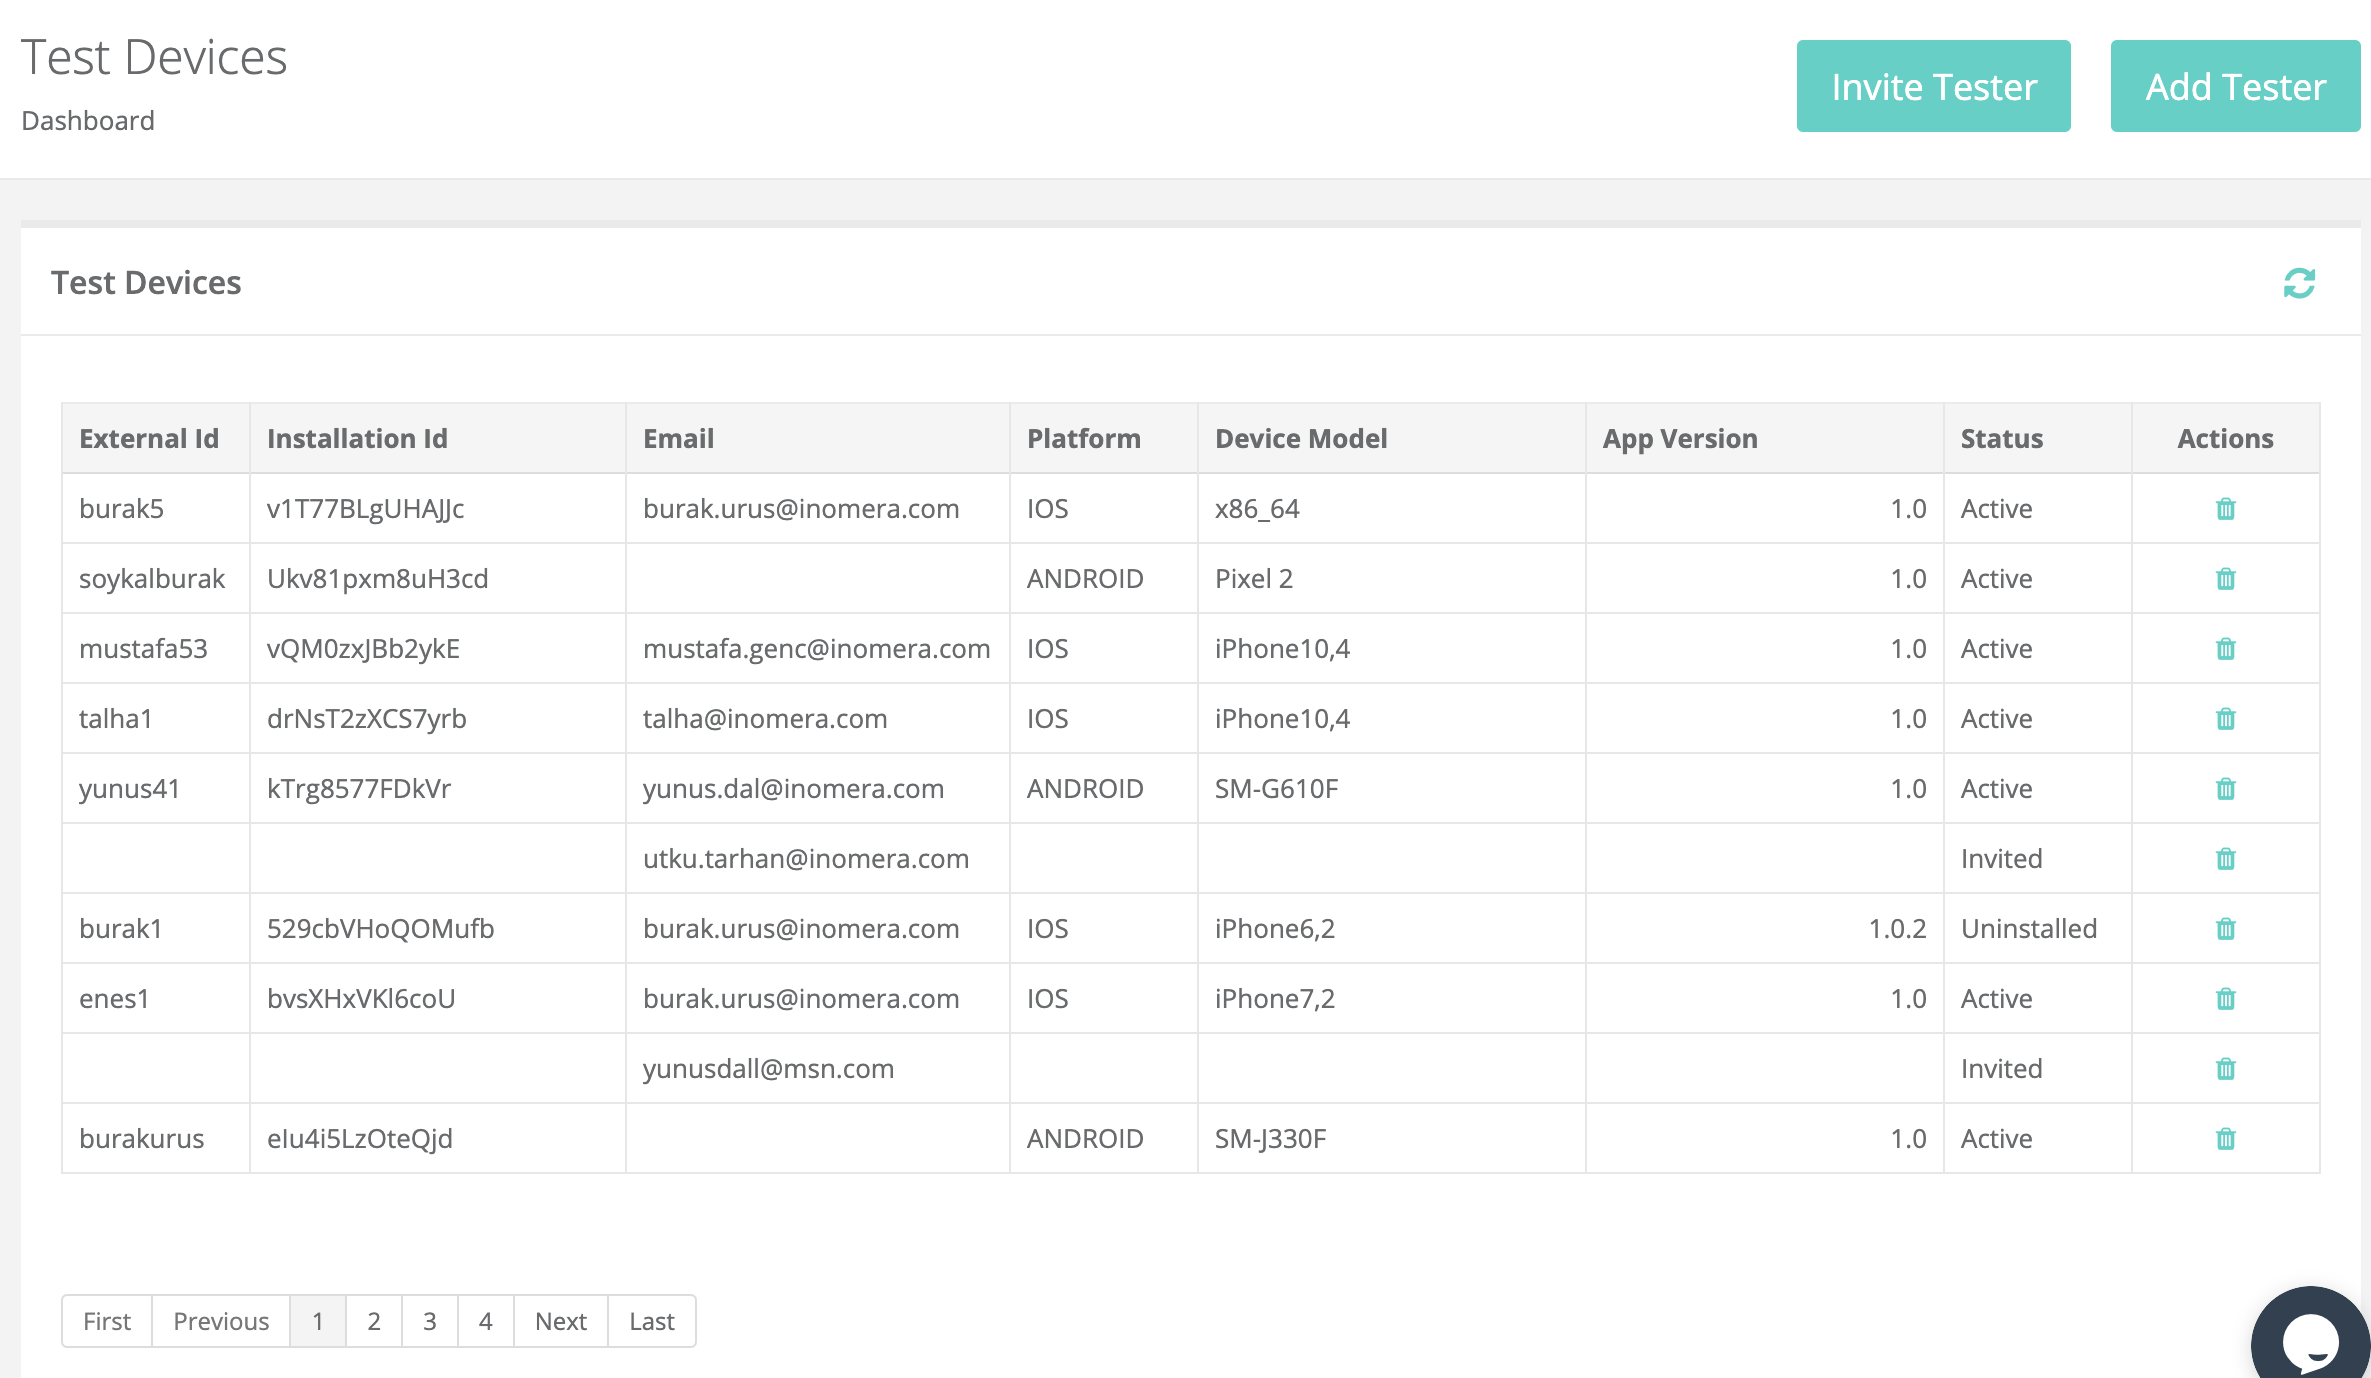
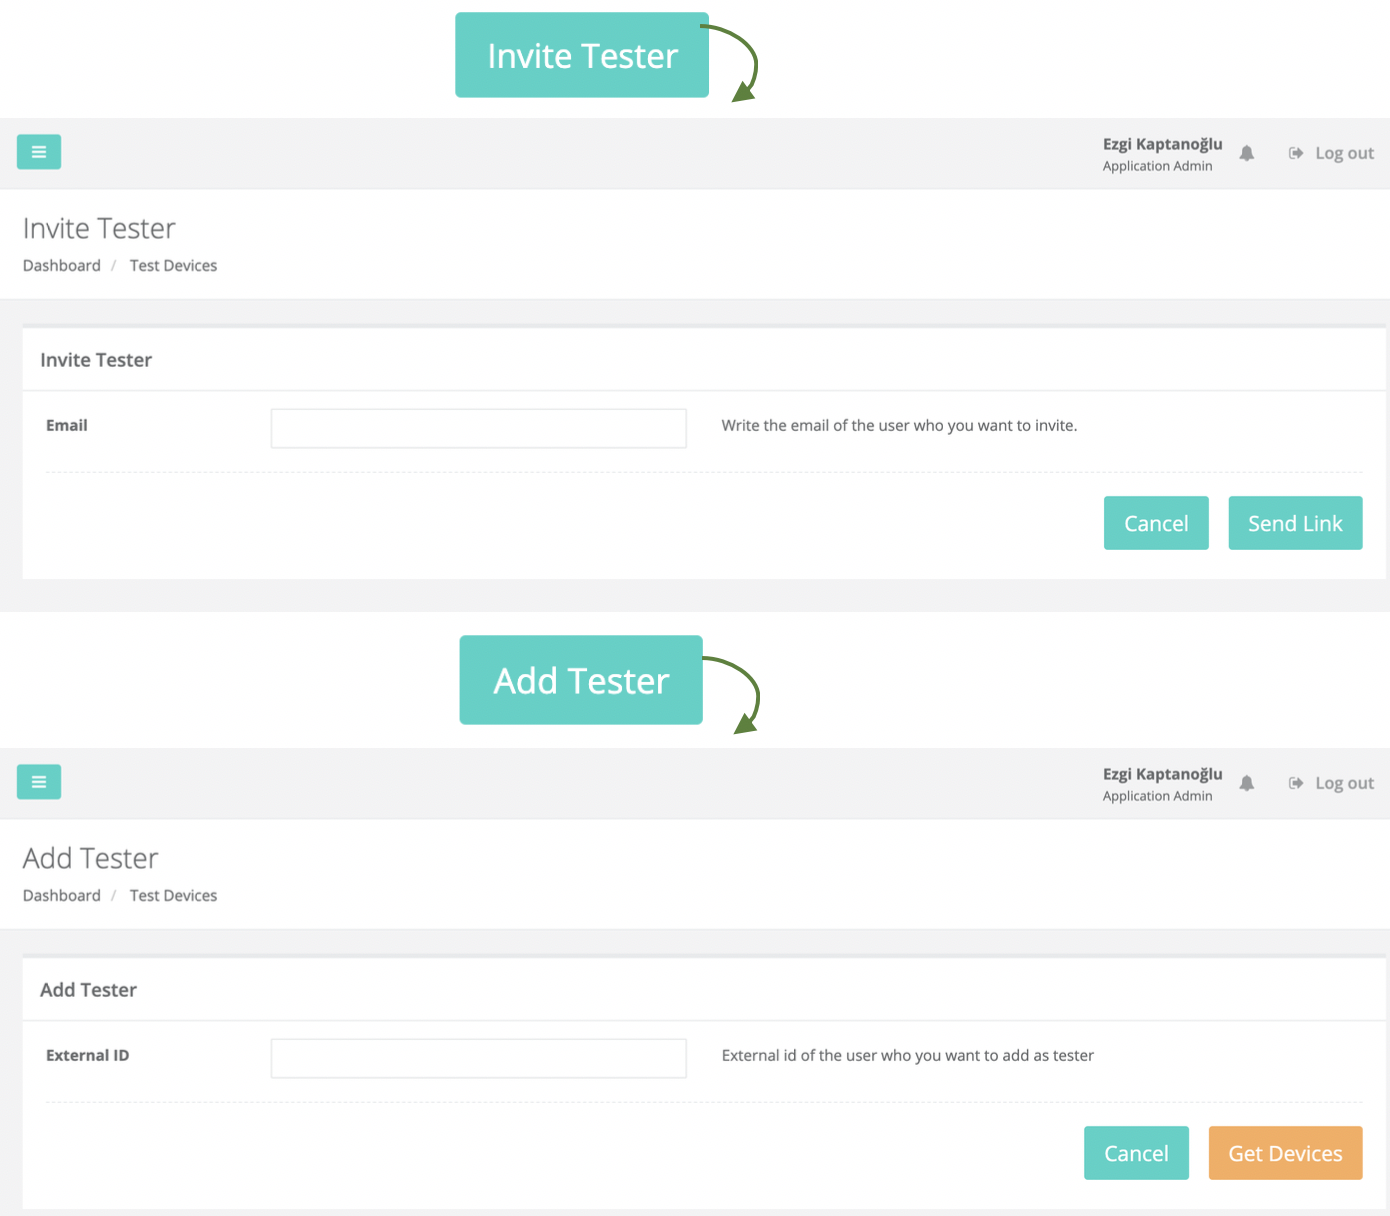
- There are two ways to add a new test device to the system. The first is to add the user by entering the External ID of the user with the "Add Tester" button, and the second is to send an invitation to the user with the "Invite Tester" button.
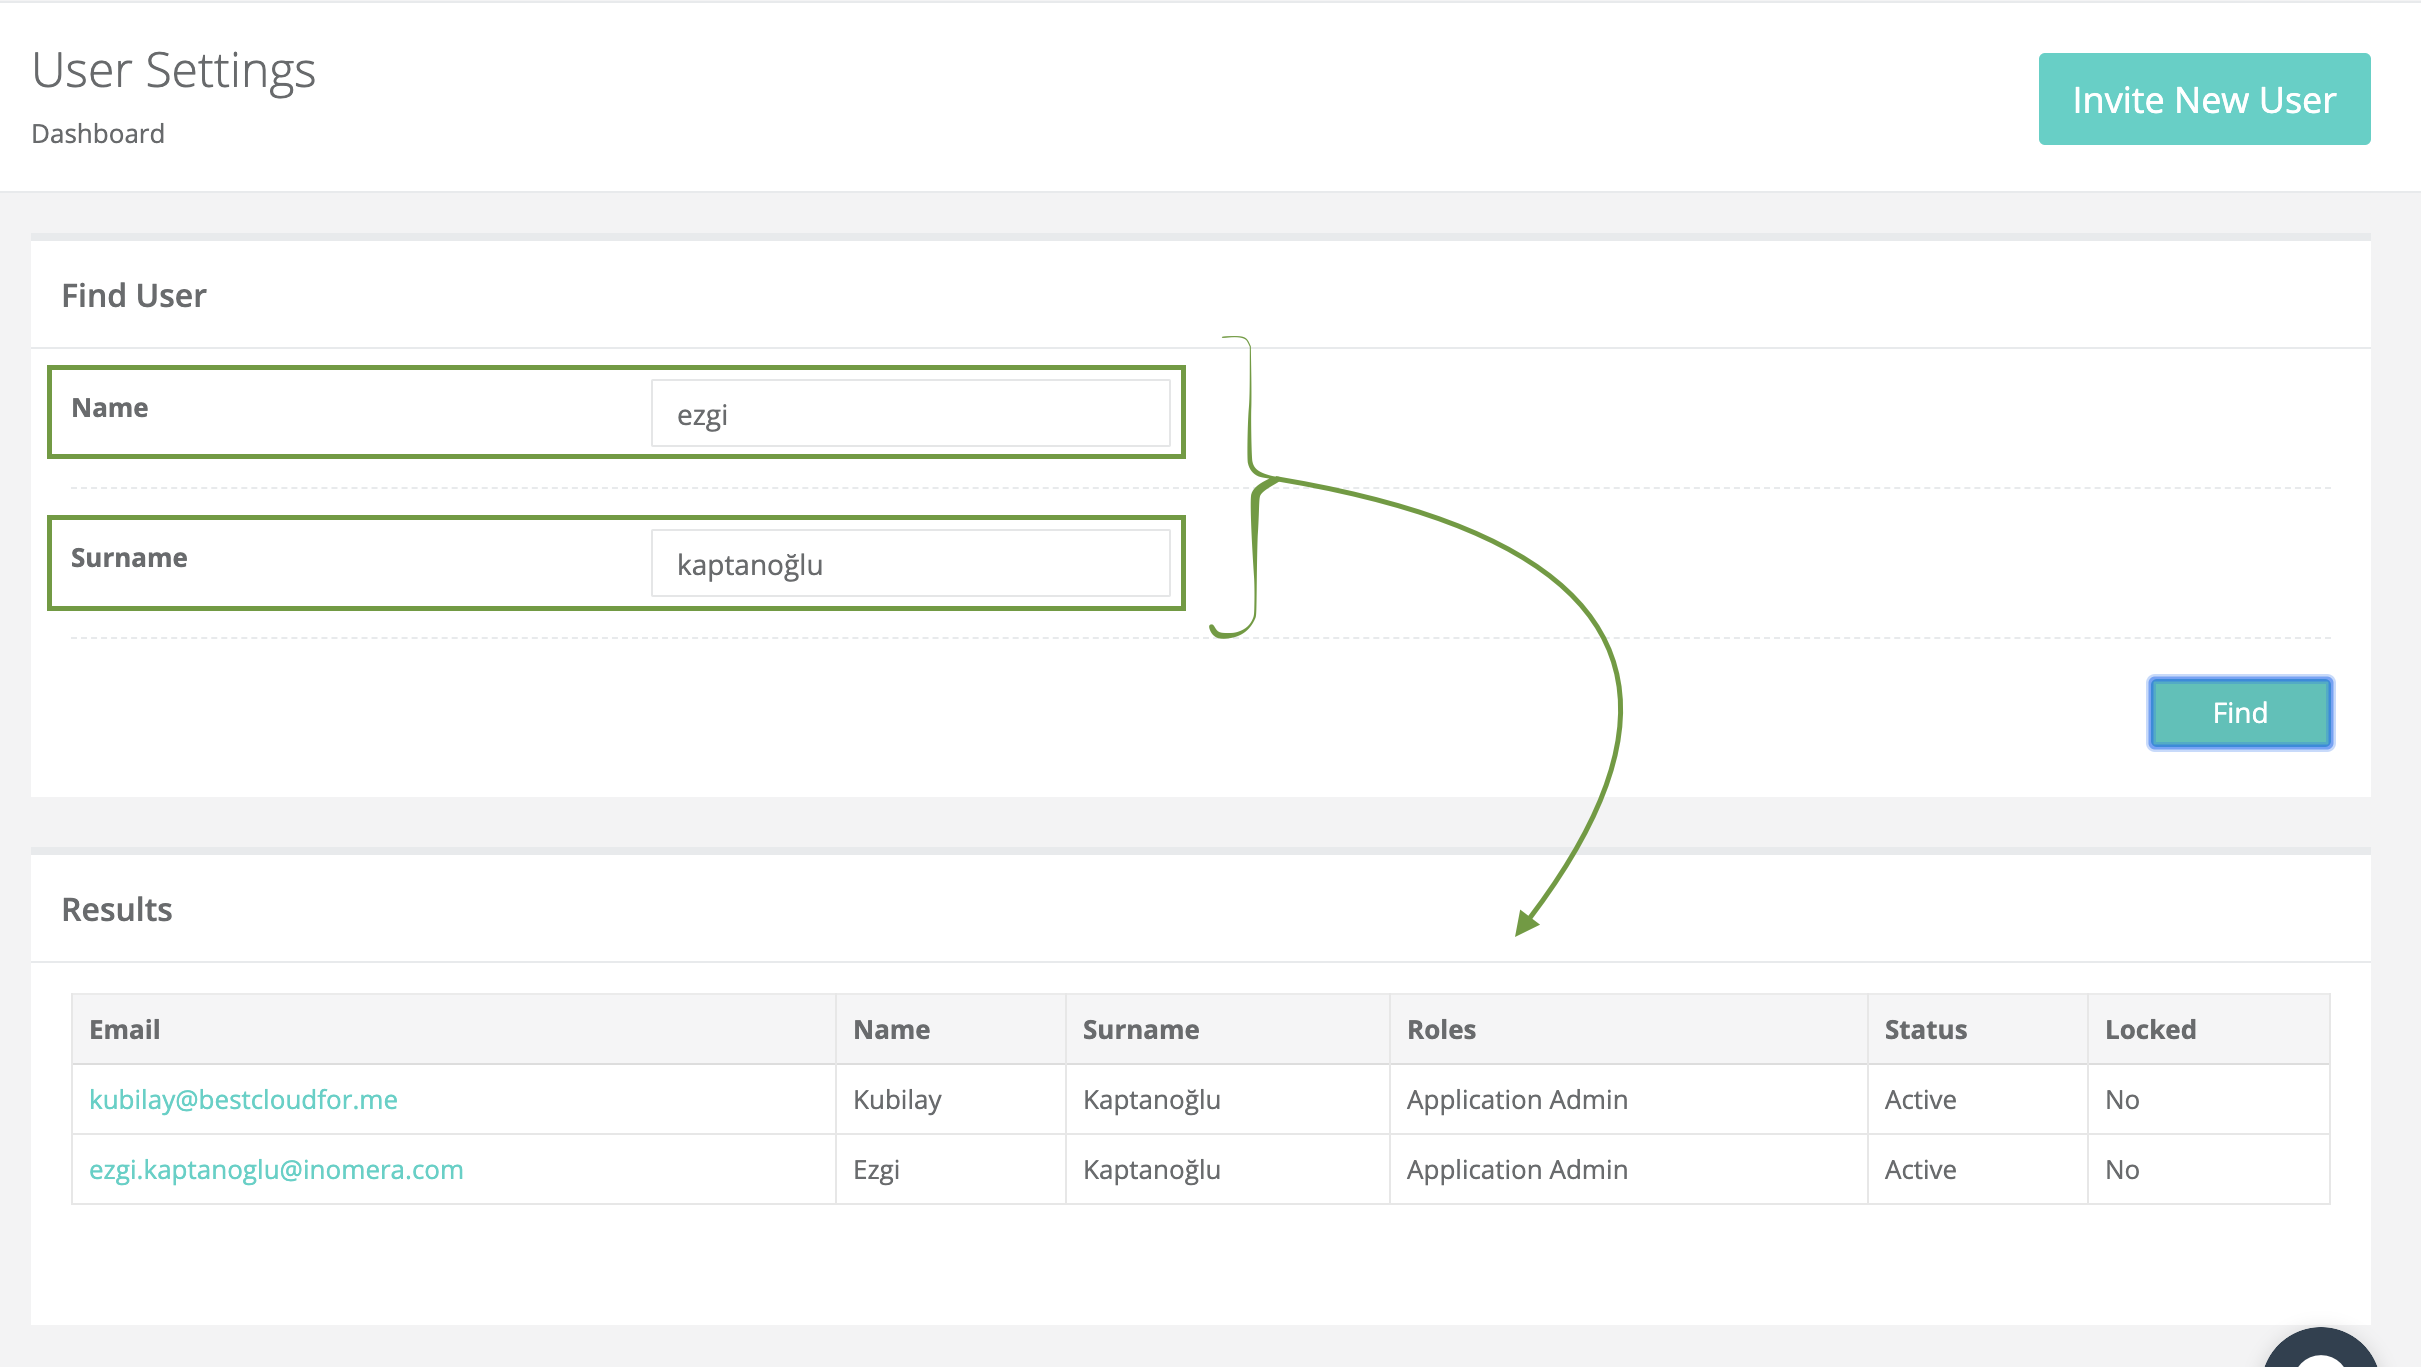
¶ Users
- The User screen is where all users in the panel can be seen and role information can be updated.
- In the Find User section, you can search by username and surname. The results are displayed in the Results section. E-mail, name, surname, application role and current status of the users are shown.
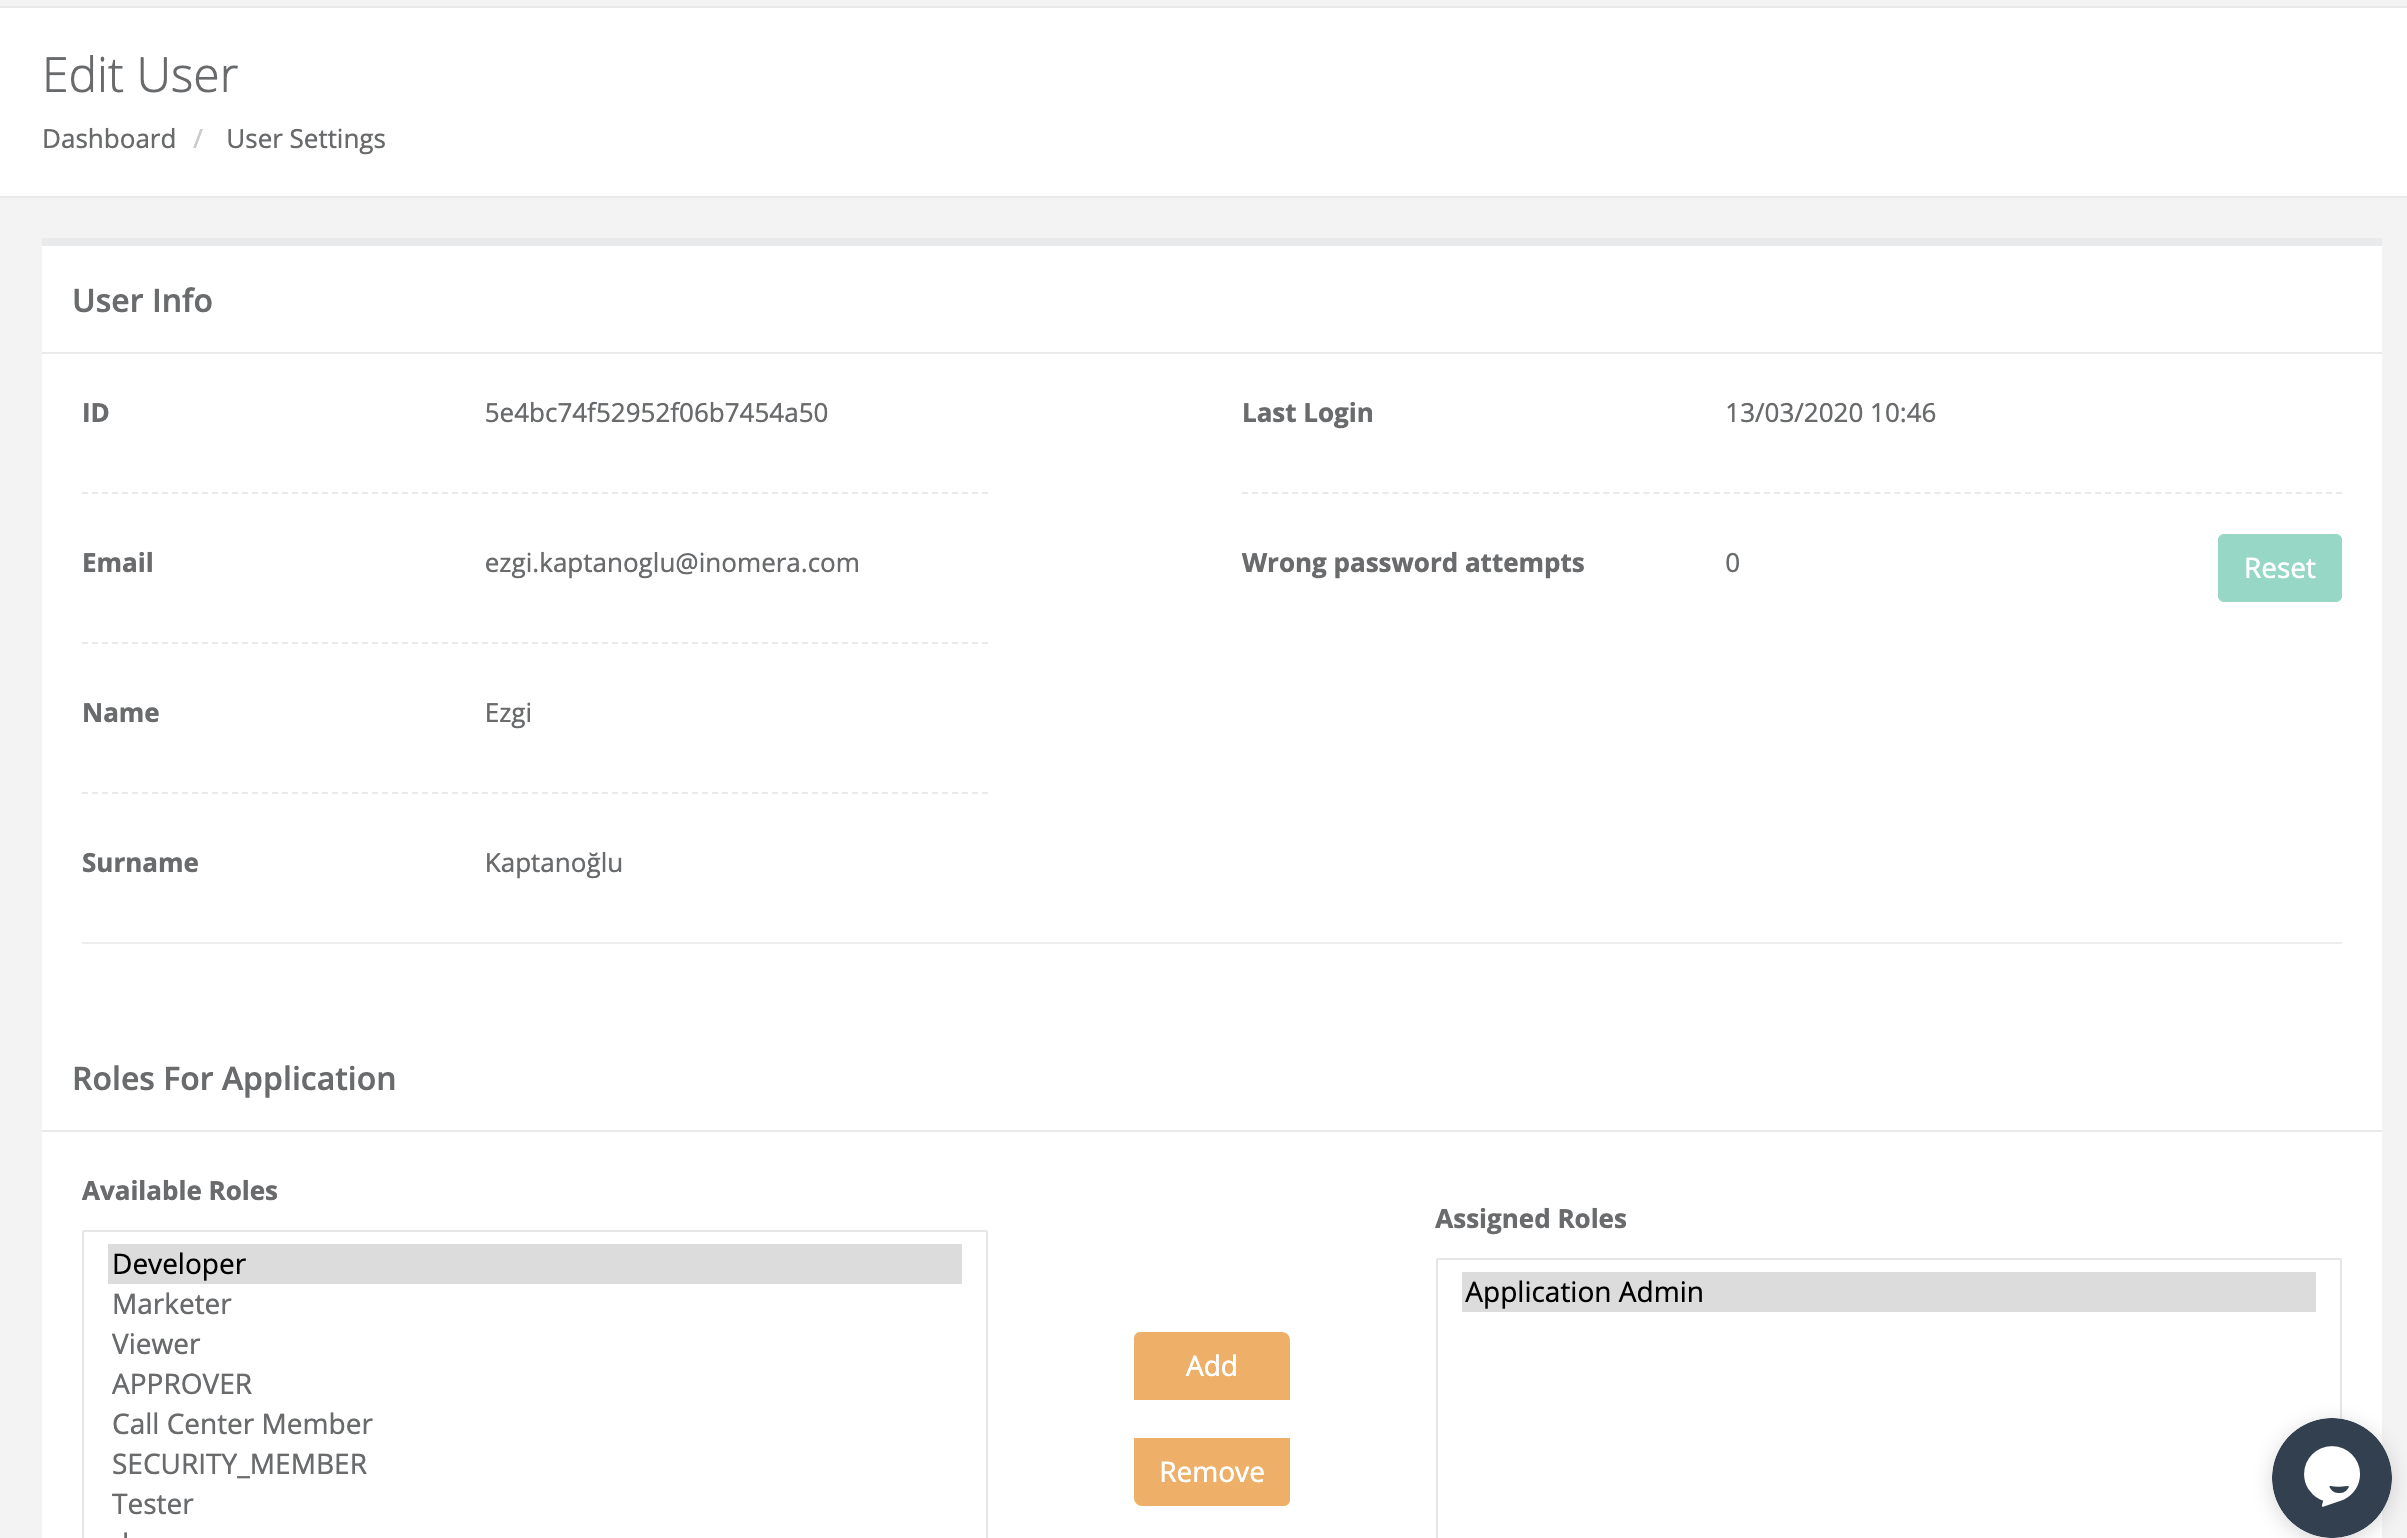
- When clicking on the e-mail address of the user, user information is displayed in the result section. User ID, e-mail, name, surname, last login date and time and wrong password entry numbers are shown here.
- Also, the current role of the user can be seen from the Roles For Application section and new roles can be added to the user from the Available Roles area.
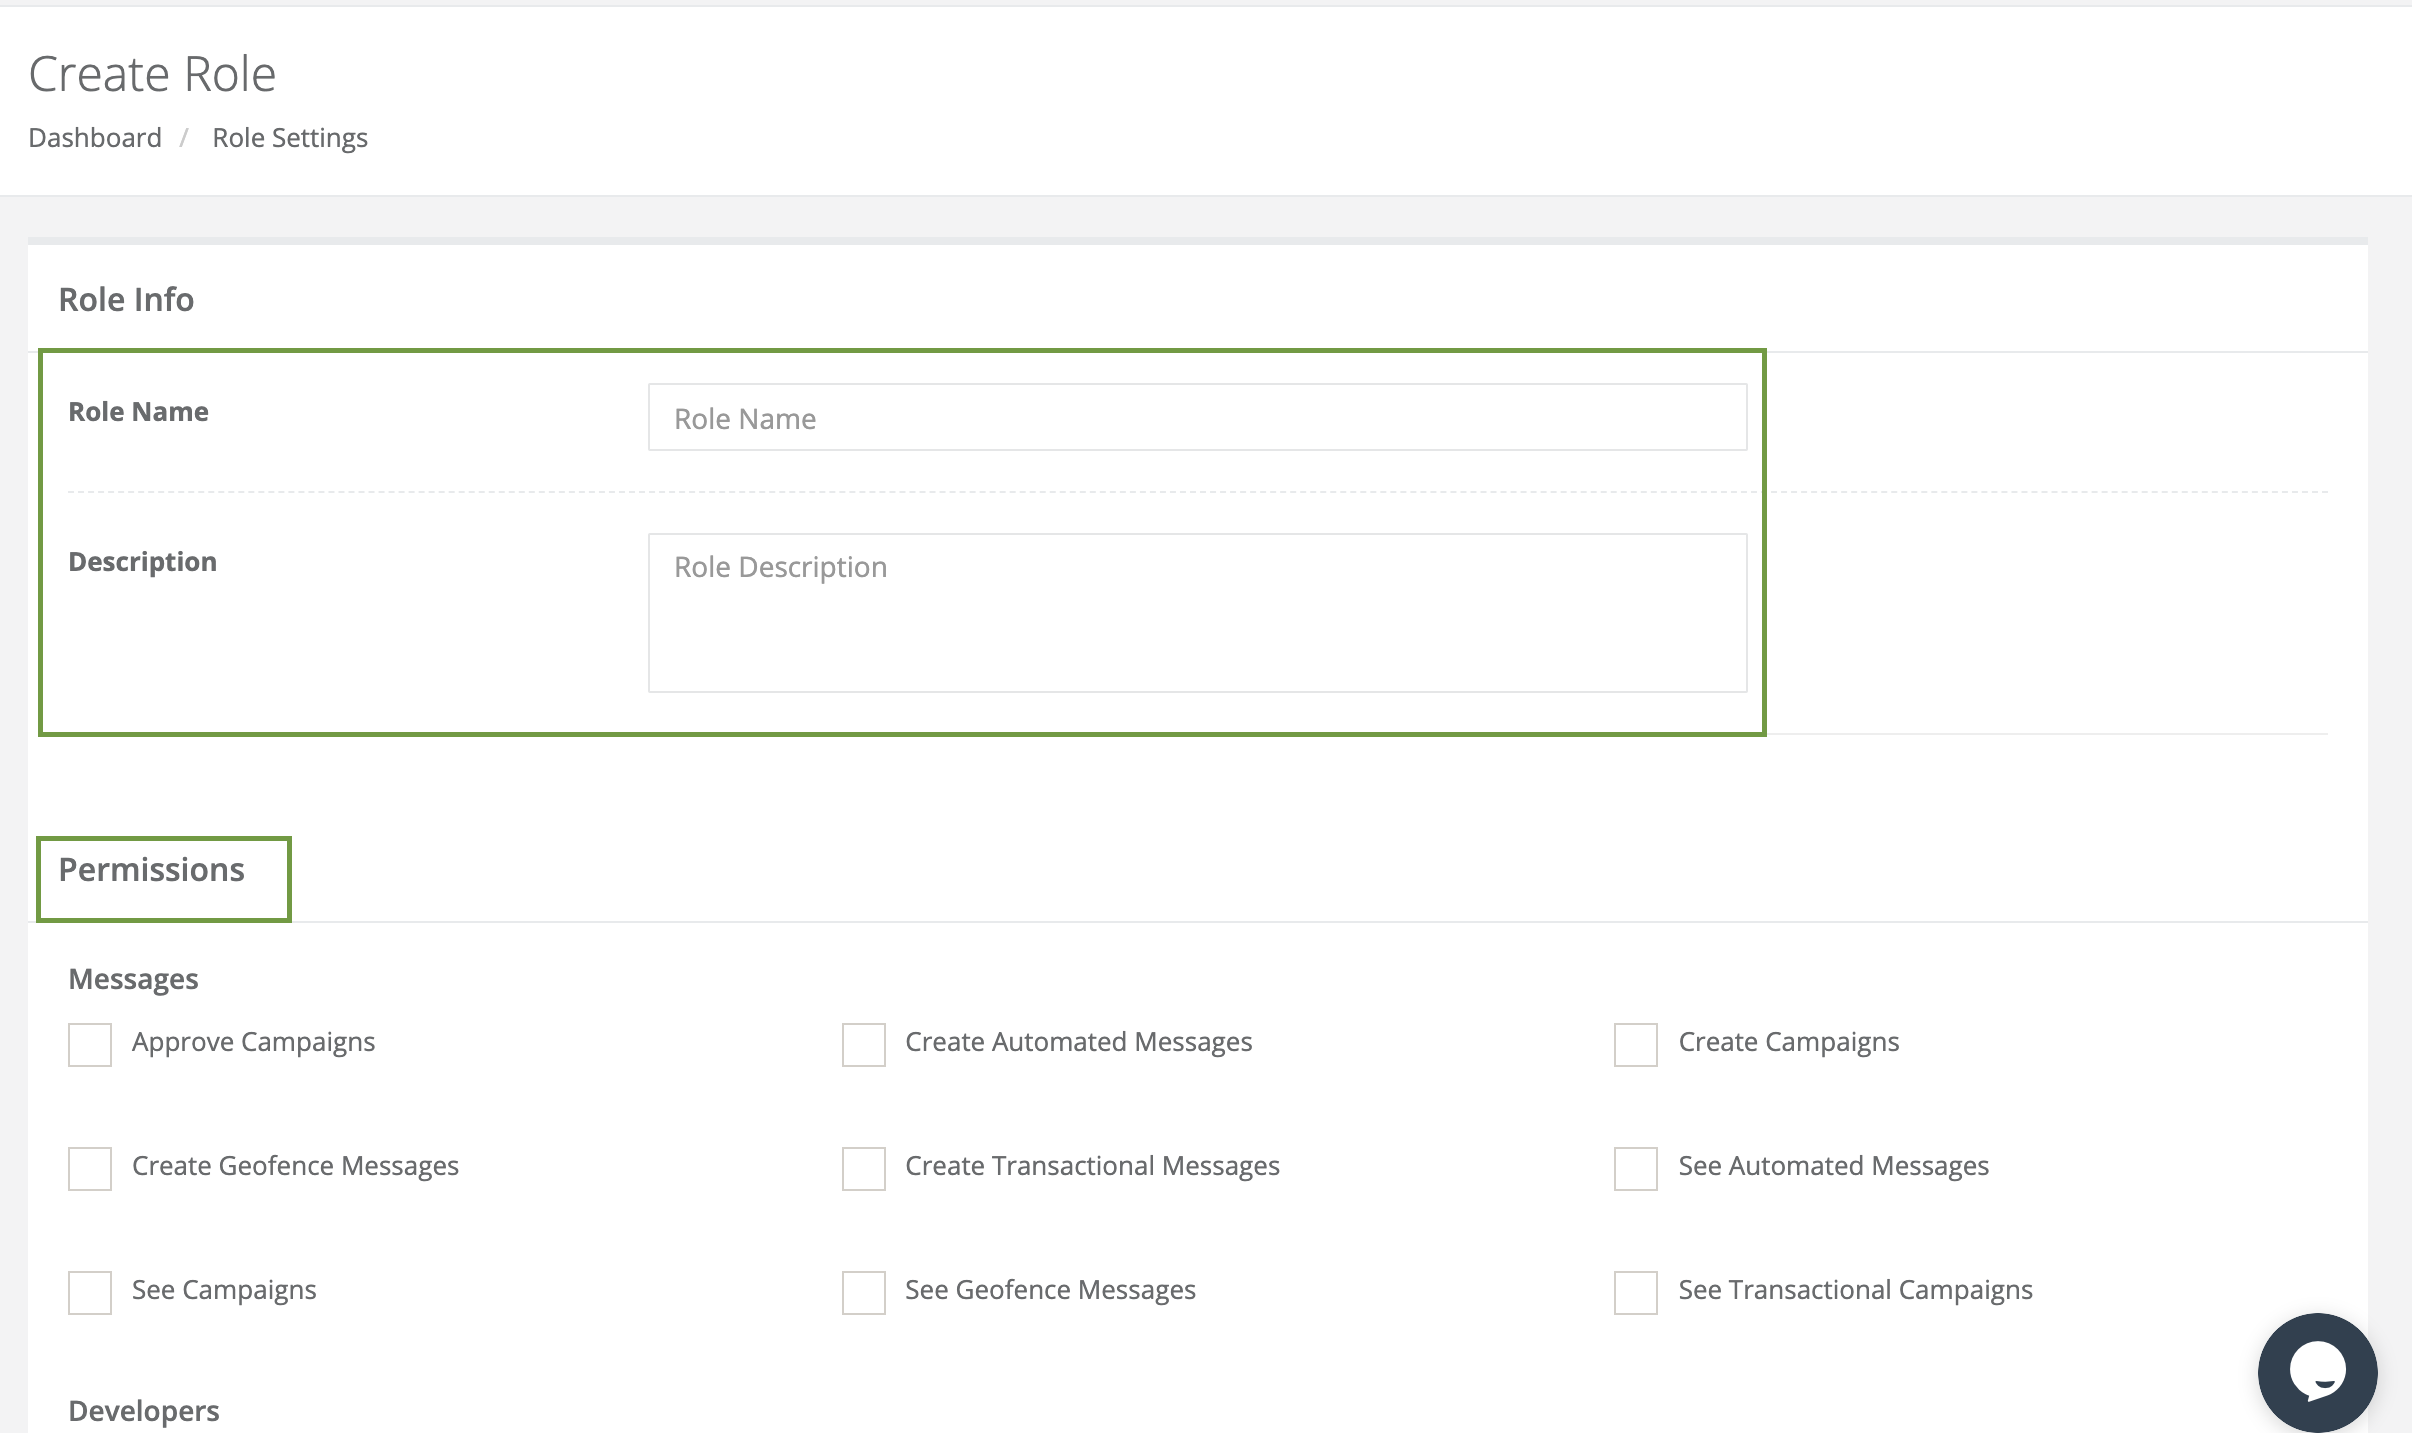
¶ Roles & Permissions
- The Roles & Permissions page shows the user roles registered in the system and the actions users are allowed to take.
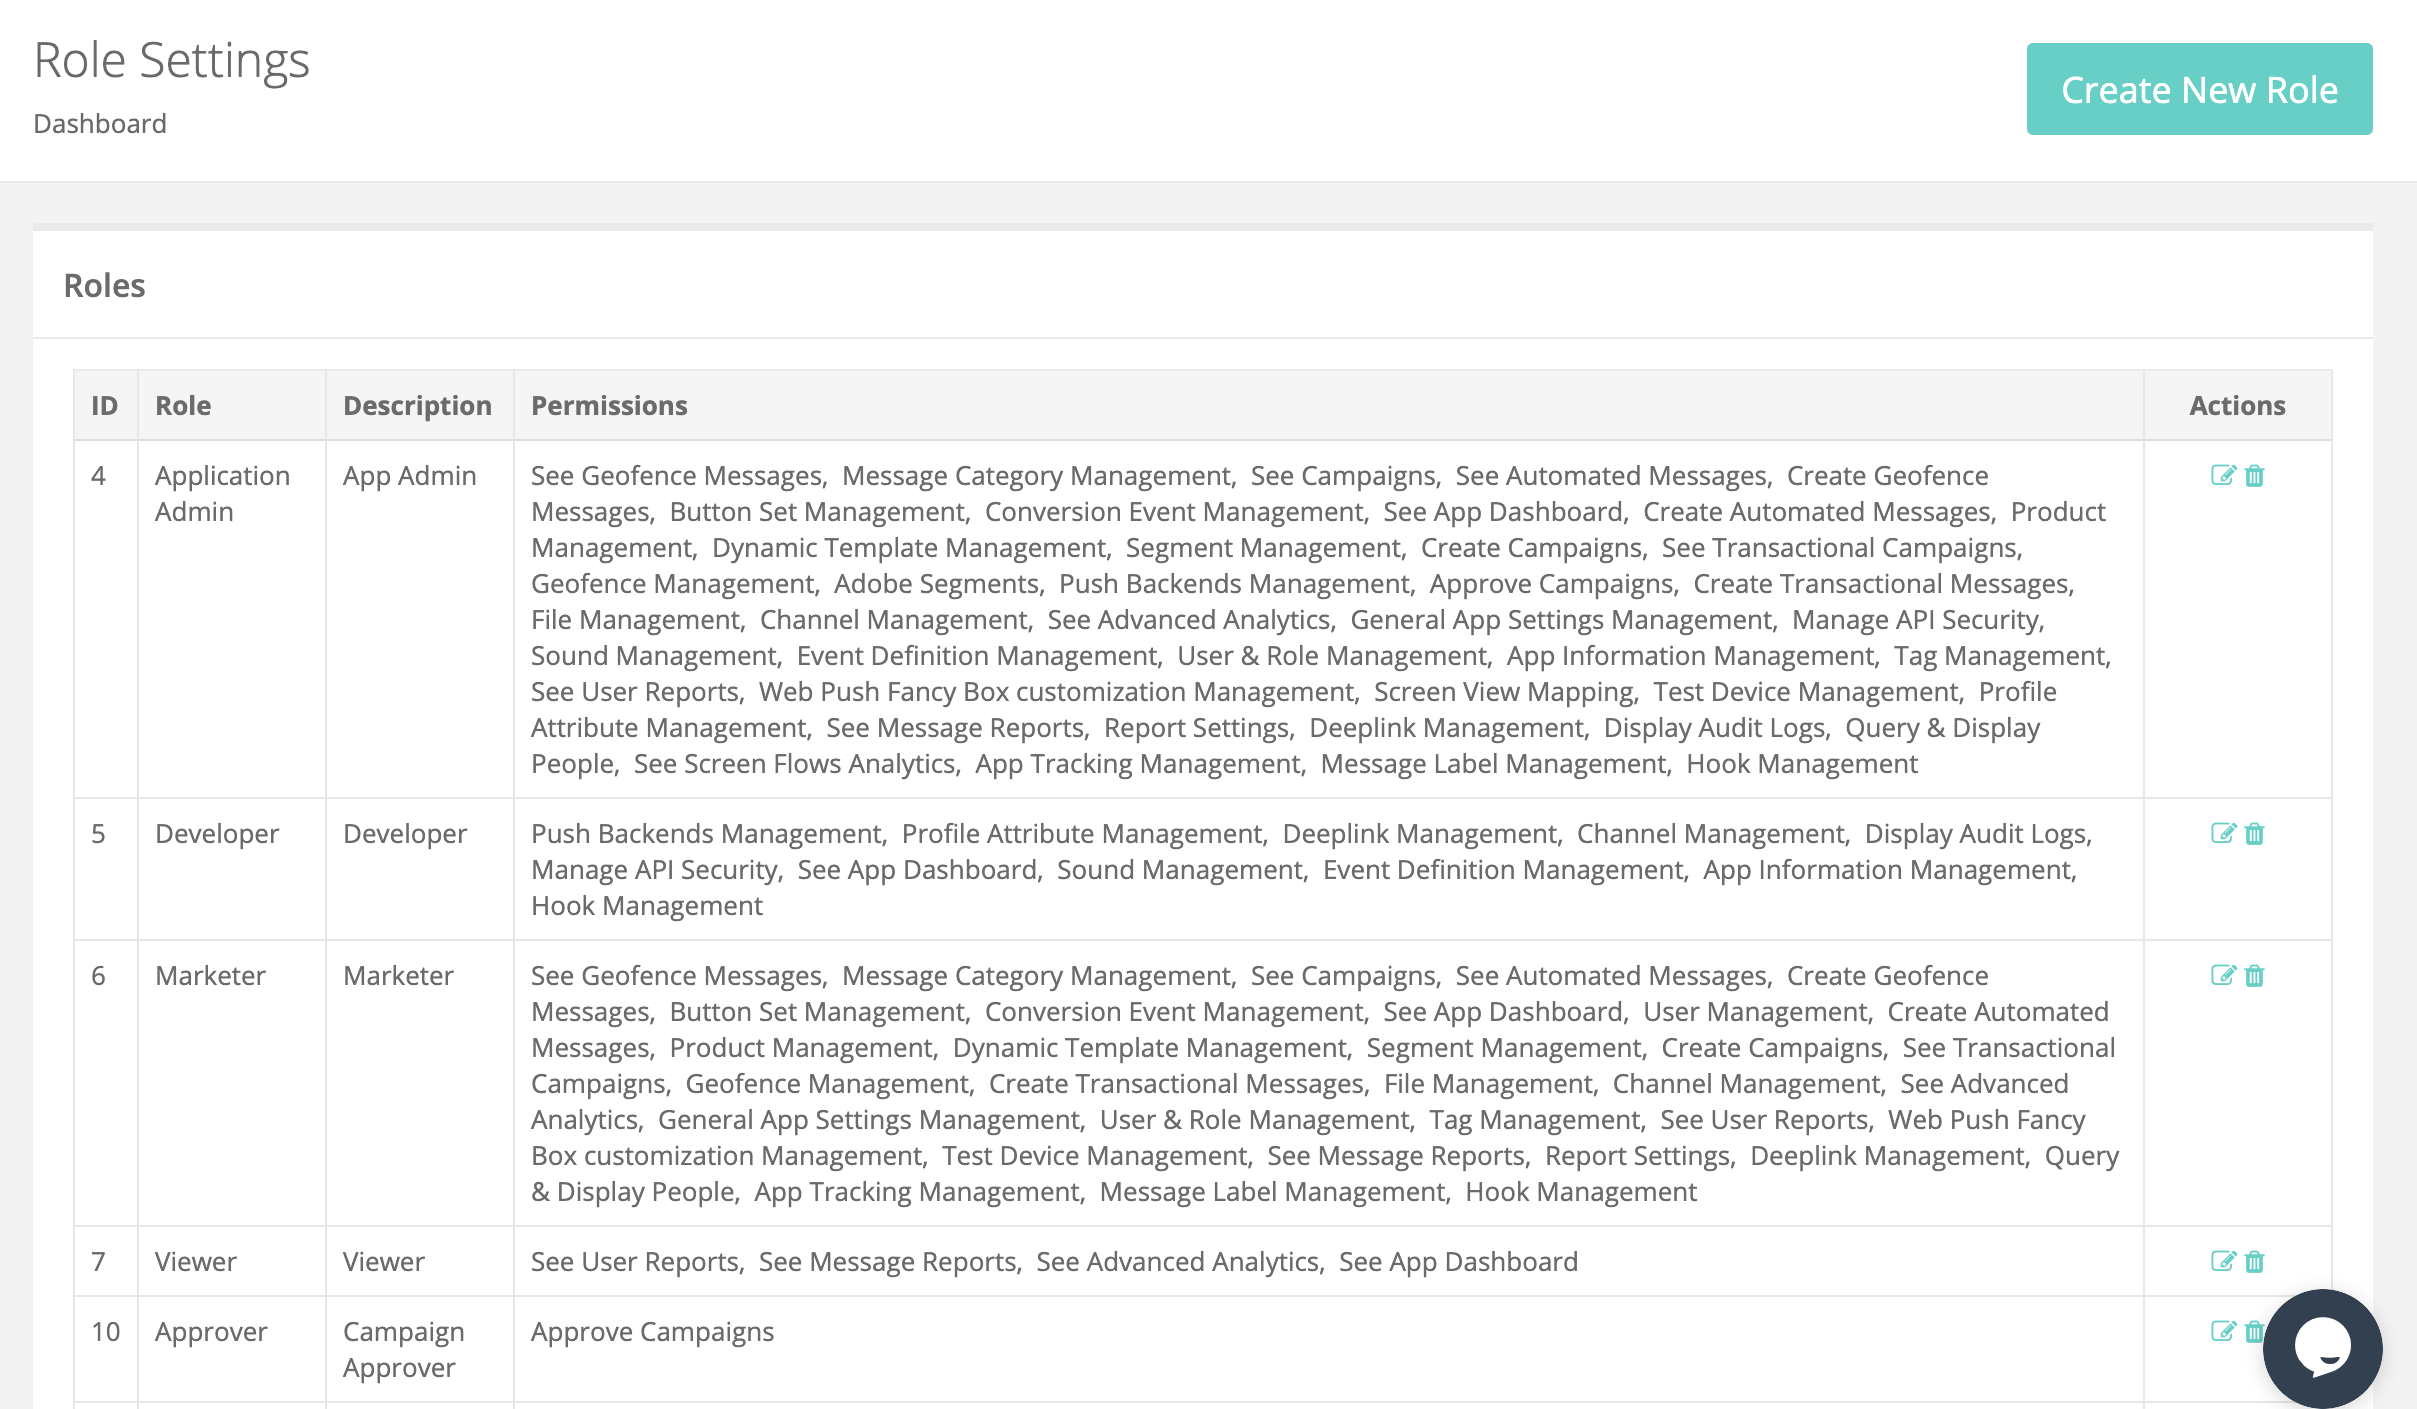
- New roles can be created with the Create New Role button except for the existing roles determined by the system.
- First, a name and definition are determined for the new role to be created. Then, the activities that will be allowed to be used by the user are selected from the Permission section.
¶ Button Sets
- Button Sets page is the area where the buttons in interactive messages can be seen and new buttons are created.
- All Button Sets section contains ID, Button Set Name, Buttons information of the available buttons. Editing can be done on the buttons from the Actions area or the button can be removed from the panel.
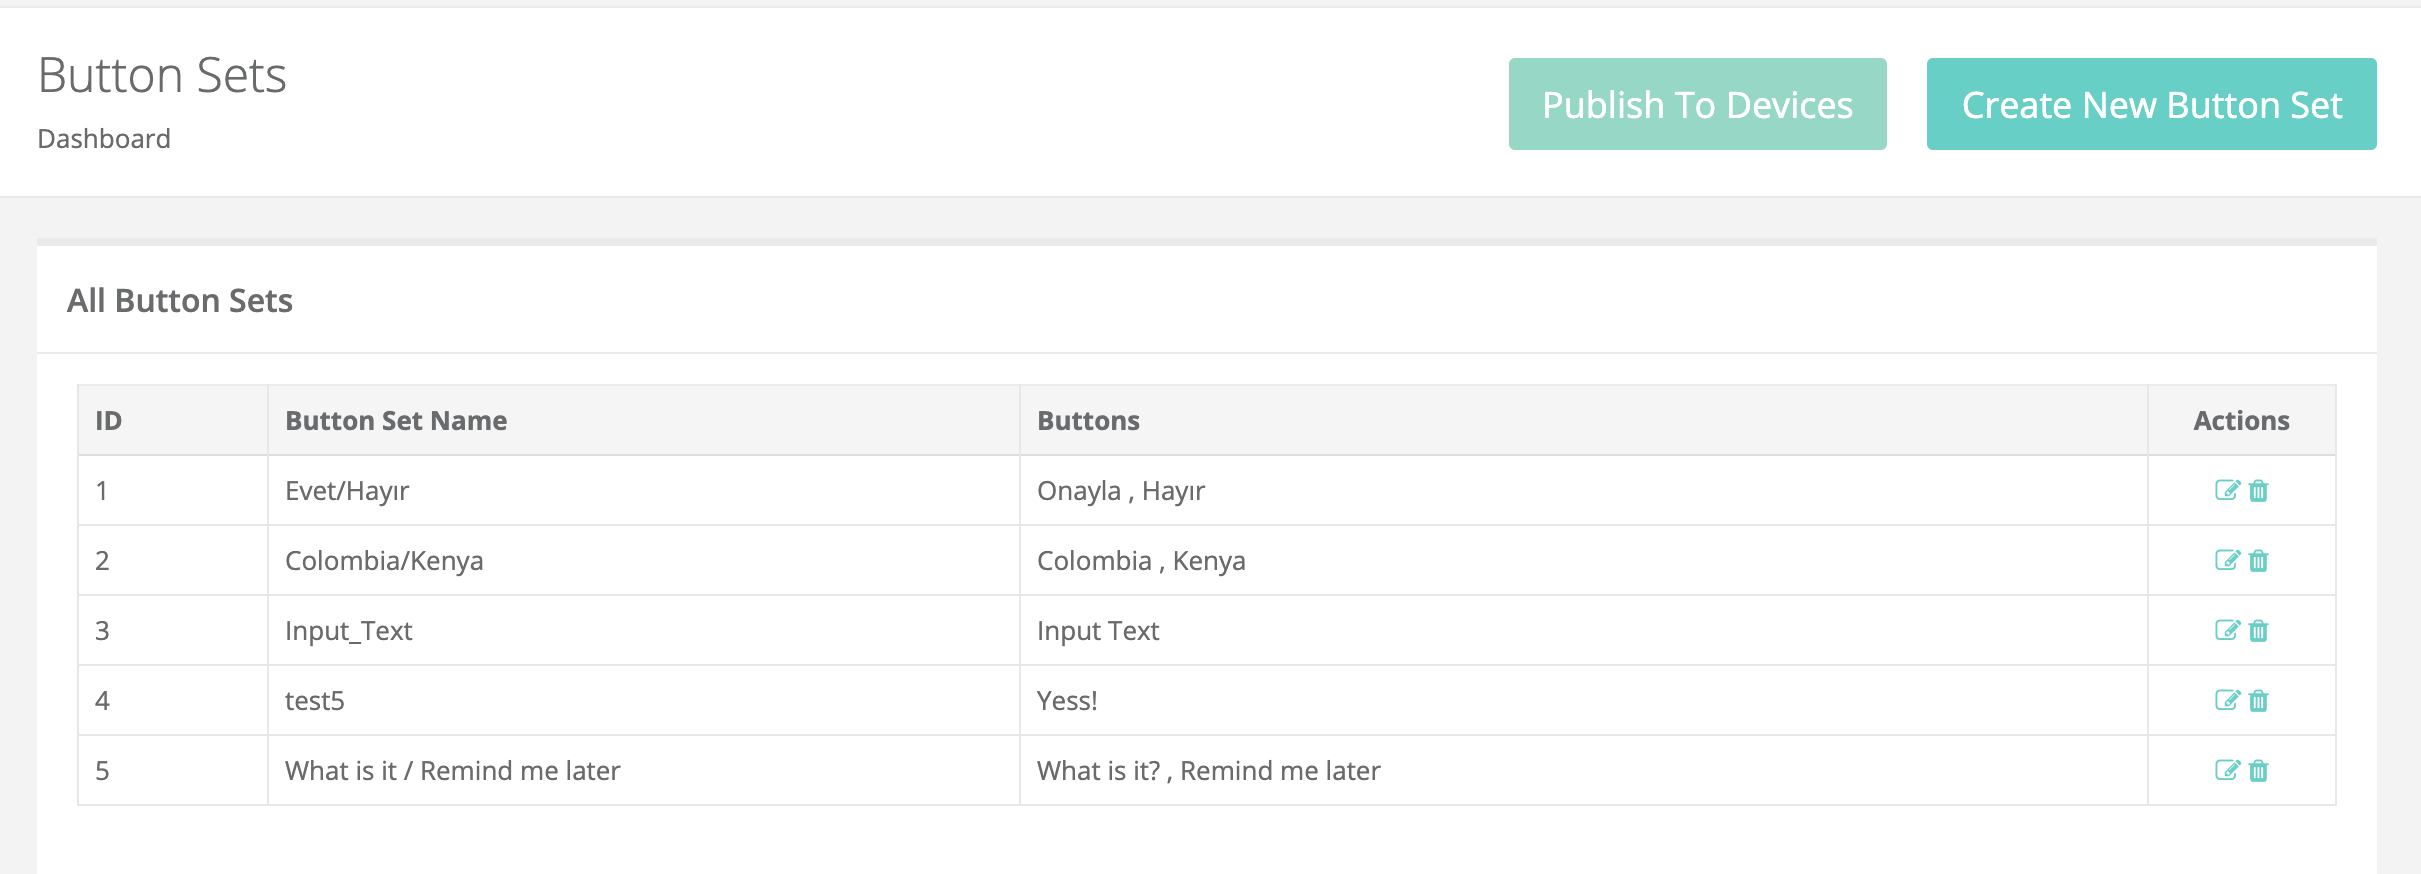
- New buttons can be created by clicking the Create New Button Set button. Firstly, a name is determined for the buttons from the Button Set Name field. Then, the button text is determined and the Add Button field is clicked.
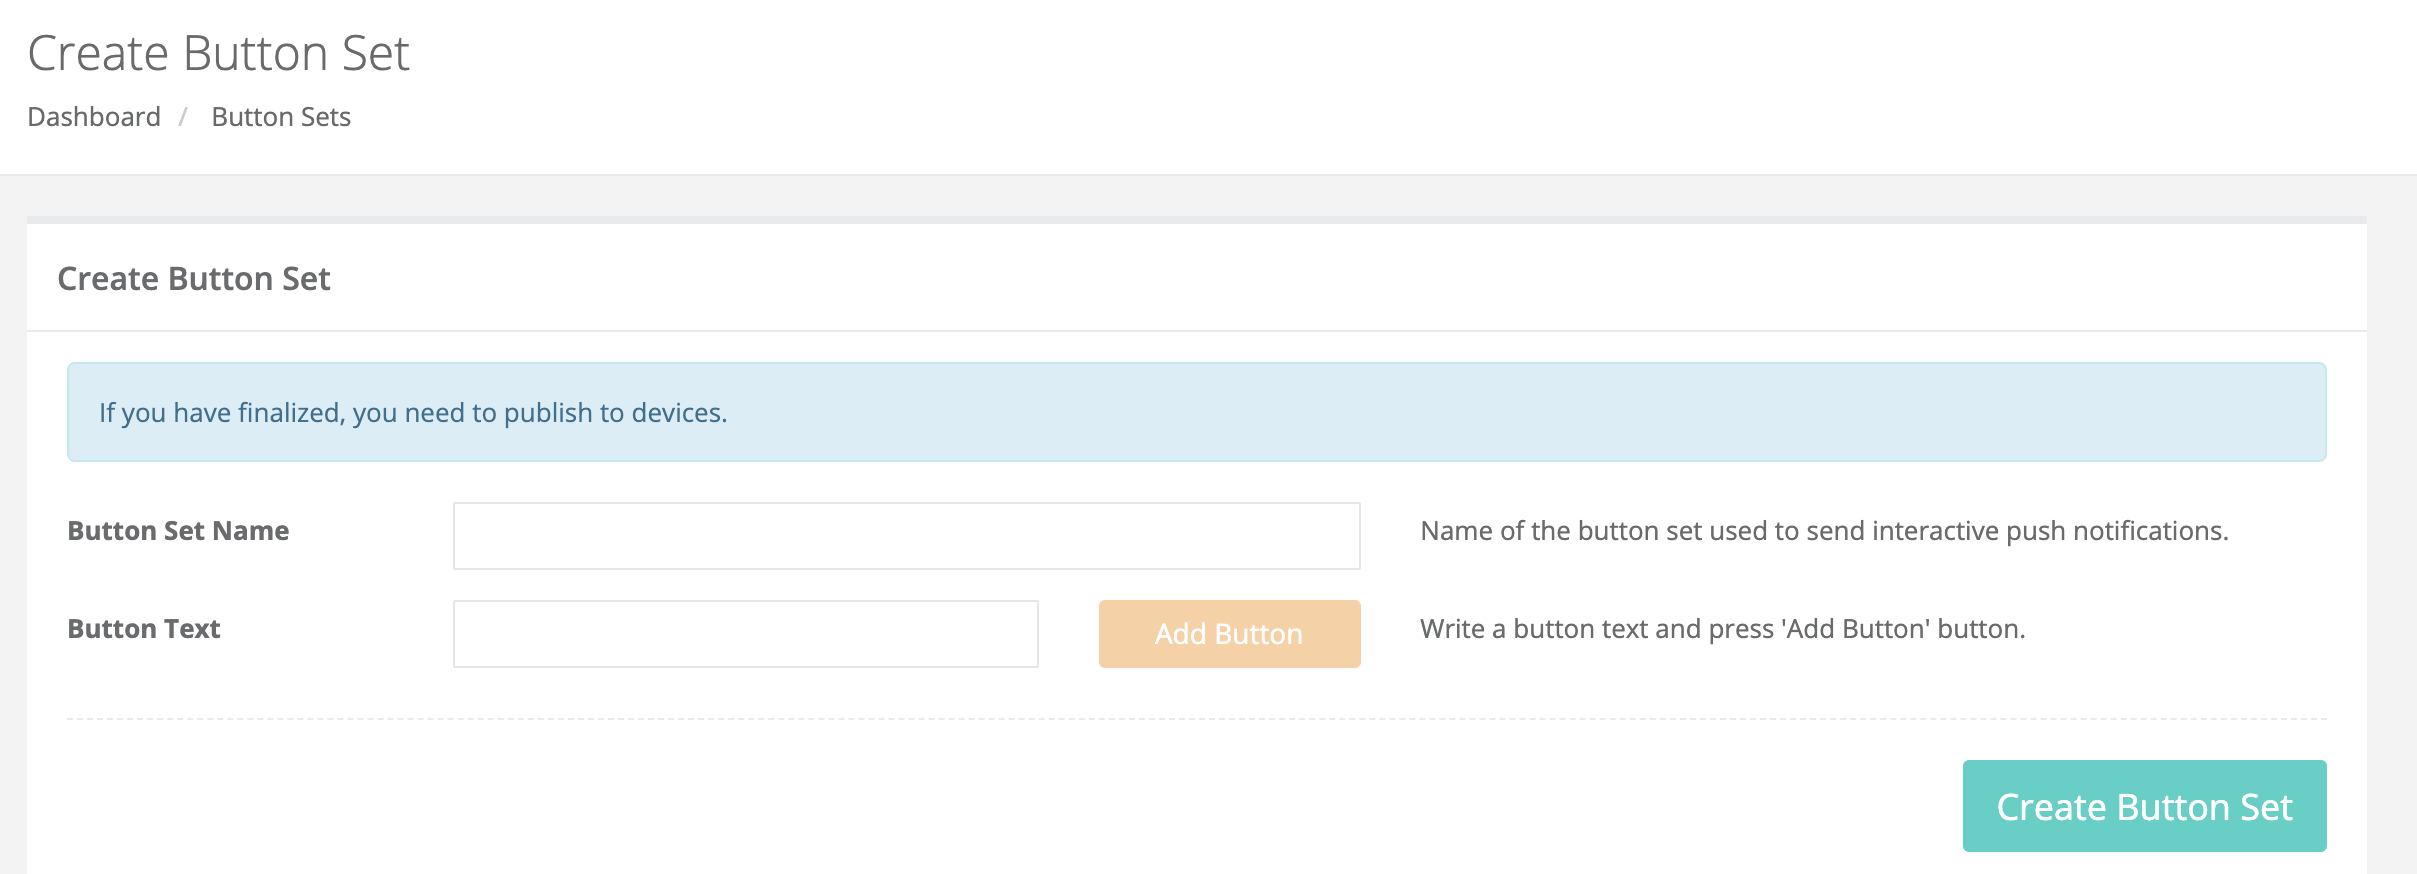
- Various features are determined for the button added.
- Button Name is the text to be displayed on the Button.
- Button Icon is a feature used only for the Android platform. Enables the selected icon to appear on the button.
- Destructive is a feature used only for the iOS platform. It allows the buttons to be displayed in red.
- Authorization mode: If this feature is enabled, iOS users need to unlock their device's lock screen before opening the app by clicking the button.
- Run application in: It is a feature used only for the iOS platform. In this area, when the user clicks the button, it is decided whether the application will open in the foreground or the background.
- Button Behavior It is a feature used only for the iOS platform. This option allows the user to enter a text by clicking the button.
- With the Remove button, the button can be removed from the button set.
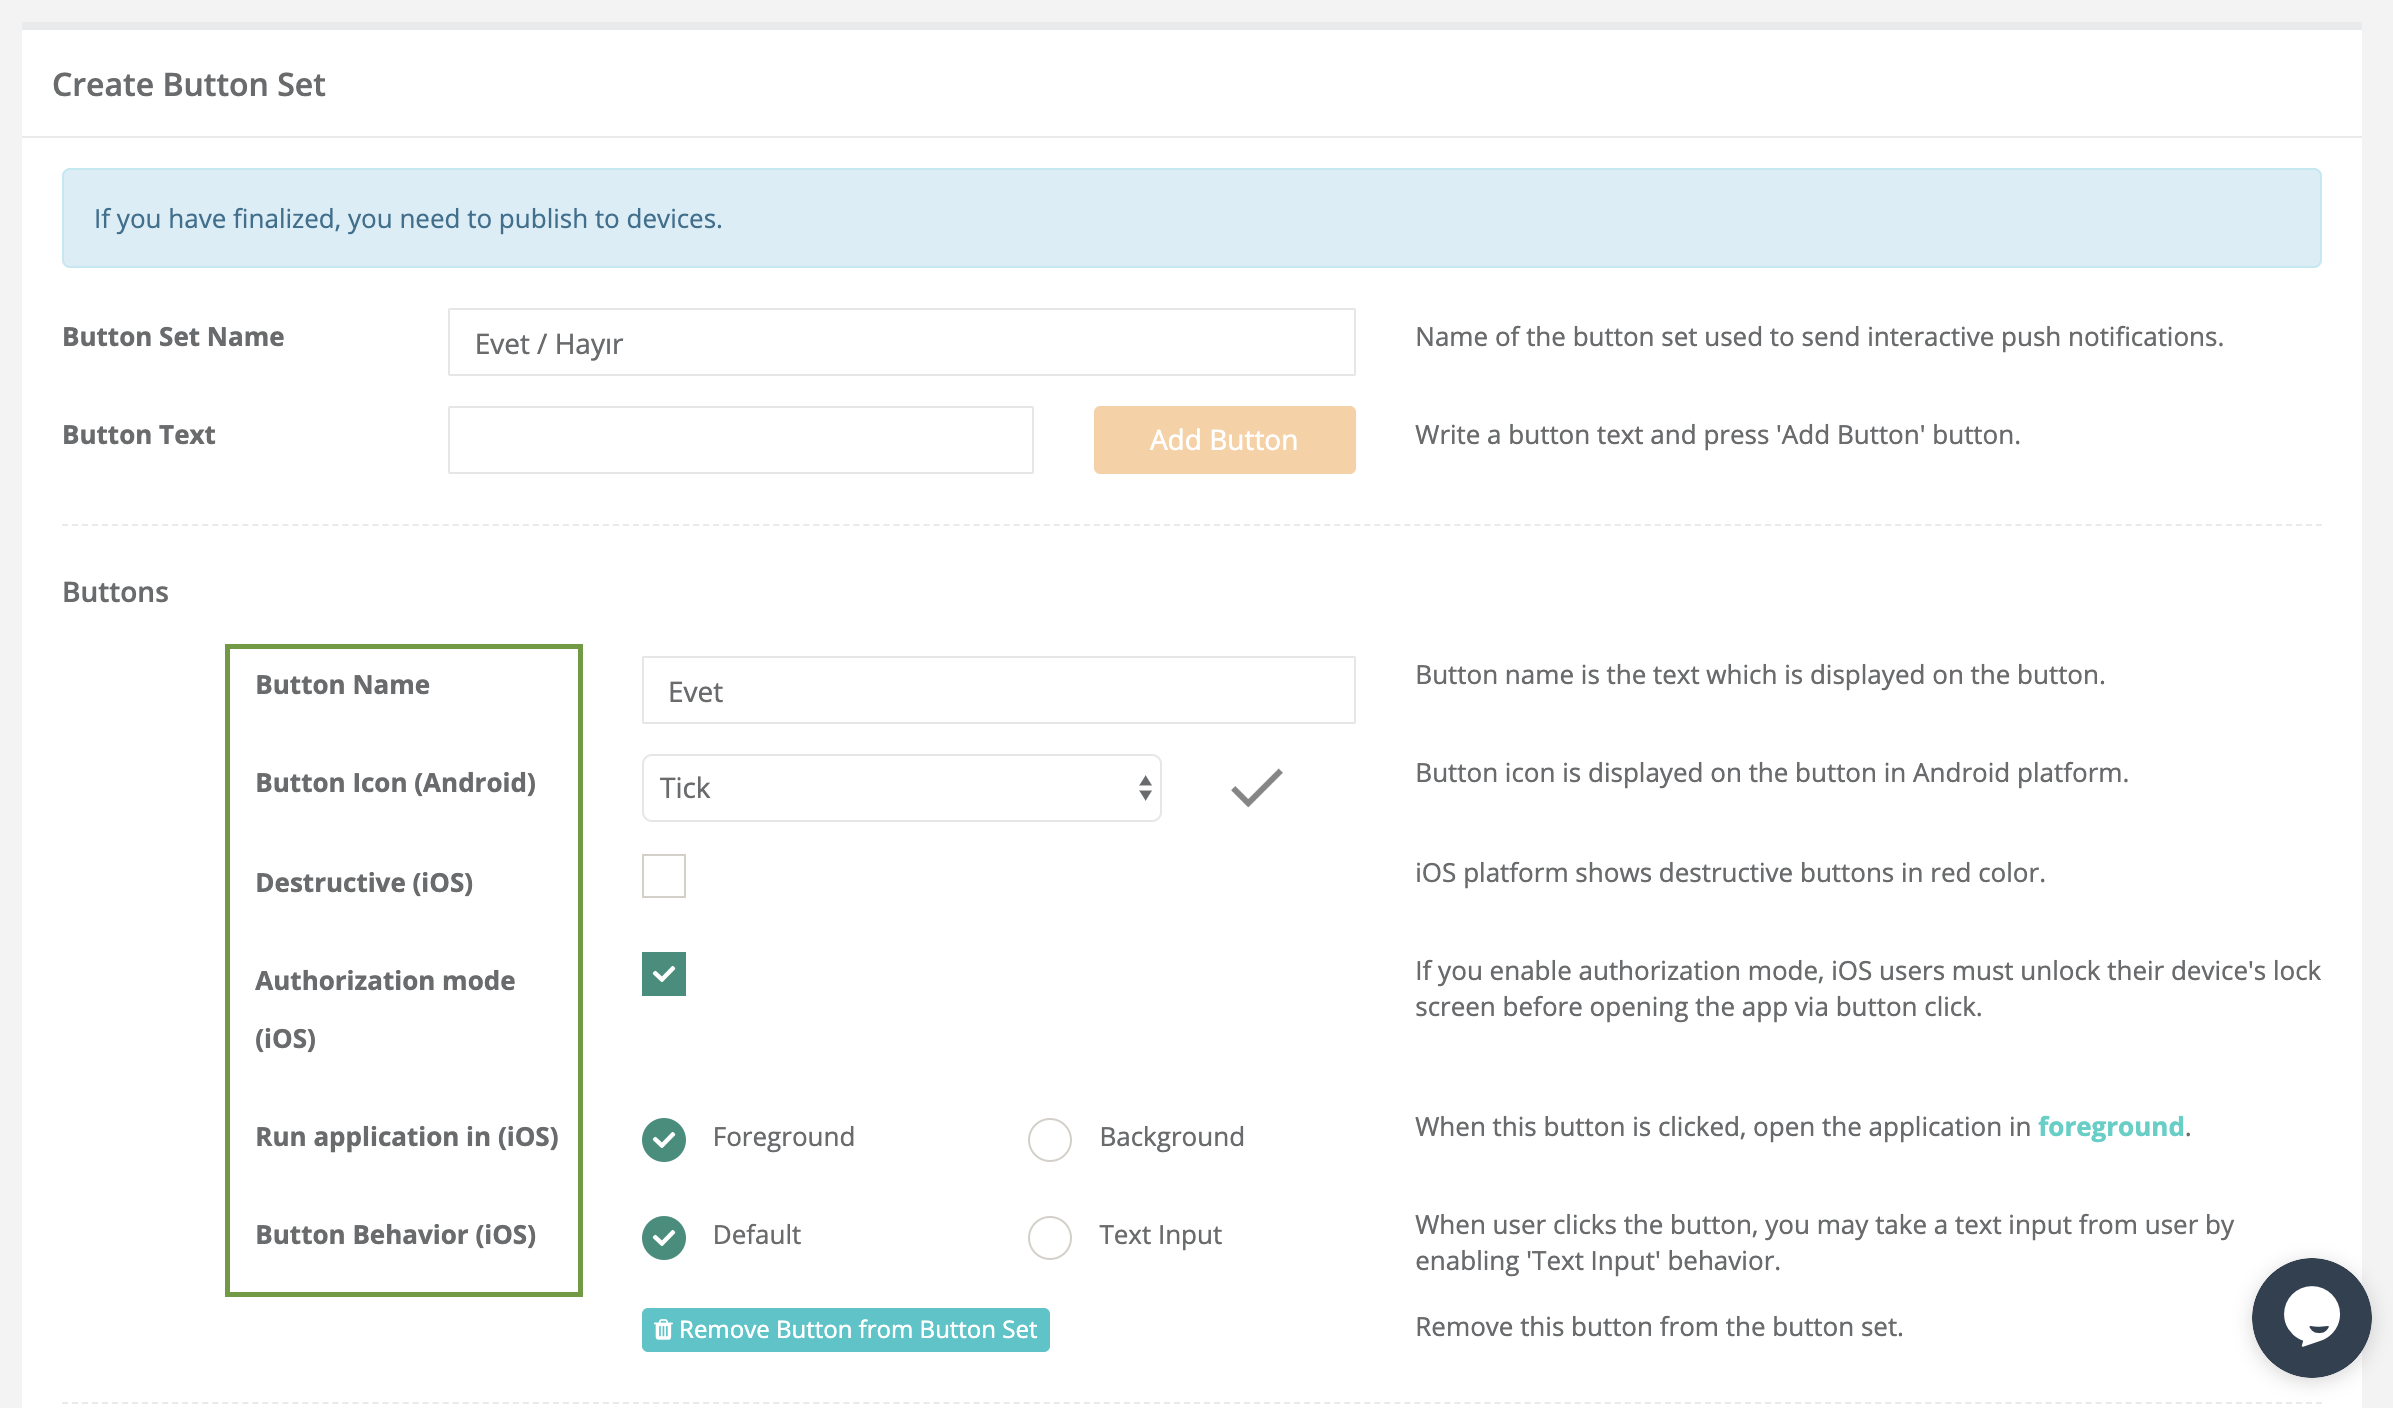
- Publish to Devices: After a new button is created, the publish to device button must be clicked. This button sends a silent push and enables the created buttons to be introduced to the devices.
¶ Events
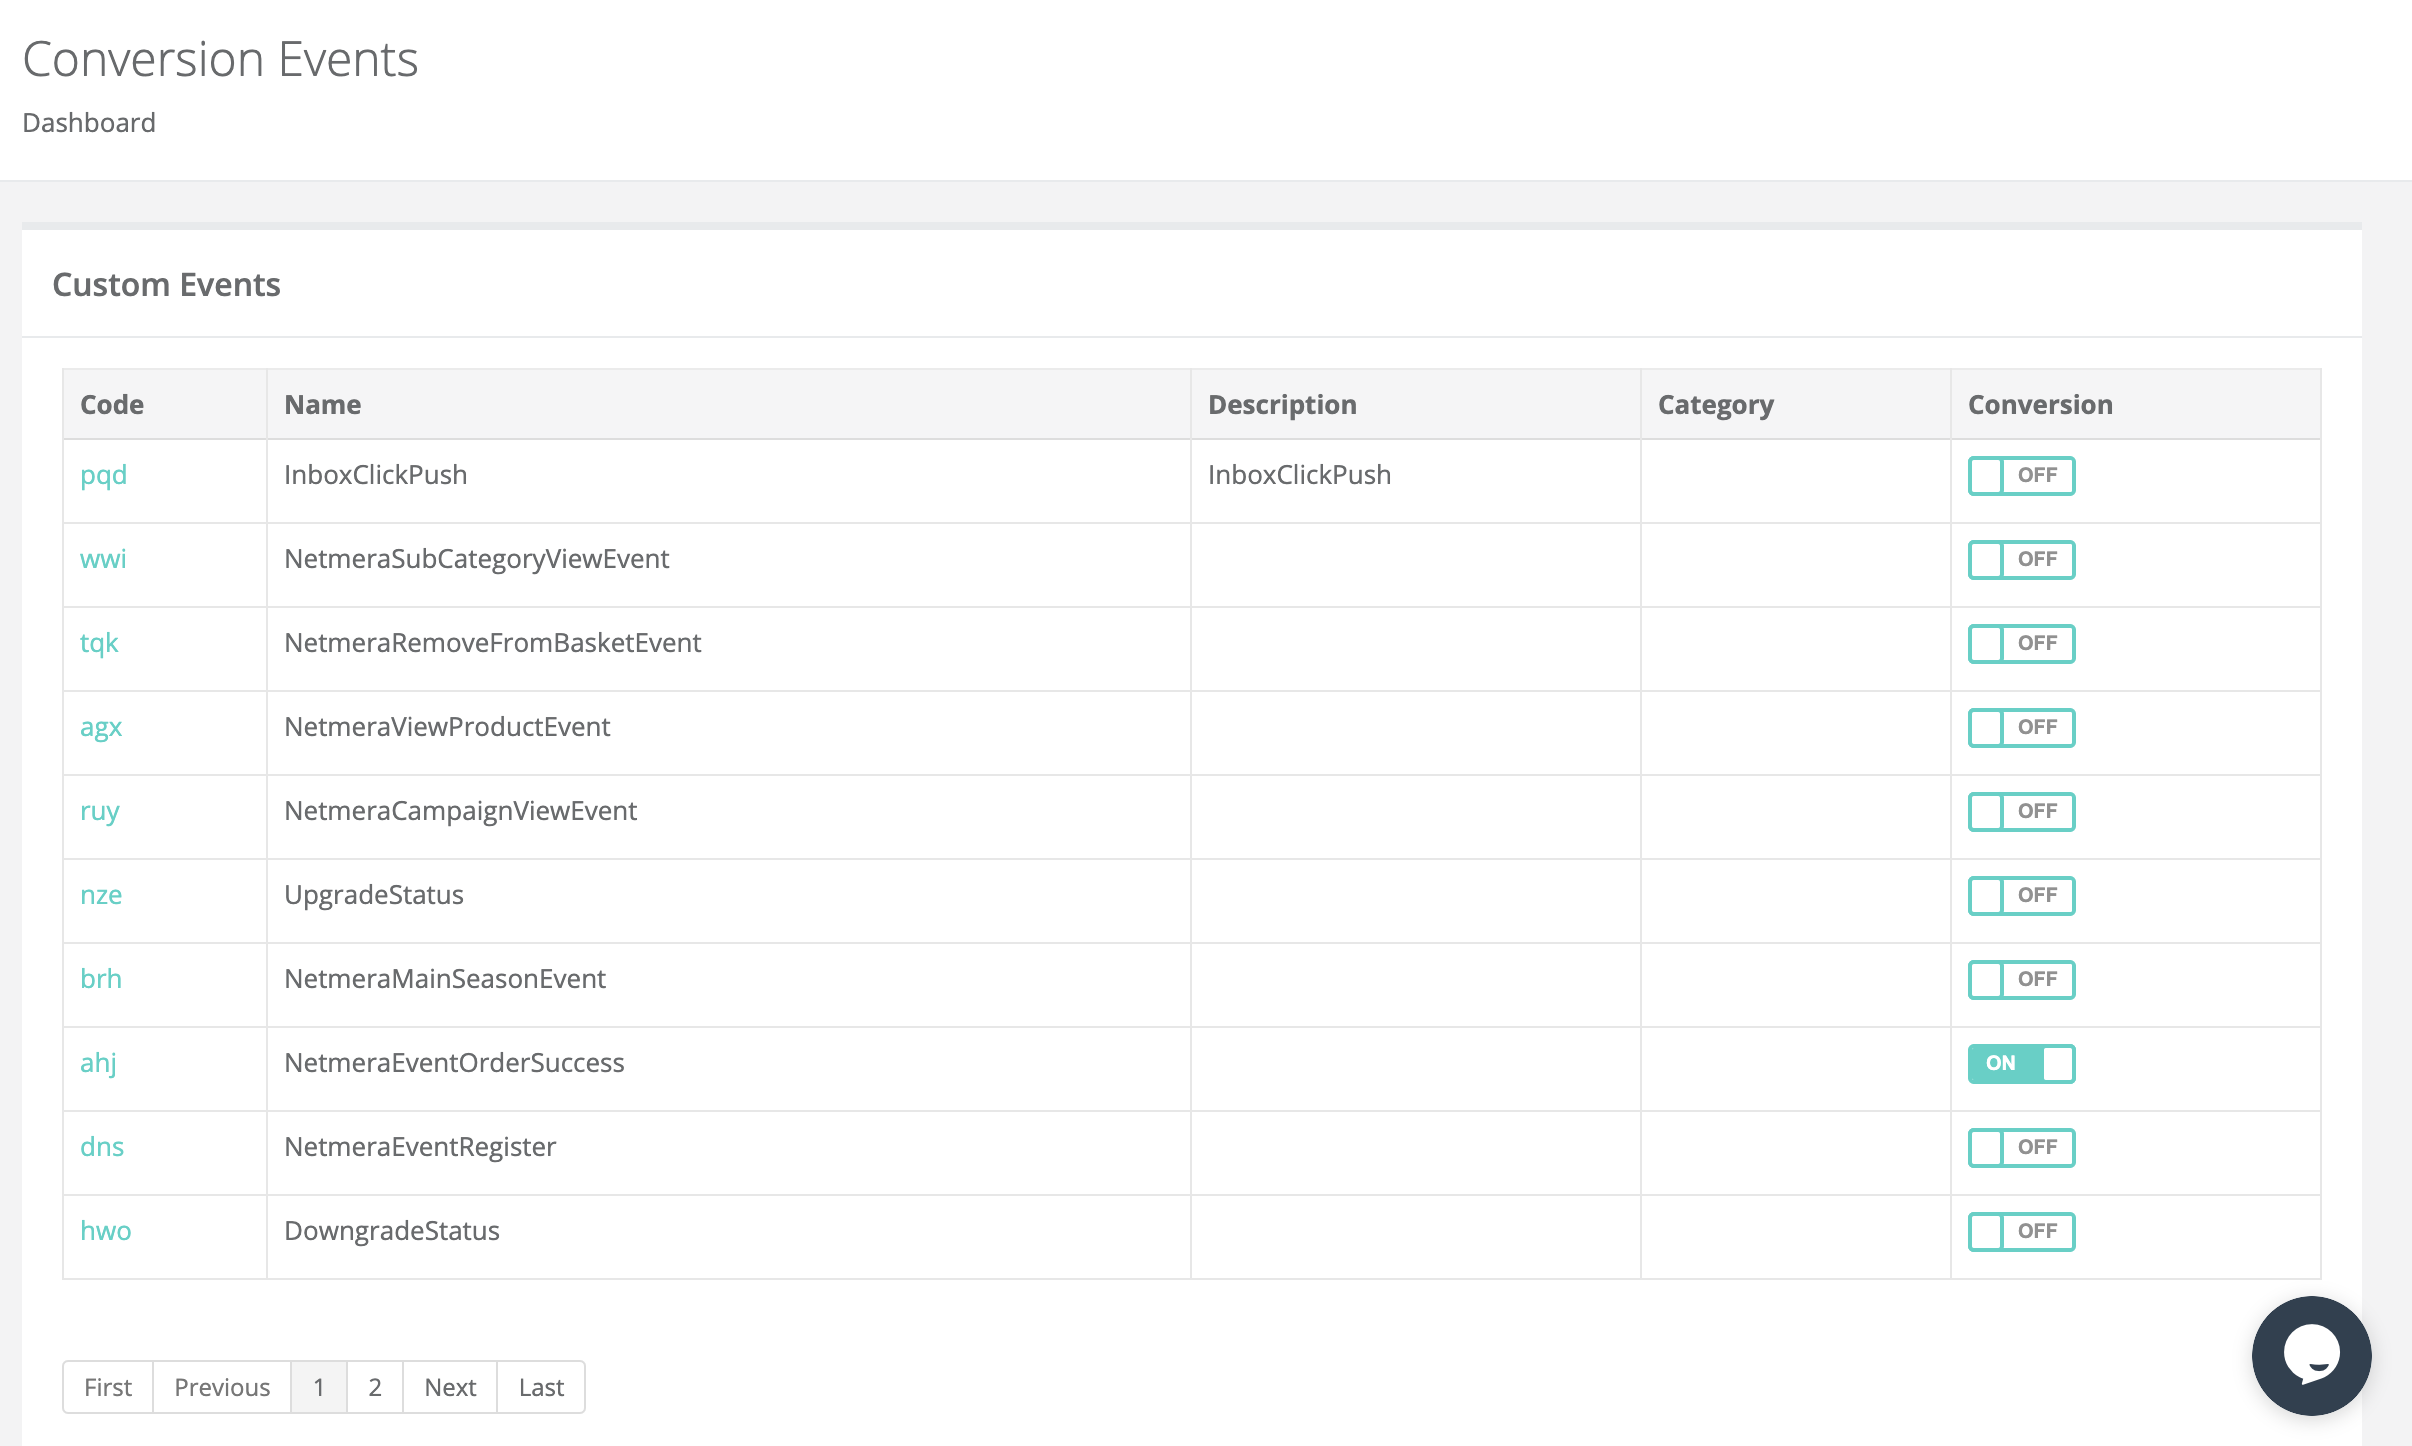
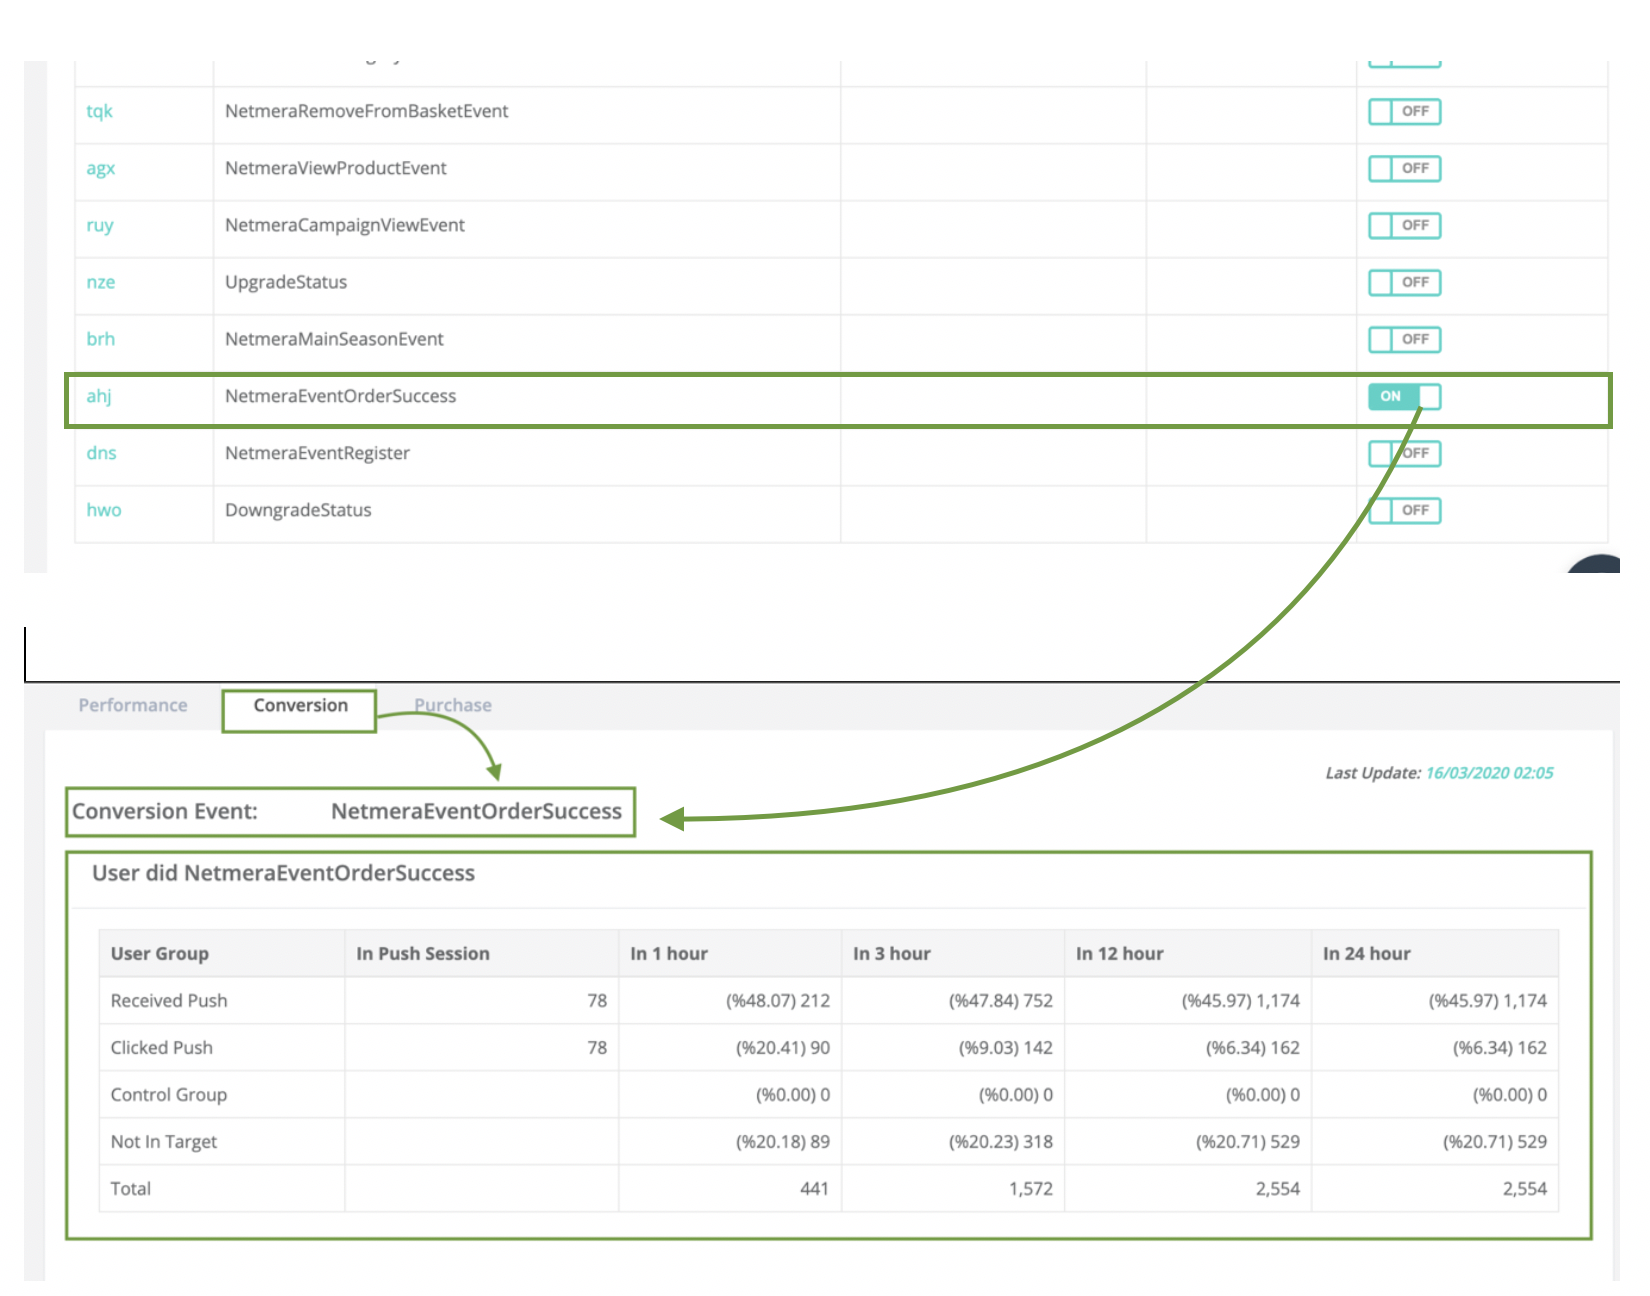
- The Events screen is where all the events defined in the application are displayed.
- Here, the code, name, description, if any, the category of events and whether there are conversion events are shown.
- Custom Events are created by panel users in the Developers >> Events section.
- Standard events are basic events created by Netmera.
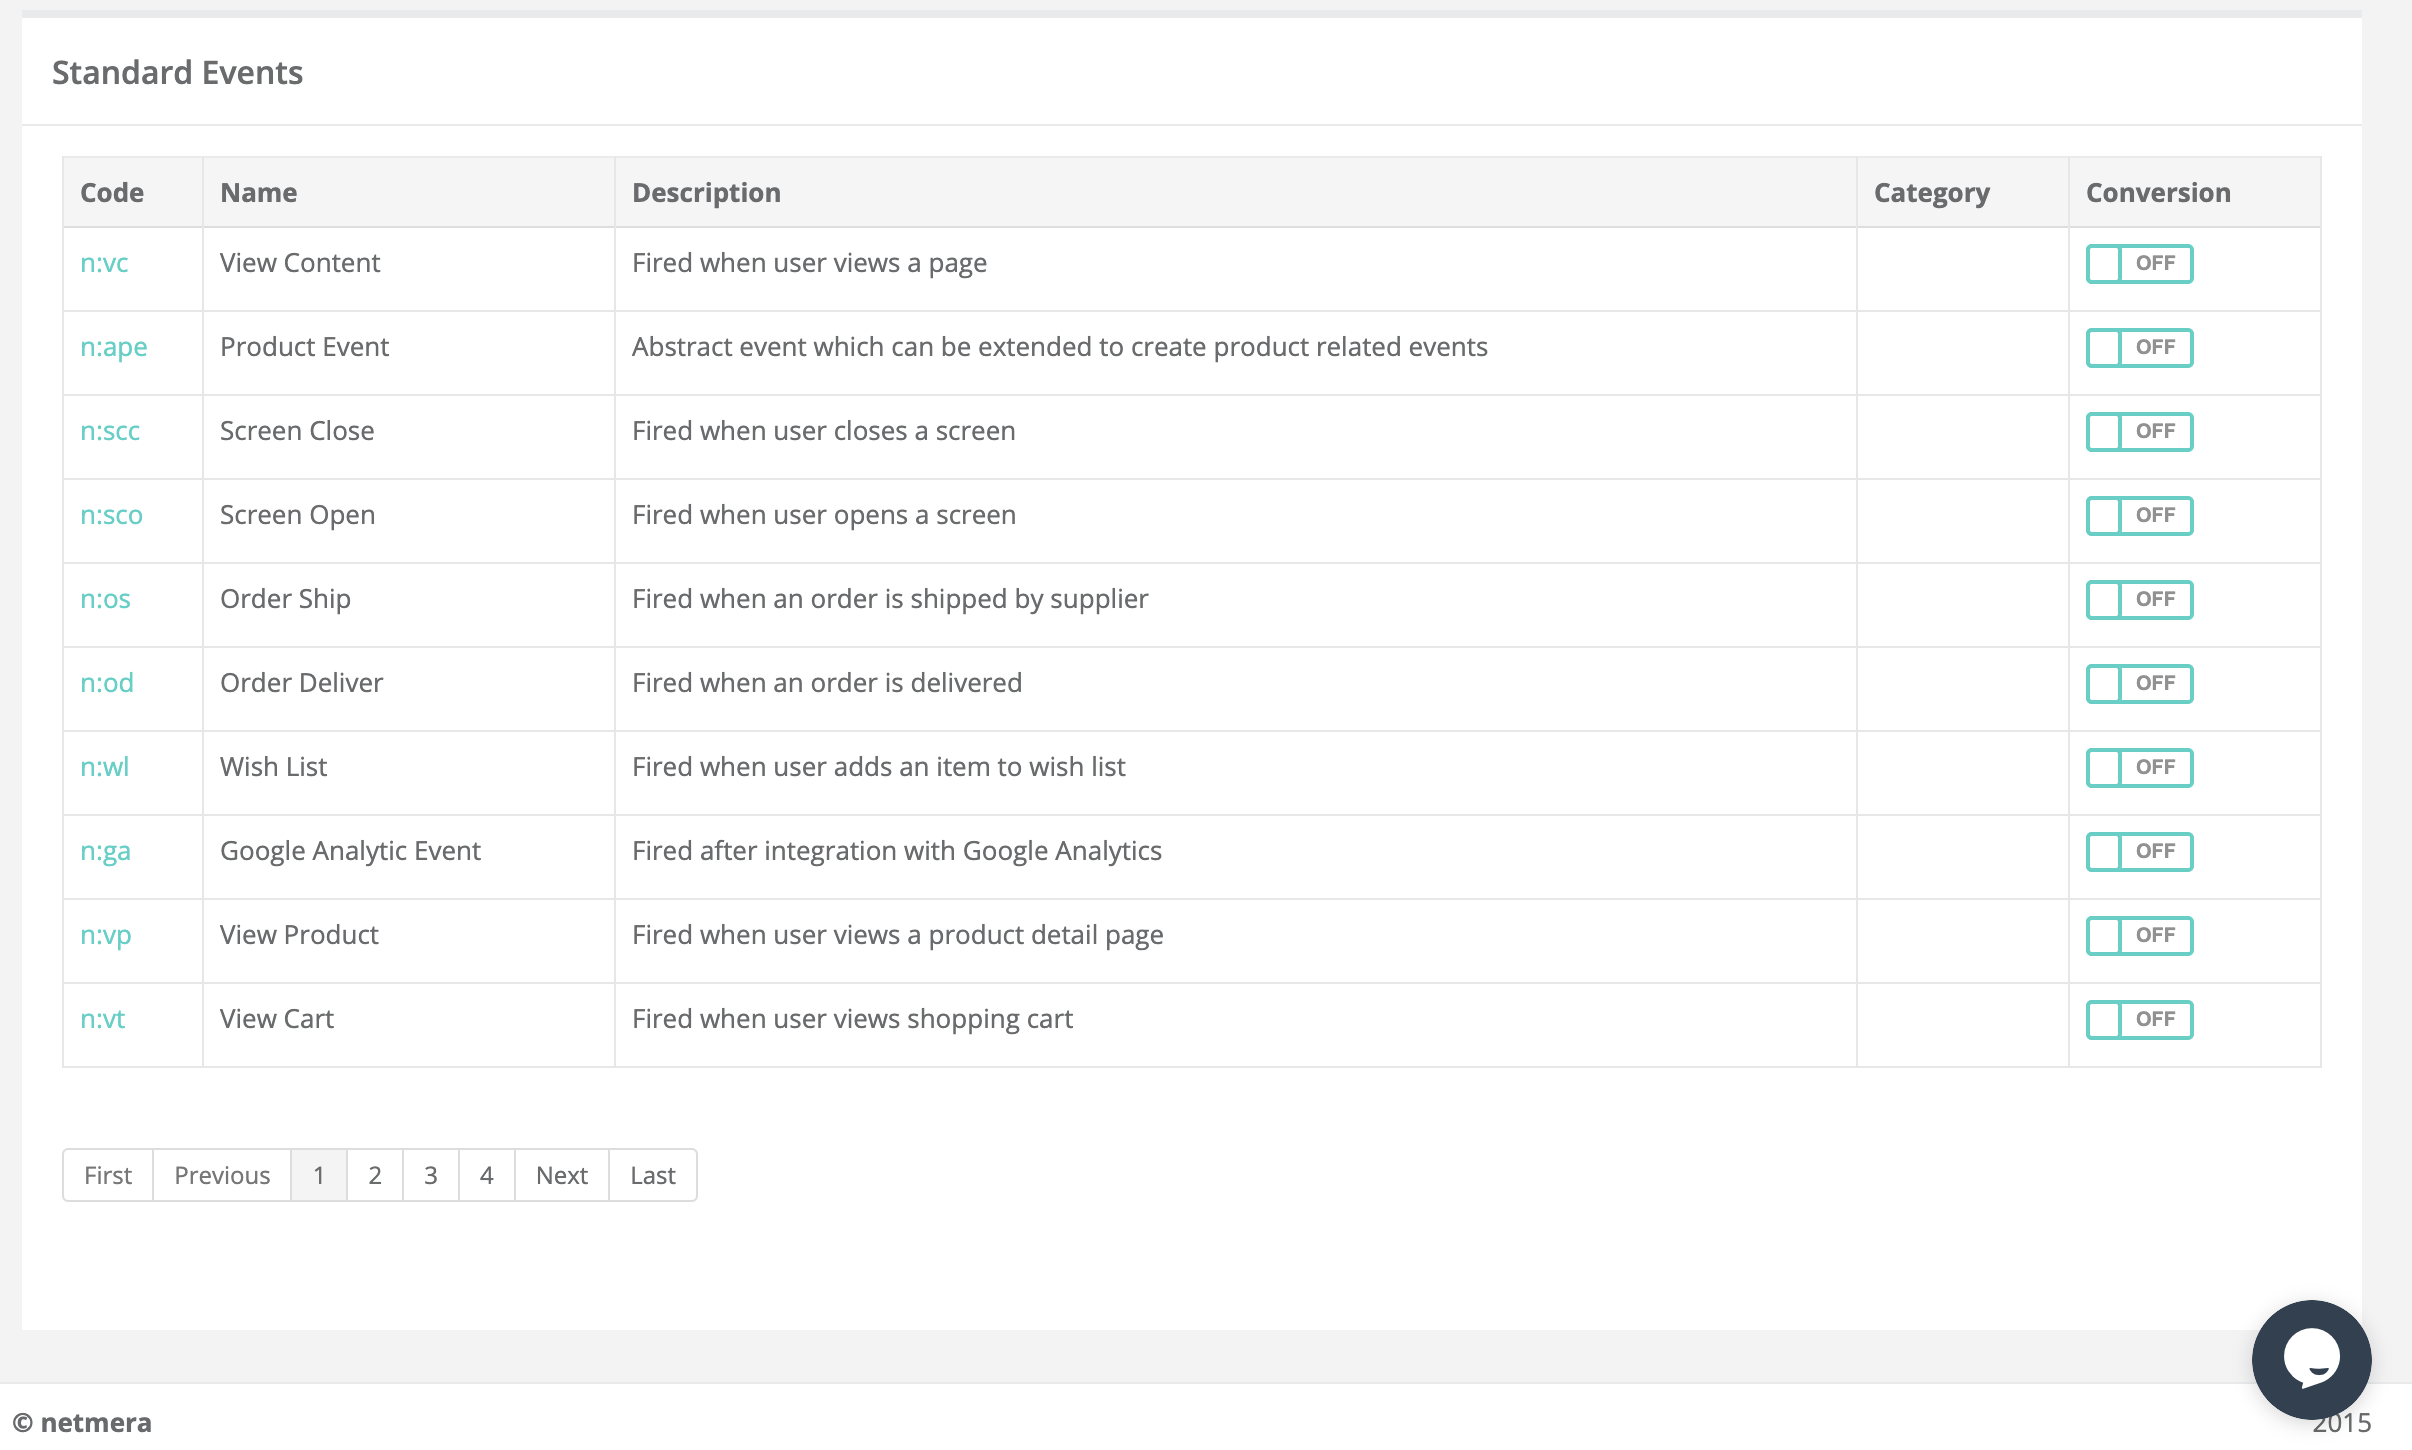
- Standard events are basic events created by Netmera. If the conversion status next to the events is On, they will appear on the conversion page in the campaign reports.
¶ Message Categories
- Message categories are created to label the target user, to categorize and use it in different push transmissions. They provide category-based breakdown in pushes sent to users.
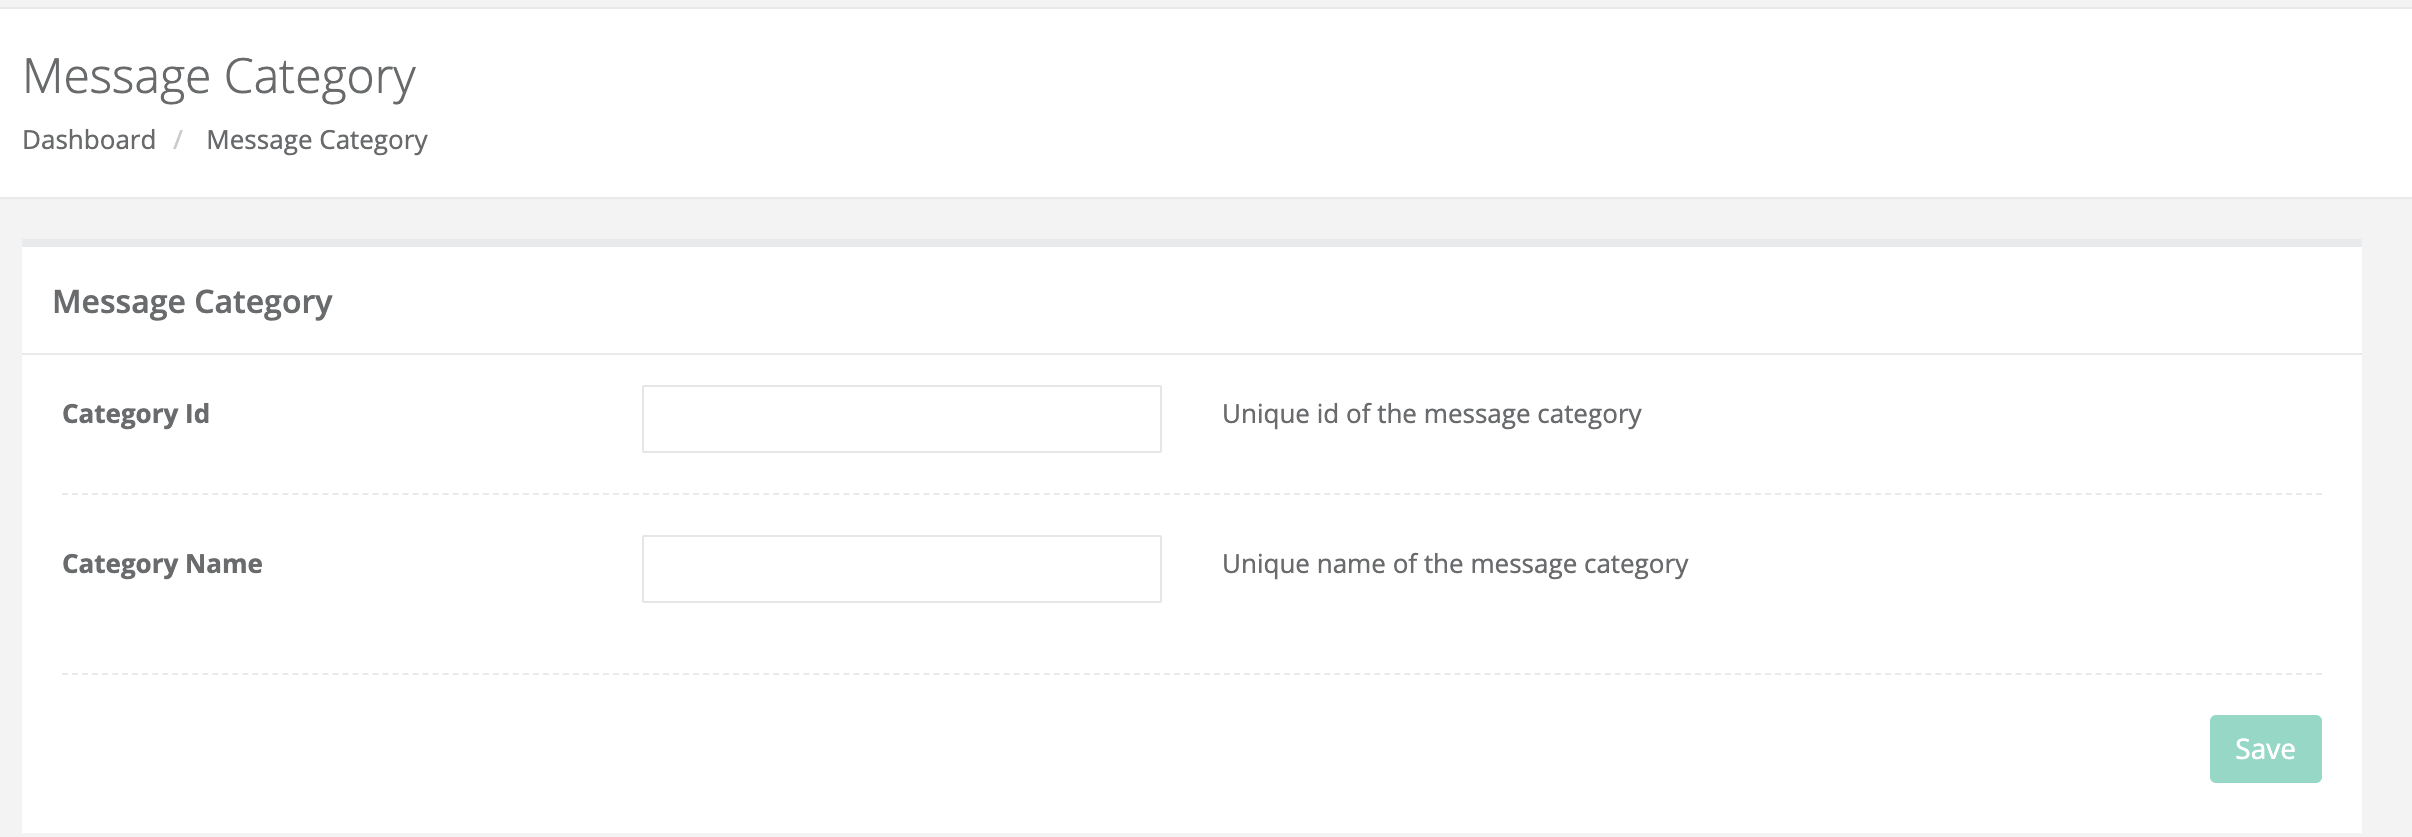
- The Message Categories page is where existing categories are shown and new message categories are created.
- While the categories in the system are shown, their IDs, names, the number of users with open notifications in the category and the number of users with closed notifications are included. Categories can be modified or removed from the action area.
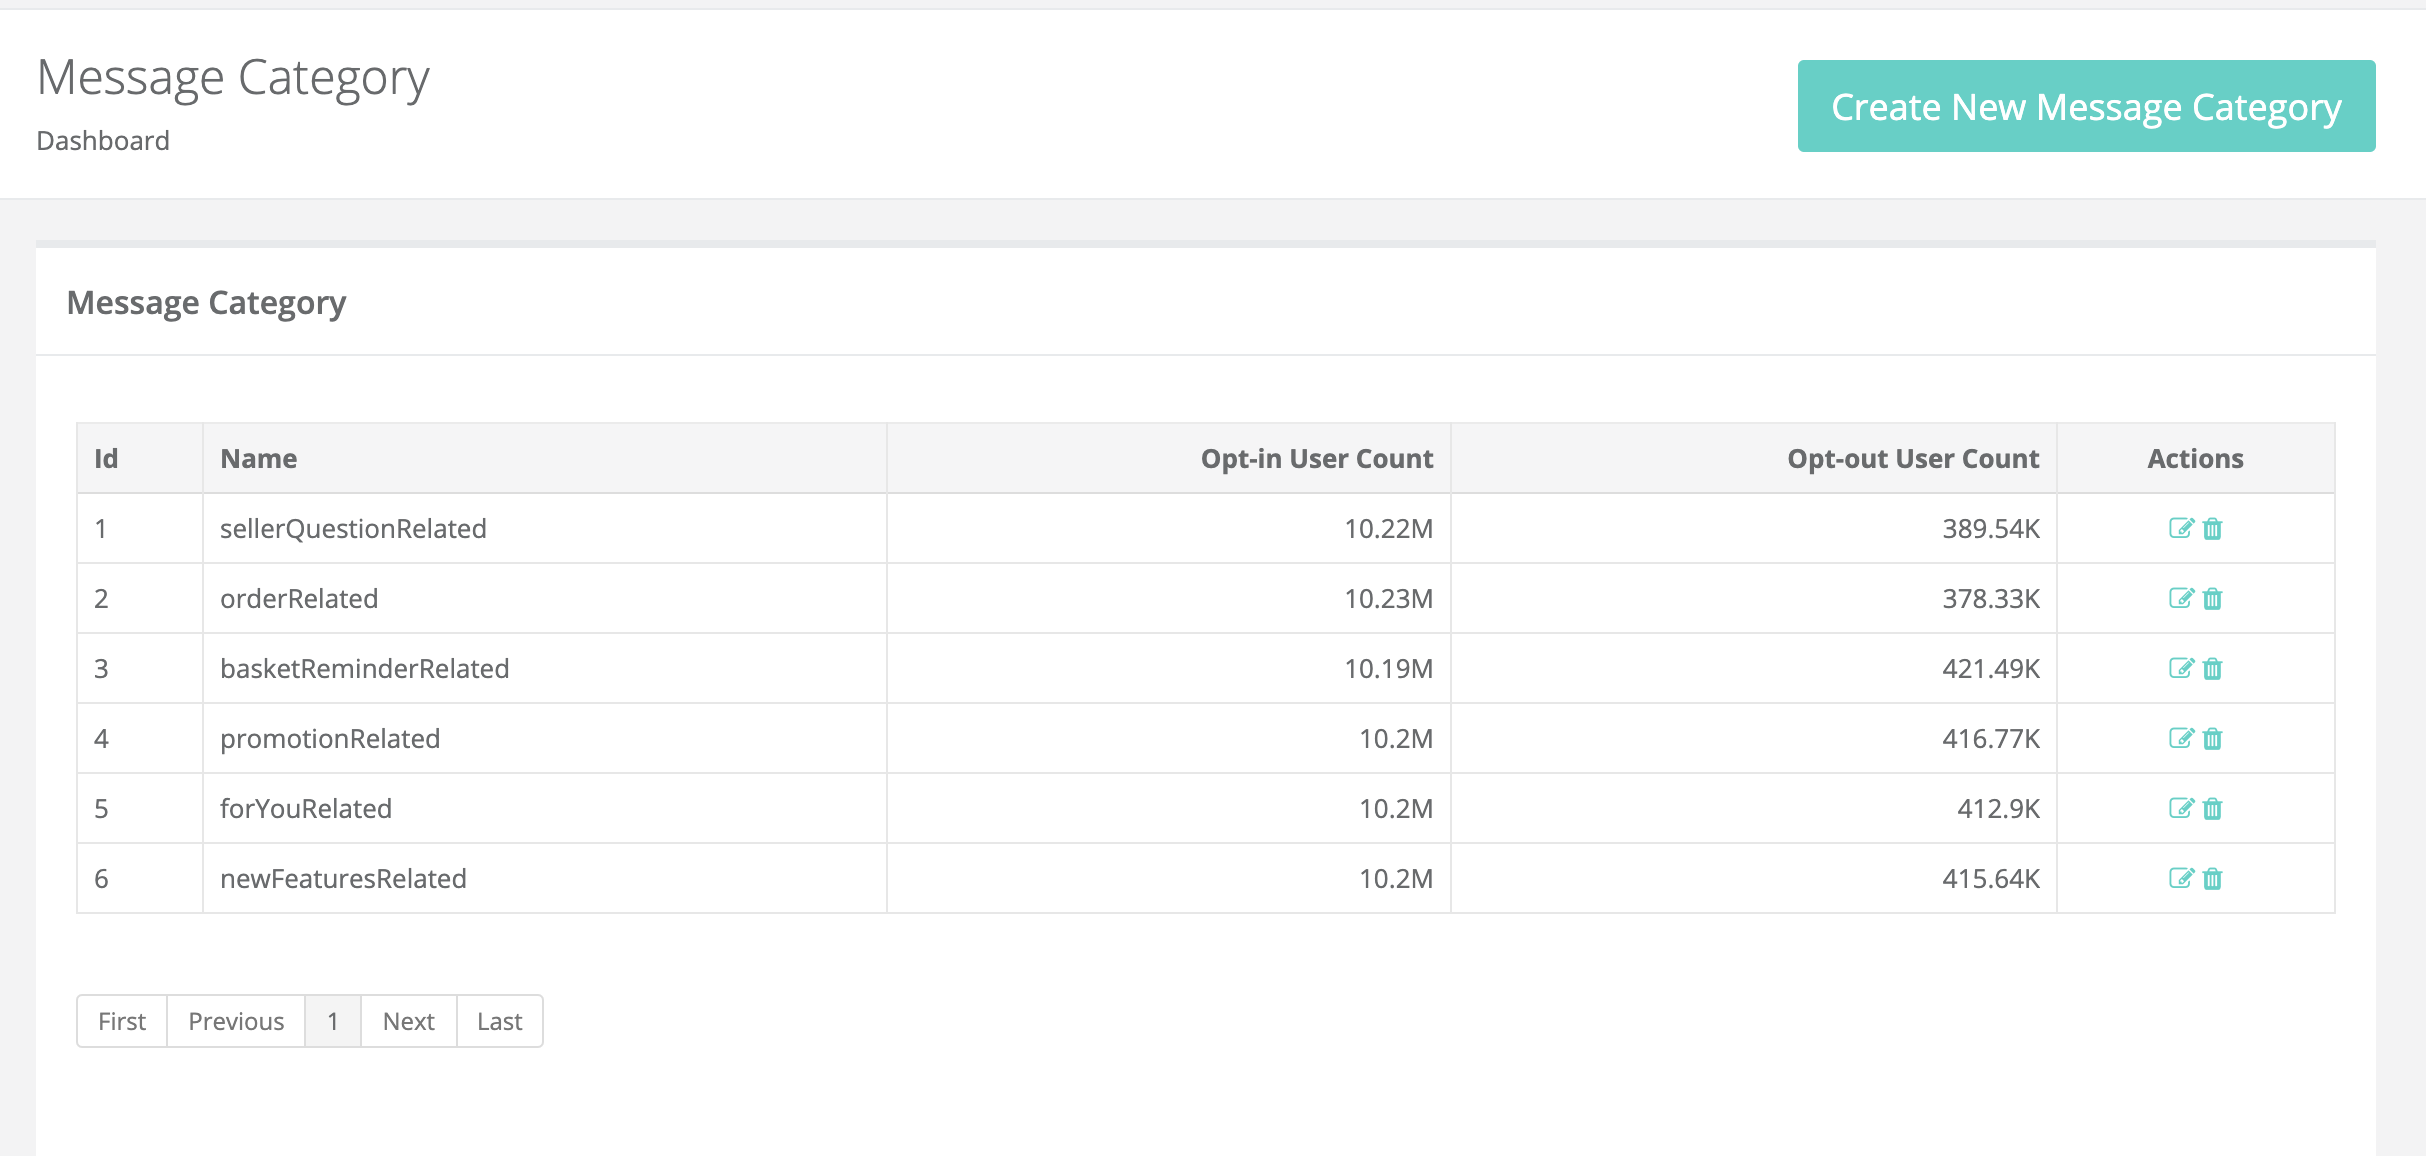
- When creating a new category, an ID and Name are determined and saved for the category. Then the category can be selected when creating a new campaign.
¶ Message Labels
- Labels are responsible for bringing together messages that serve the same purpose. For example, by adding a label to 5 Automated Messages in the system, it can be ensured that the user receiving a message does not receive the others. Automated Message scenario can be determined to not send messages to users receiving push with this label, and messages with similar content can be prevented from being sent to the same user.
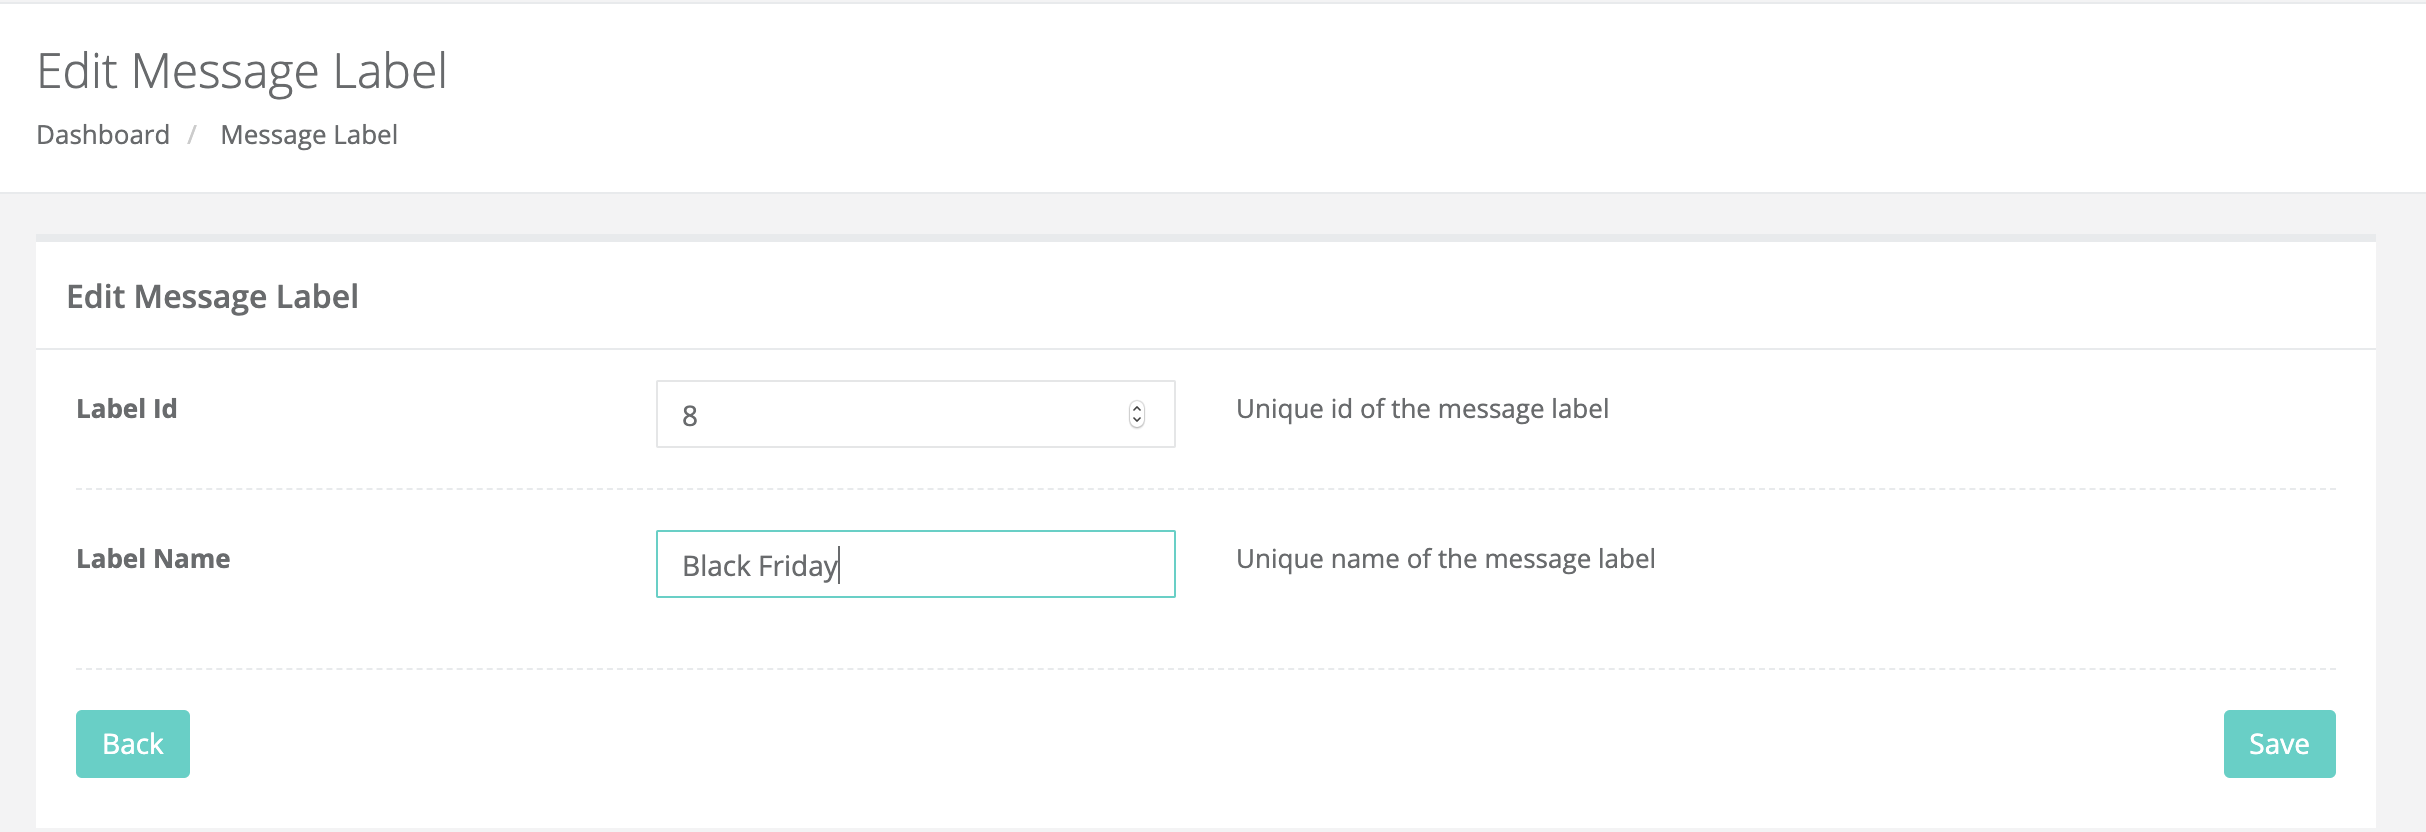
- The created Labels can be seen on the Message Labels page, along with their IDs.
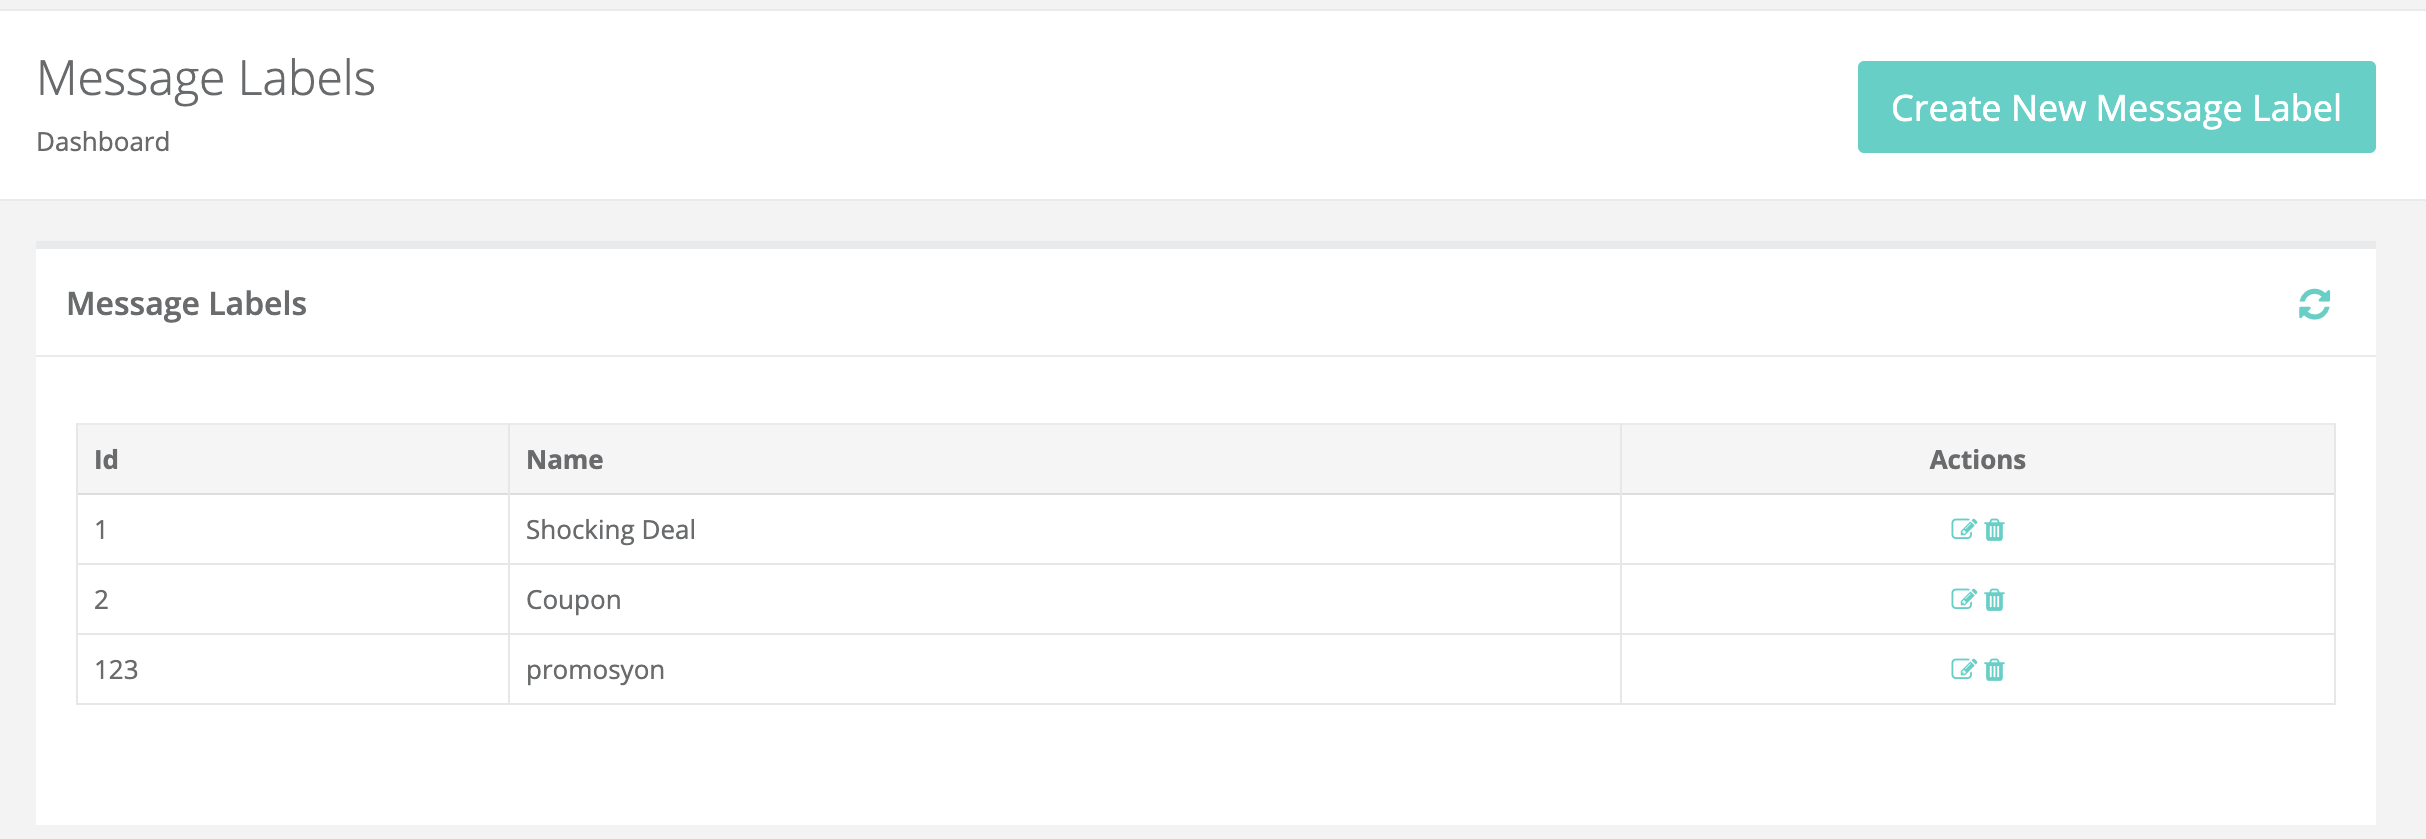
- When creating a new label, an ID and Name are determined and saved for the label. Then the label can be selected when creating a new campaign.
¶ Landing Pages
- Templates” are message templates such as survey, star rating used in pop-up and full-screen messages. Landing Pages are alternatives created for these templates.
- These alternative templates are displayed on the main screen and can be edited.
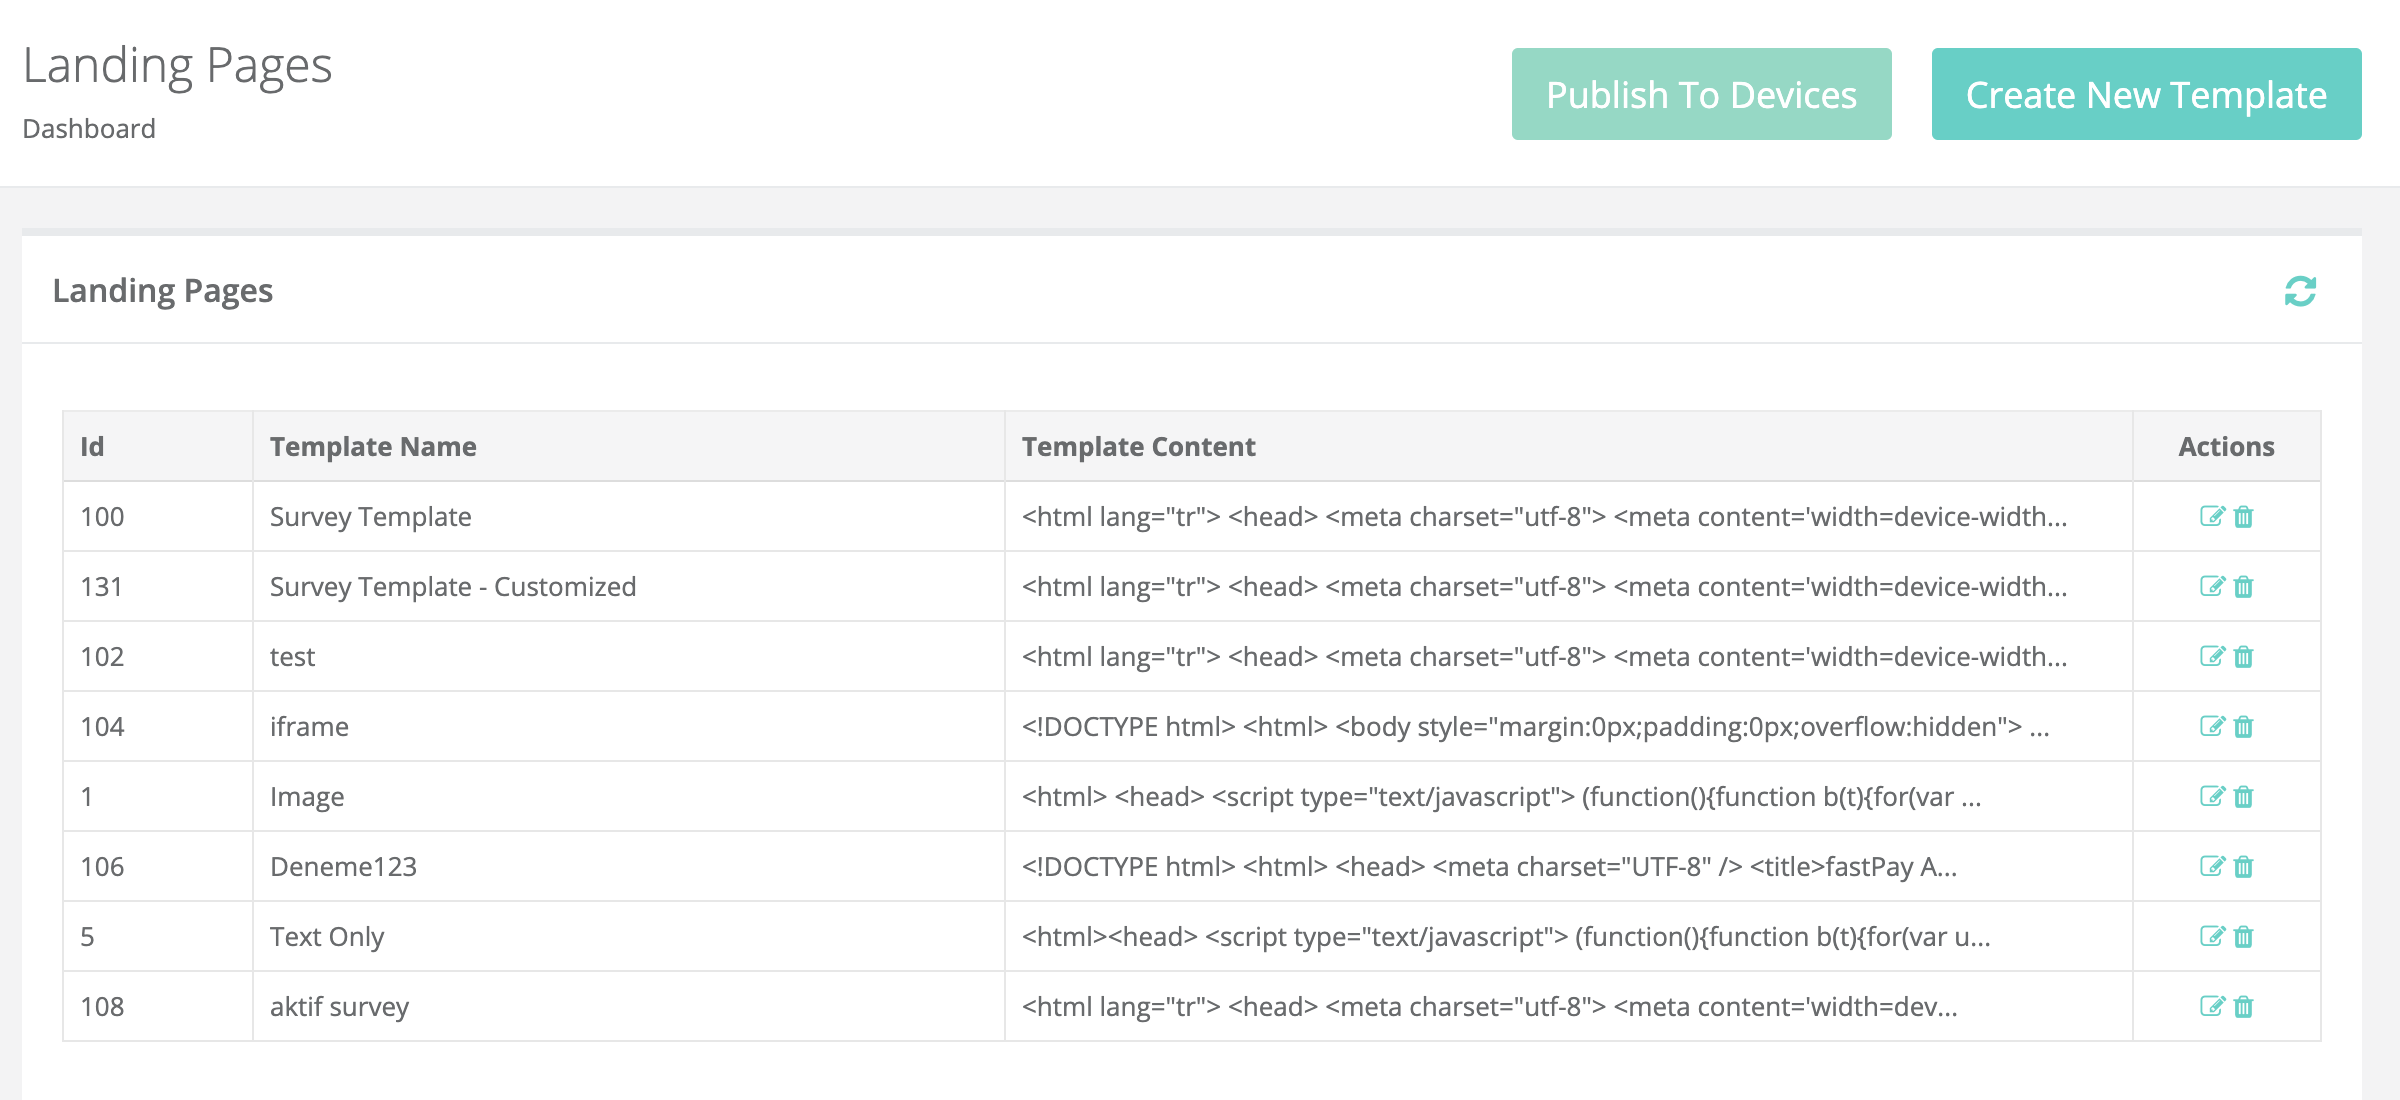
- Dashboard users who want to use a template other than the existing templates can create their templates with the Create New Template button on the Landing Pages screen.
- A name must be specified for the template on the Create Landing Page screen and the HTML content of the template must be entered.

- The Create Dynamic Template button is not enough to create a new template. After this step, the publish to device button must be clicked. This button provides the introduction of the templates created by sending a silent push to the devices.
¶ Mail Templates
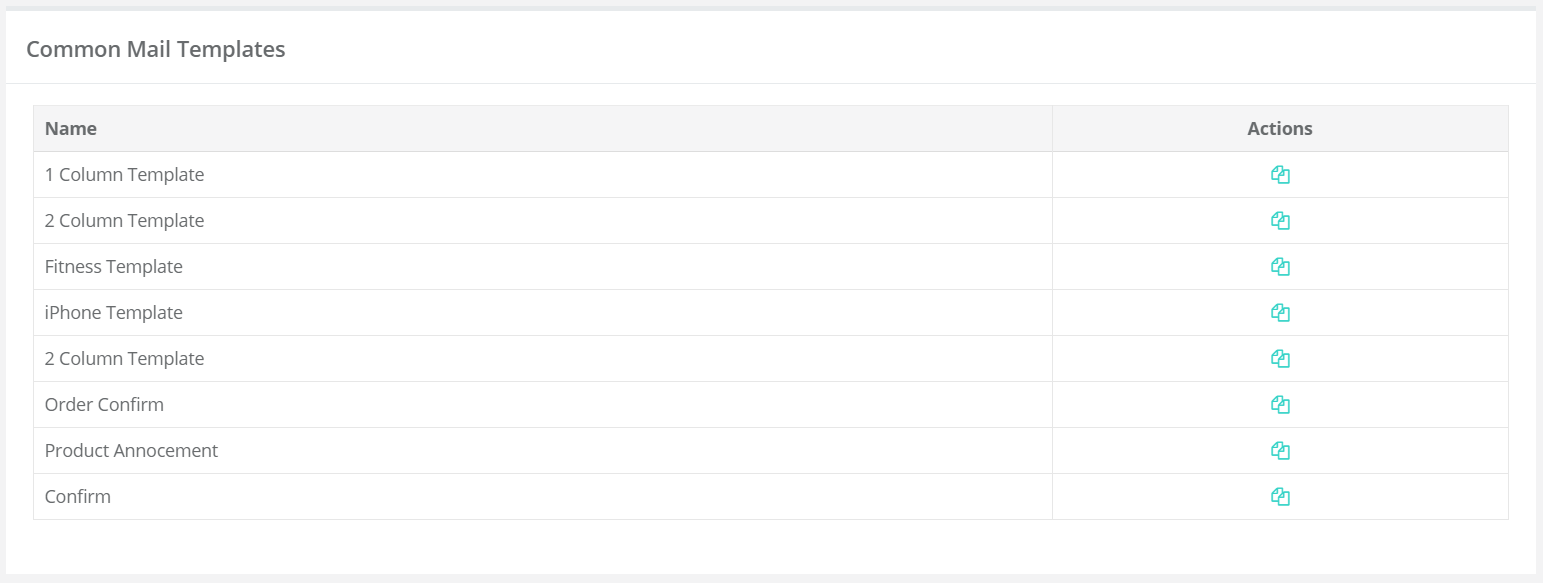
- The Mail Templates screen is the screen where the templates to be used when sending e-mail are determined. While creating e-mail in Netmera, standard templates or custom templates defined in the panel can be used.
- In the Common Mail Templates section at the top of the page on the Mail Templates screen, the names of the mail templates provided by Netmera are displayed. These templates can be defined for use by clicking the Actions button on the right of the table.
- While editing existing Netmera templates, the name to be given to the template should be entered in the Template Label section.
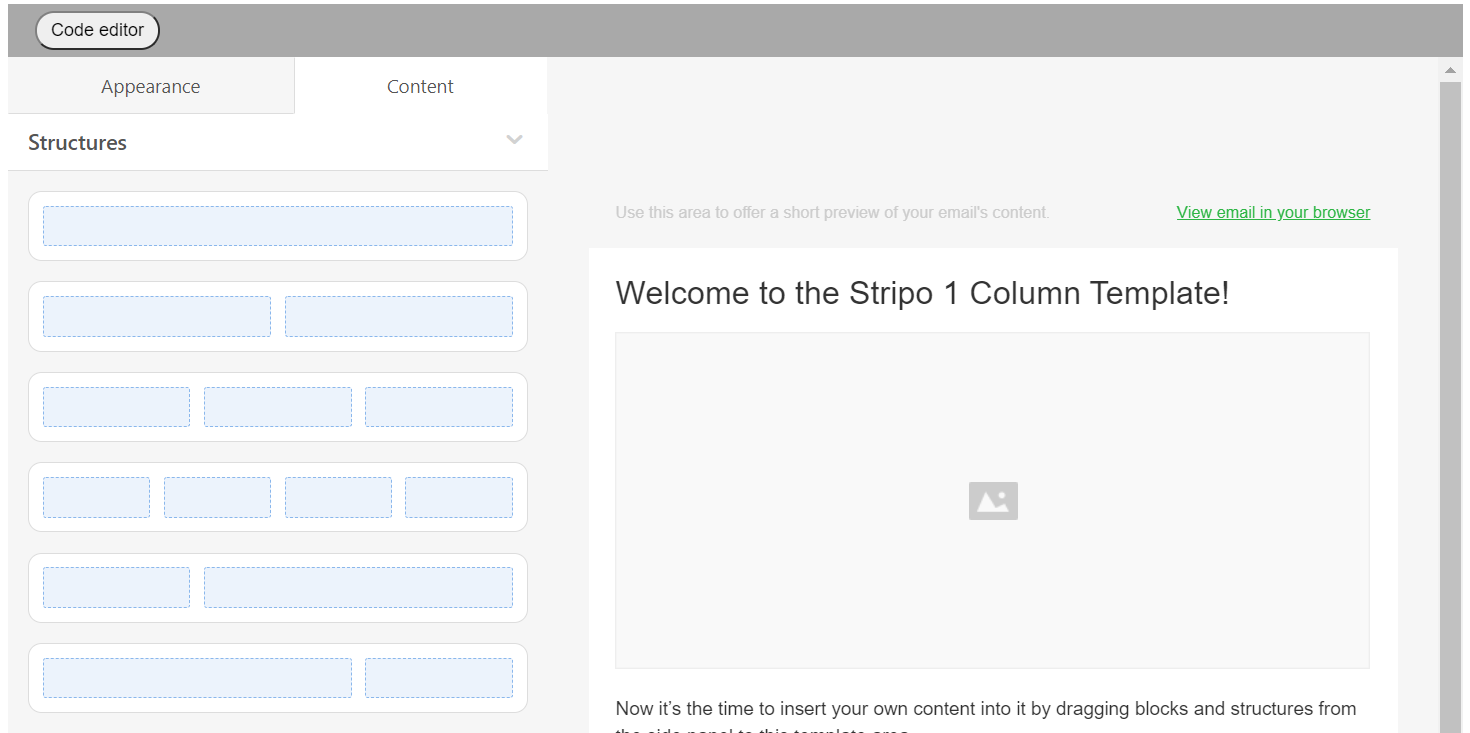
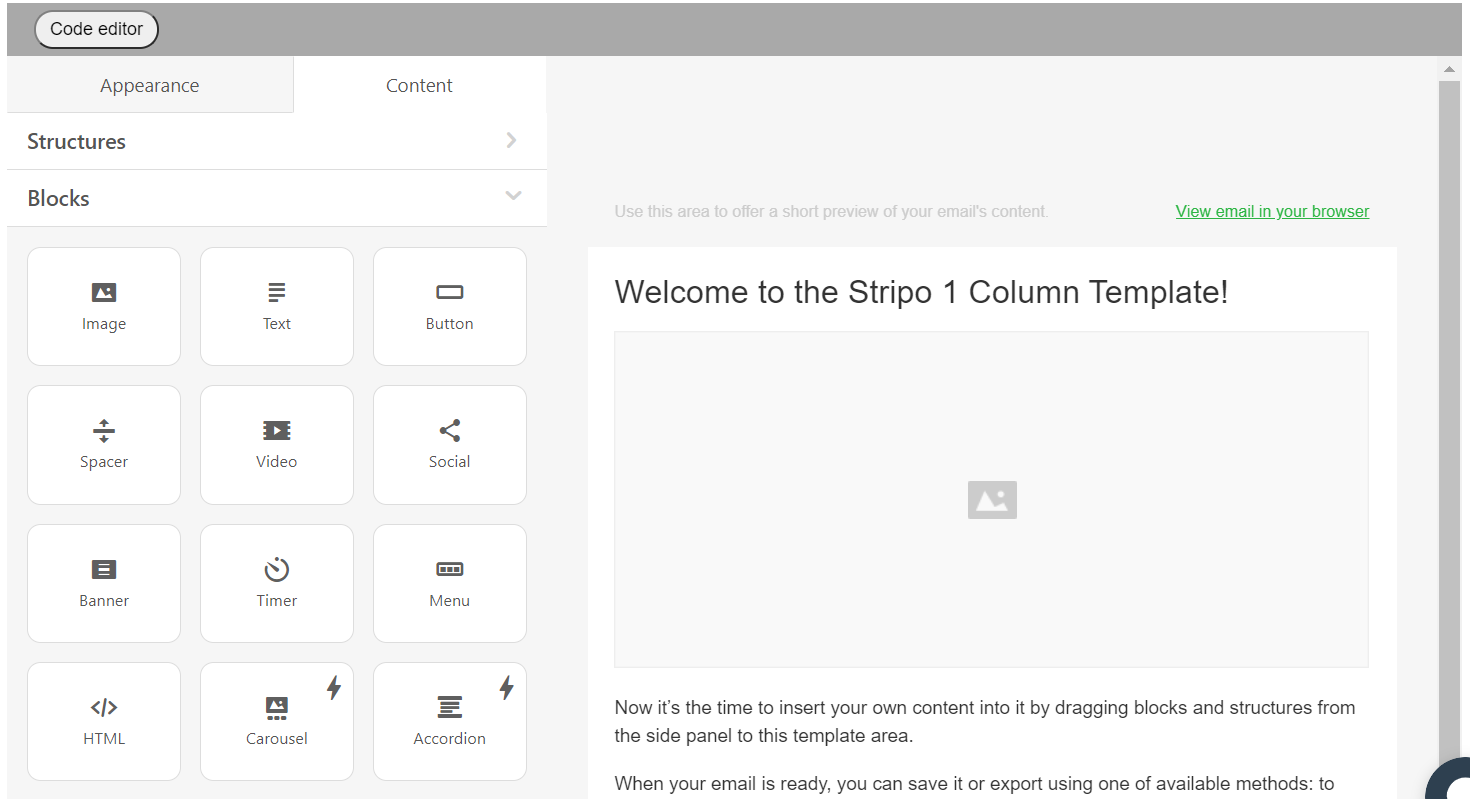
- There are two types of editing tabs, Appearance and Content. While designing the general view of the mail template in the appearance section; In the content section, the content of the mail template is organized.
- In the Appearance> General section, general template features such as the width of the template, the part where the mail will be located on the page, the space between the lines, and the font are designed.
- In the Stripes section, general views such as title, content, footer, and informational parts' font, font color, content background color, color for added link, font size are designed.
- In the Headings section, the font and font size for the headings, the spaces between the lines, and the colors for the title are determined.
- In the Button section, features such as font and font color, the section where the buttons will be located on the page, button color are arranged in the same way.
- In the mobile formatting part, how the template appearance will be on mobile devices is designed. As with other view features, views such as the title, content, font size of the subtitle parts, and space between the lines should be arranged.

- Structure allows to drag the content of the Blocks area into the template part of one of the various fields for the content.
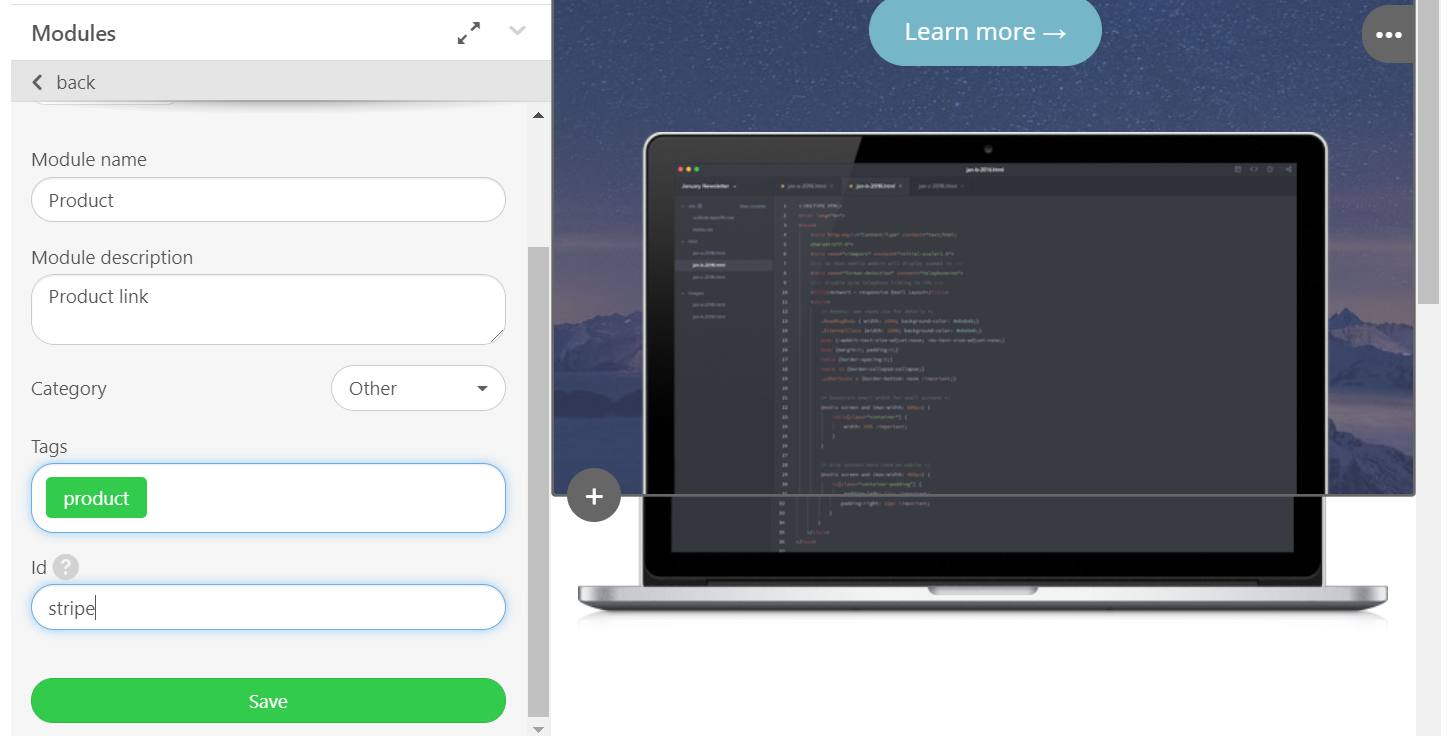
- Blocks part; It is a content area that allows you to edit email content such as images, videos, text, share various links, and adding details such as banners and carousel content.
- Modules part is a content option that allows the template to be saved as a module and added to new templates to be created later.
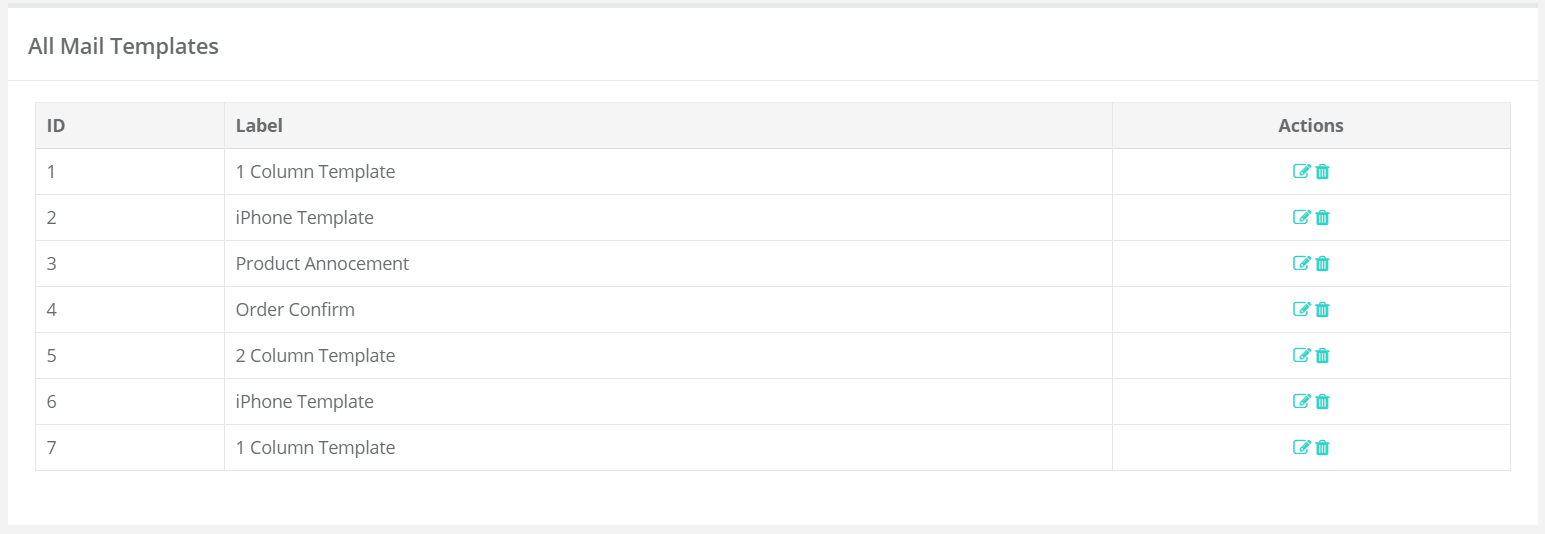
- In the All Mail Templates section, Netmera templates saved by editing, as well as custom templates defined with HTML and CSS codes are listed one after the other. Templates can be edited or deleted via the options in the Actions section on the right side of the table.
- Custom mail templates can be created by adding HTML and CSS codes by clicking the Create New Template button.

¶ WebHooks
- WebHooks is a structure that is established to receive user data, push clicks, message contents that come to the system to customers' backends. In this way, in the real-time data flow is realized from Netmera to the application backend system.
- For example, after creating a Webhook for push click, when creating a new message; In the WebHook for Push Click option in the Push Click Action field in the "What" section, the data of this event is sent to the backend system of the application as soon as they created push click webhook is selected and the user pushes
- The user information that realizes the event, which can be accessed from the funnel screen, is accessed in real-time.
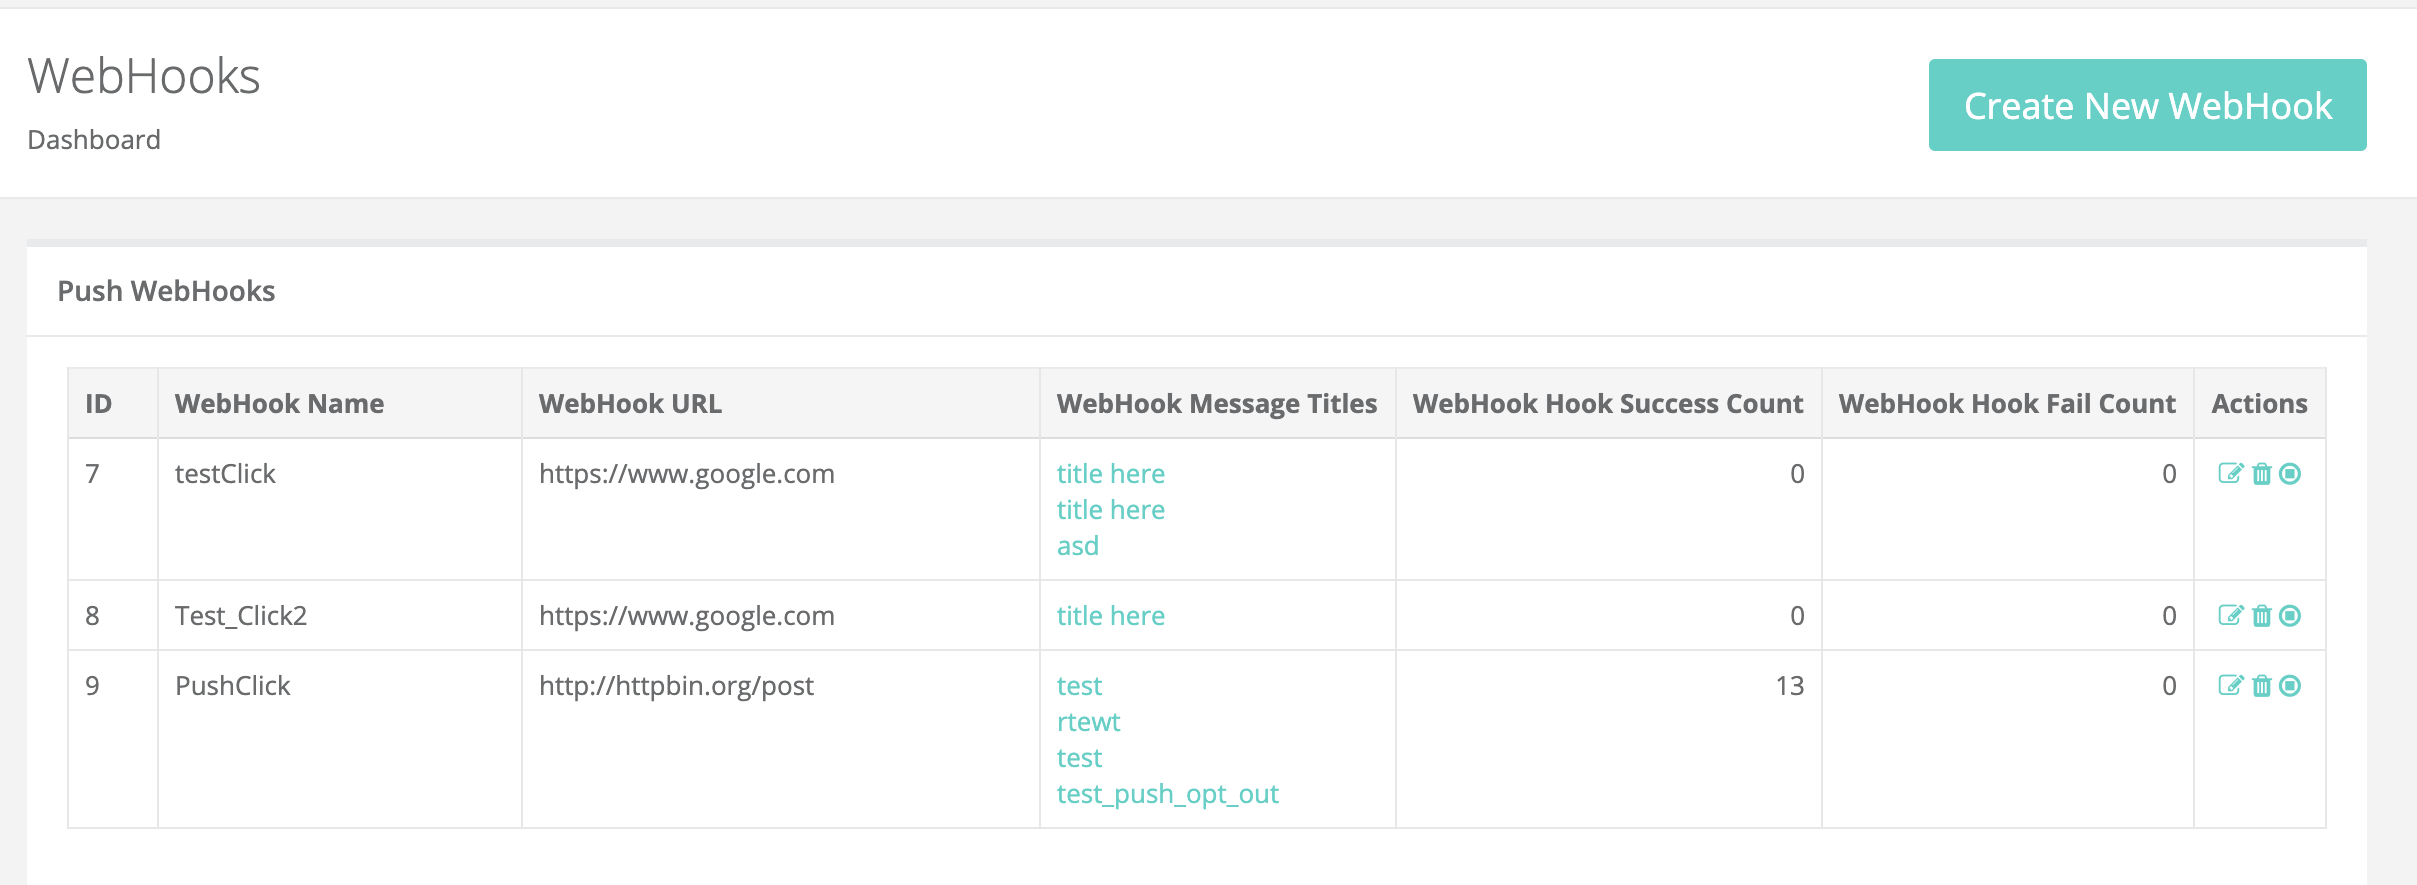
- The WebHooks screen includes the existing Push Webhook, Event Webhook, and Message Log Webhooks.
- ID, webhook name, webhook URL, webhook message headers, successful and unsuccessful webhook numbers related to these WebHooks variants are shown.
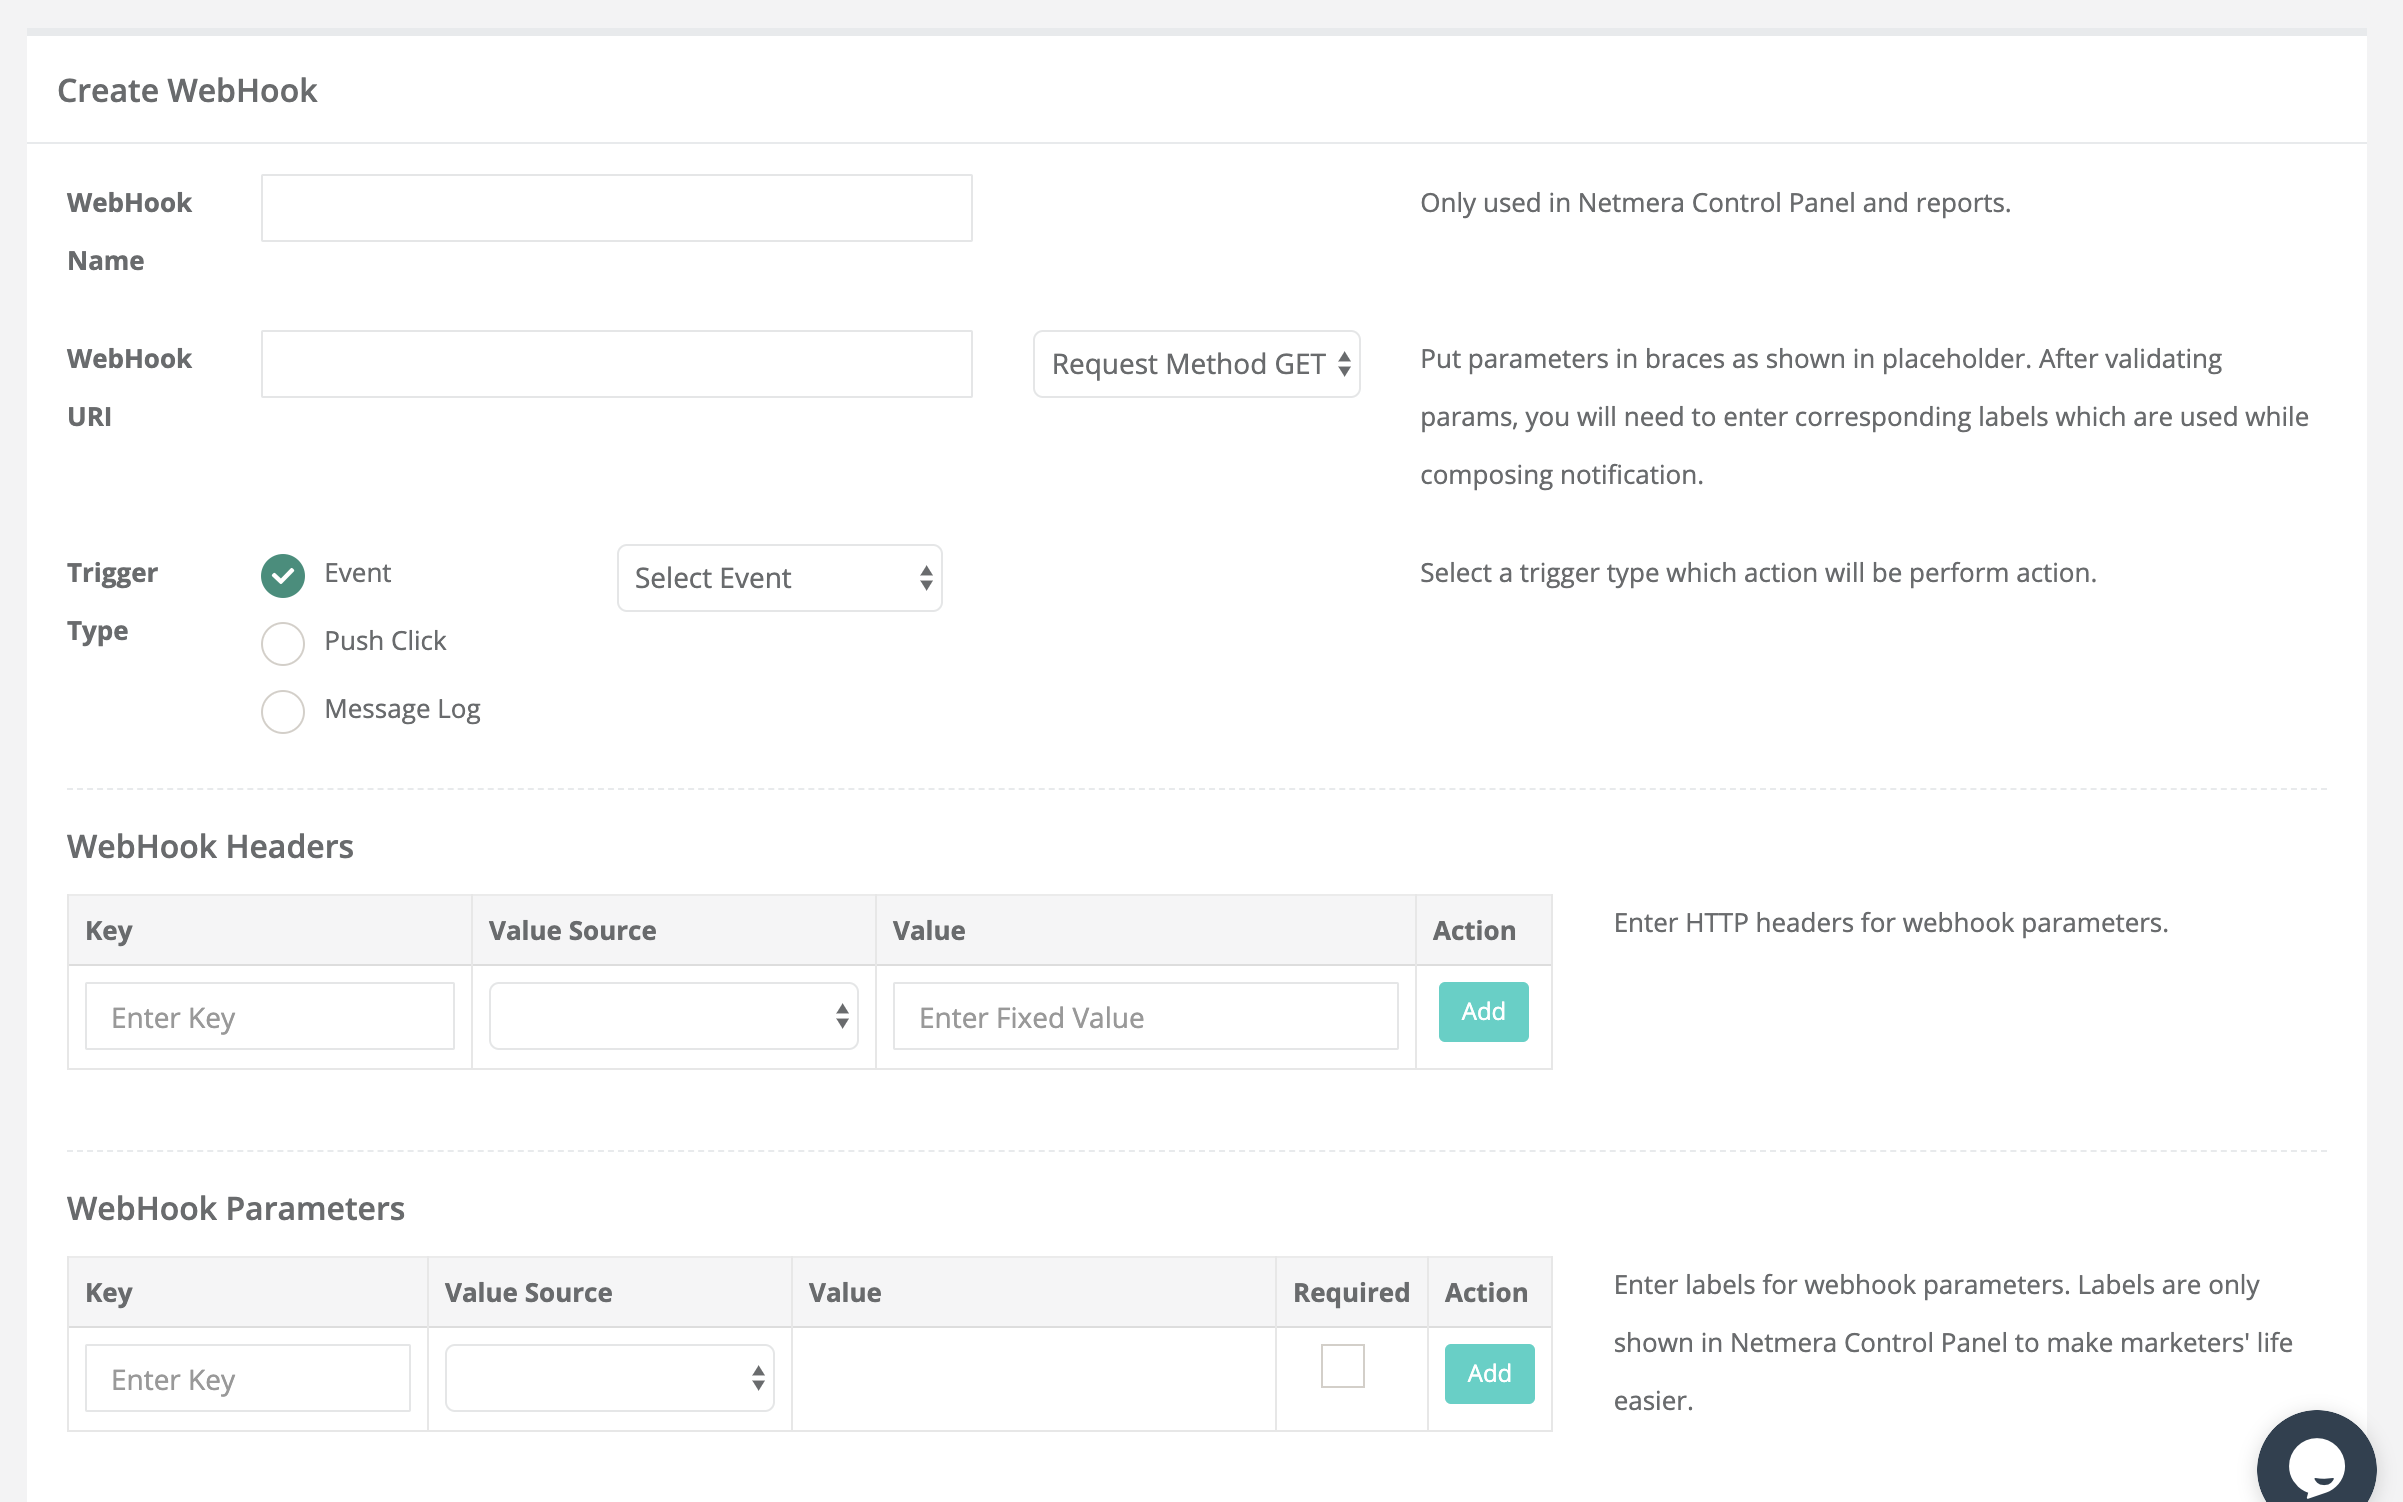
- Firstly, a name for webhook is determined on the screen of creating a new webhook. Then, the IP of the server where the webhooks sent by Netmera will be hosted is entered into the Webhook URL field.
- In the Trigger Type field, the event that will trigger Webhook is selected. It can be any event, push click or message log.
- While the events are sent to the application backend, various requests are thrown to the servers of the other party, which are called HTTP requests.The WebHook headers and parameters field is the information on the HTTP request to be performed while these events are dispatched. These parameters can be used for a variety of things, such as finding out whether the person who has thrown the request for security is the right person.
- In the "Headers" and "Parameters" fields, "value" and "keys" can be created for the information required to be included in "request".
¶ Web Push
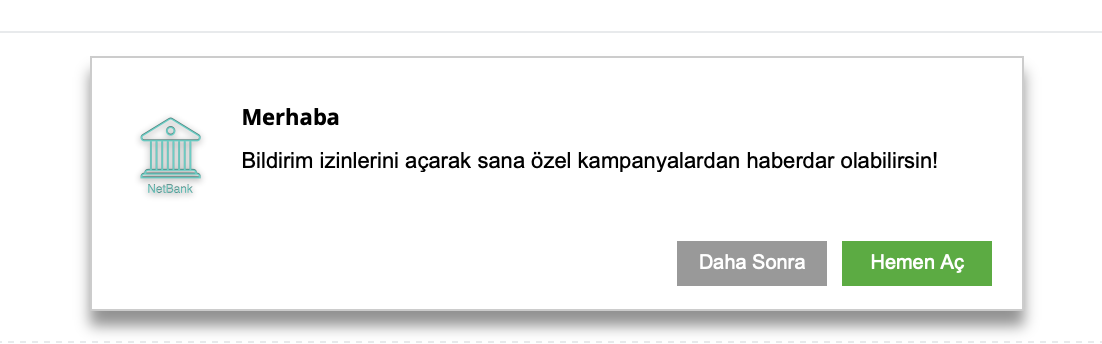
- Web push is the screen where fancy boxes are designed to be sent to users.
- Fancybox is the permission screen for web pushes. Usually they are the boxes that appear on the user's screen while browsing a web page.
- The first section on the Web Push screen is Fancy Box Trigger Options. This field contains the fancy boxes trigger options.
- Fancybox is activated from the Fancybox enable field..
- Show Fancybox Again After: If the user clicks "ask later" on the first sent permission screen, the next query is determined how many days later.
- Show Fancybox After: It is determined how many visits Fancybox will be sent to the user.
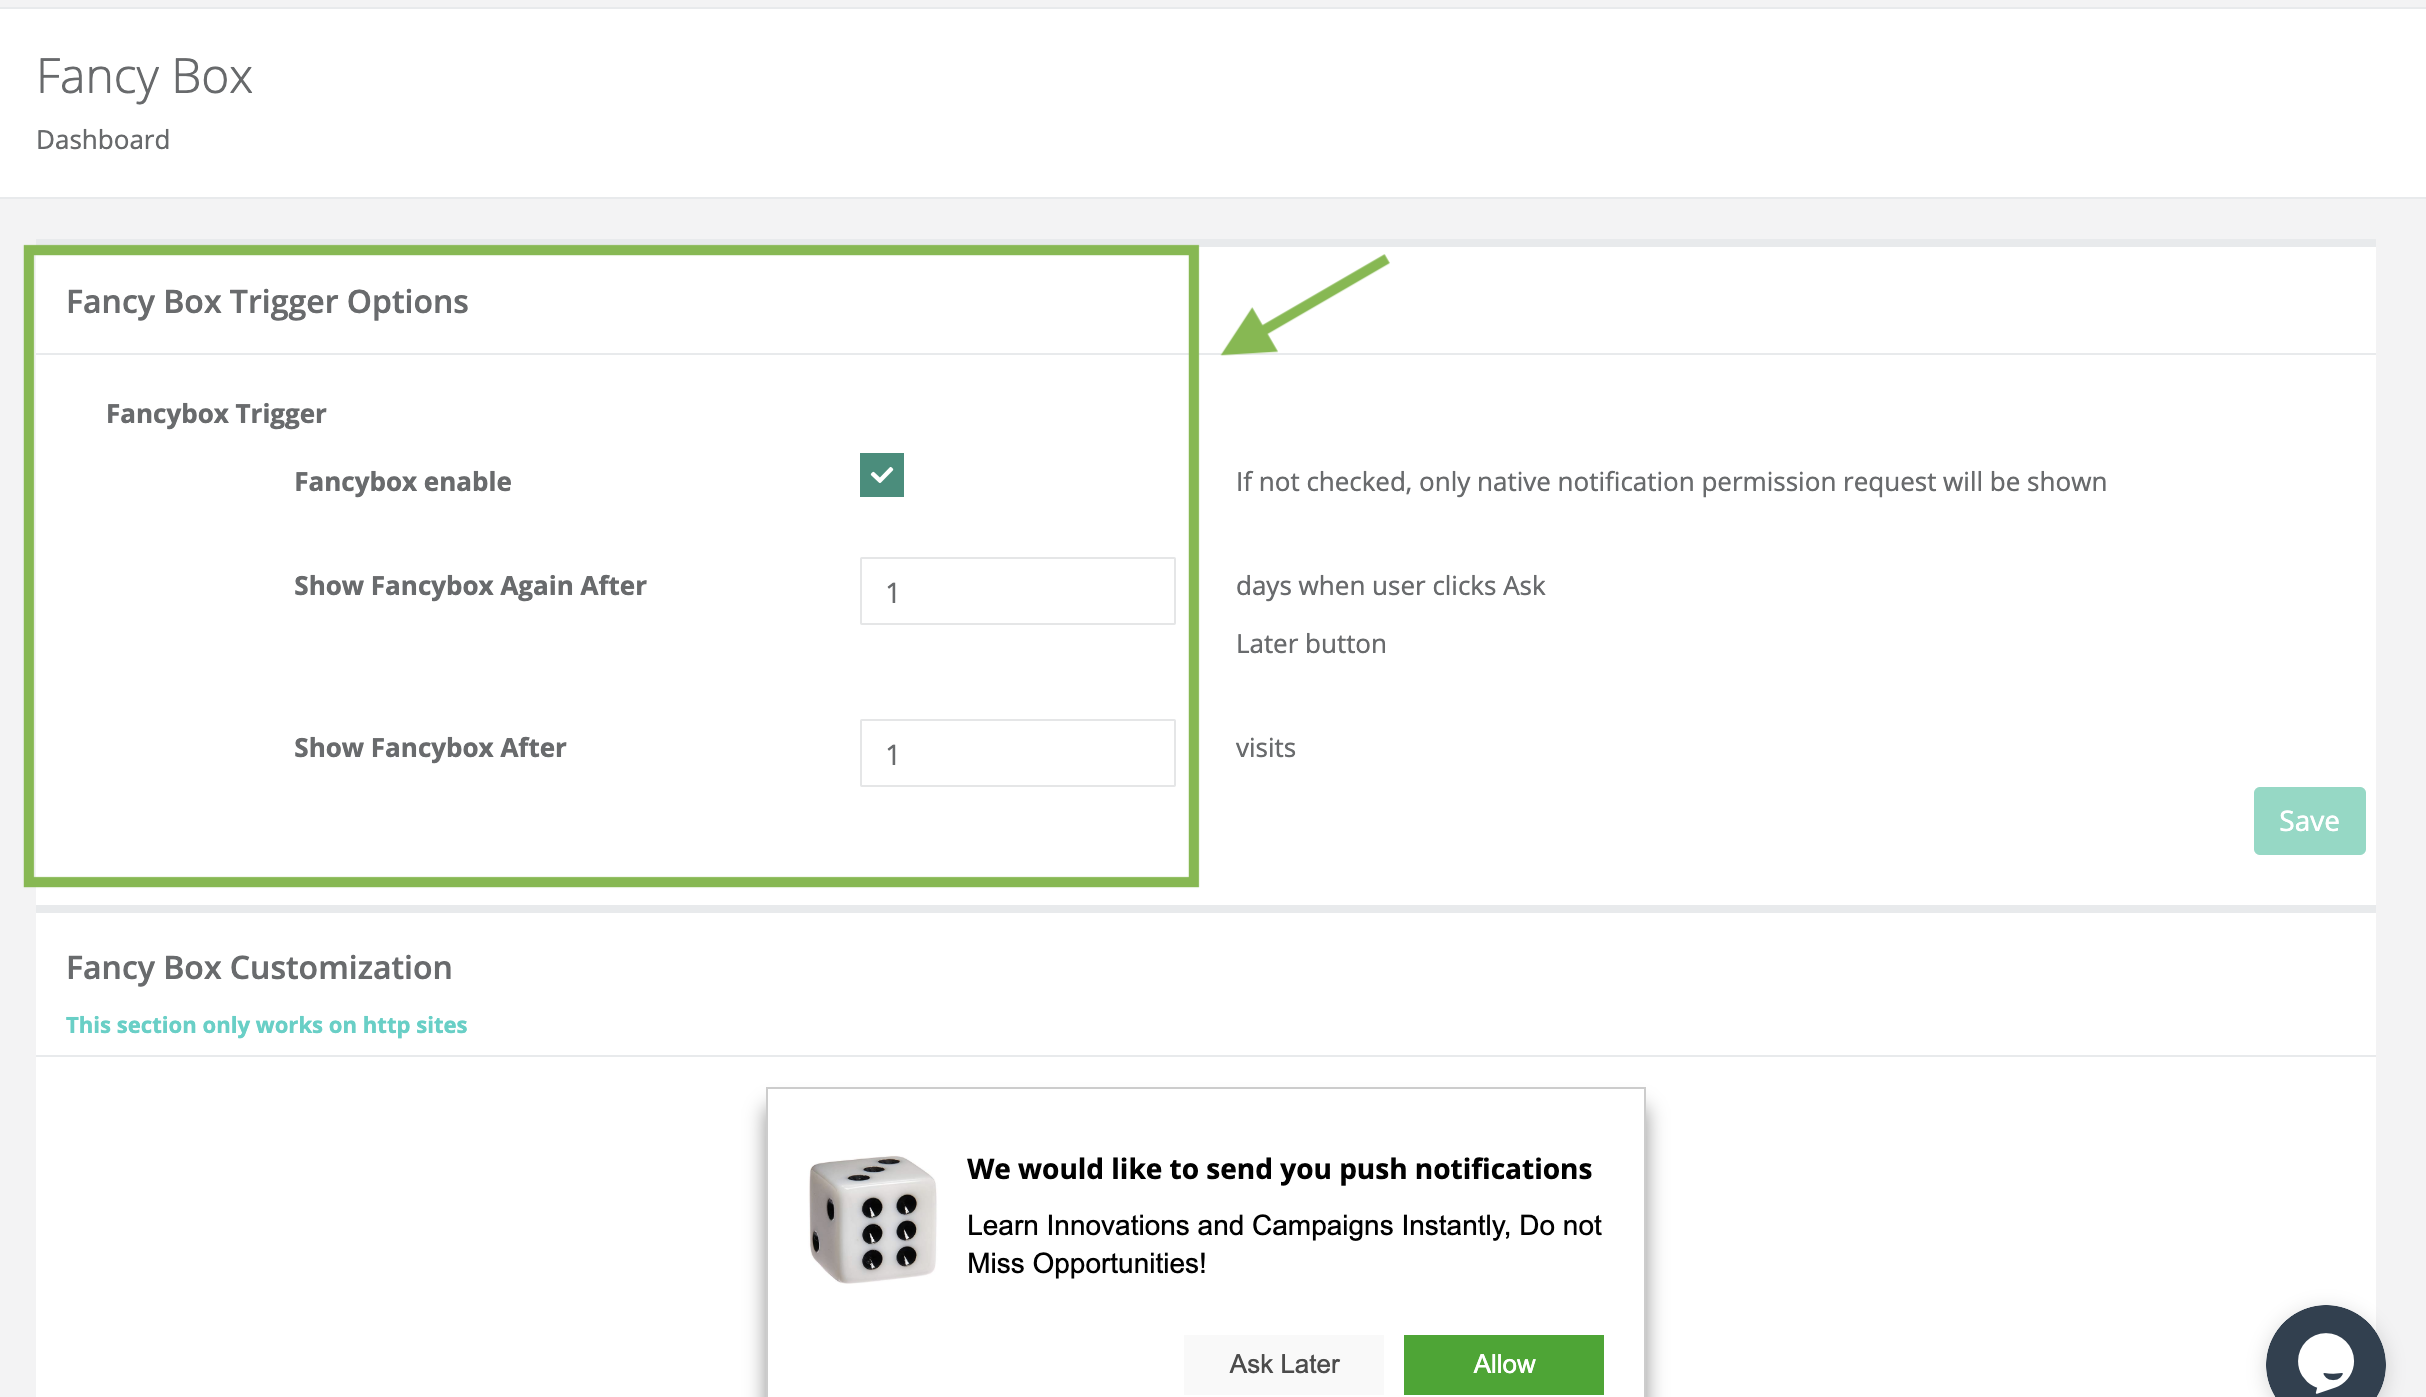
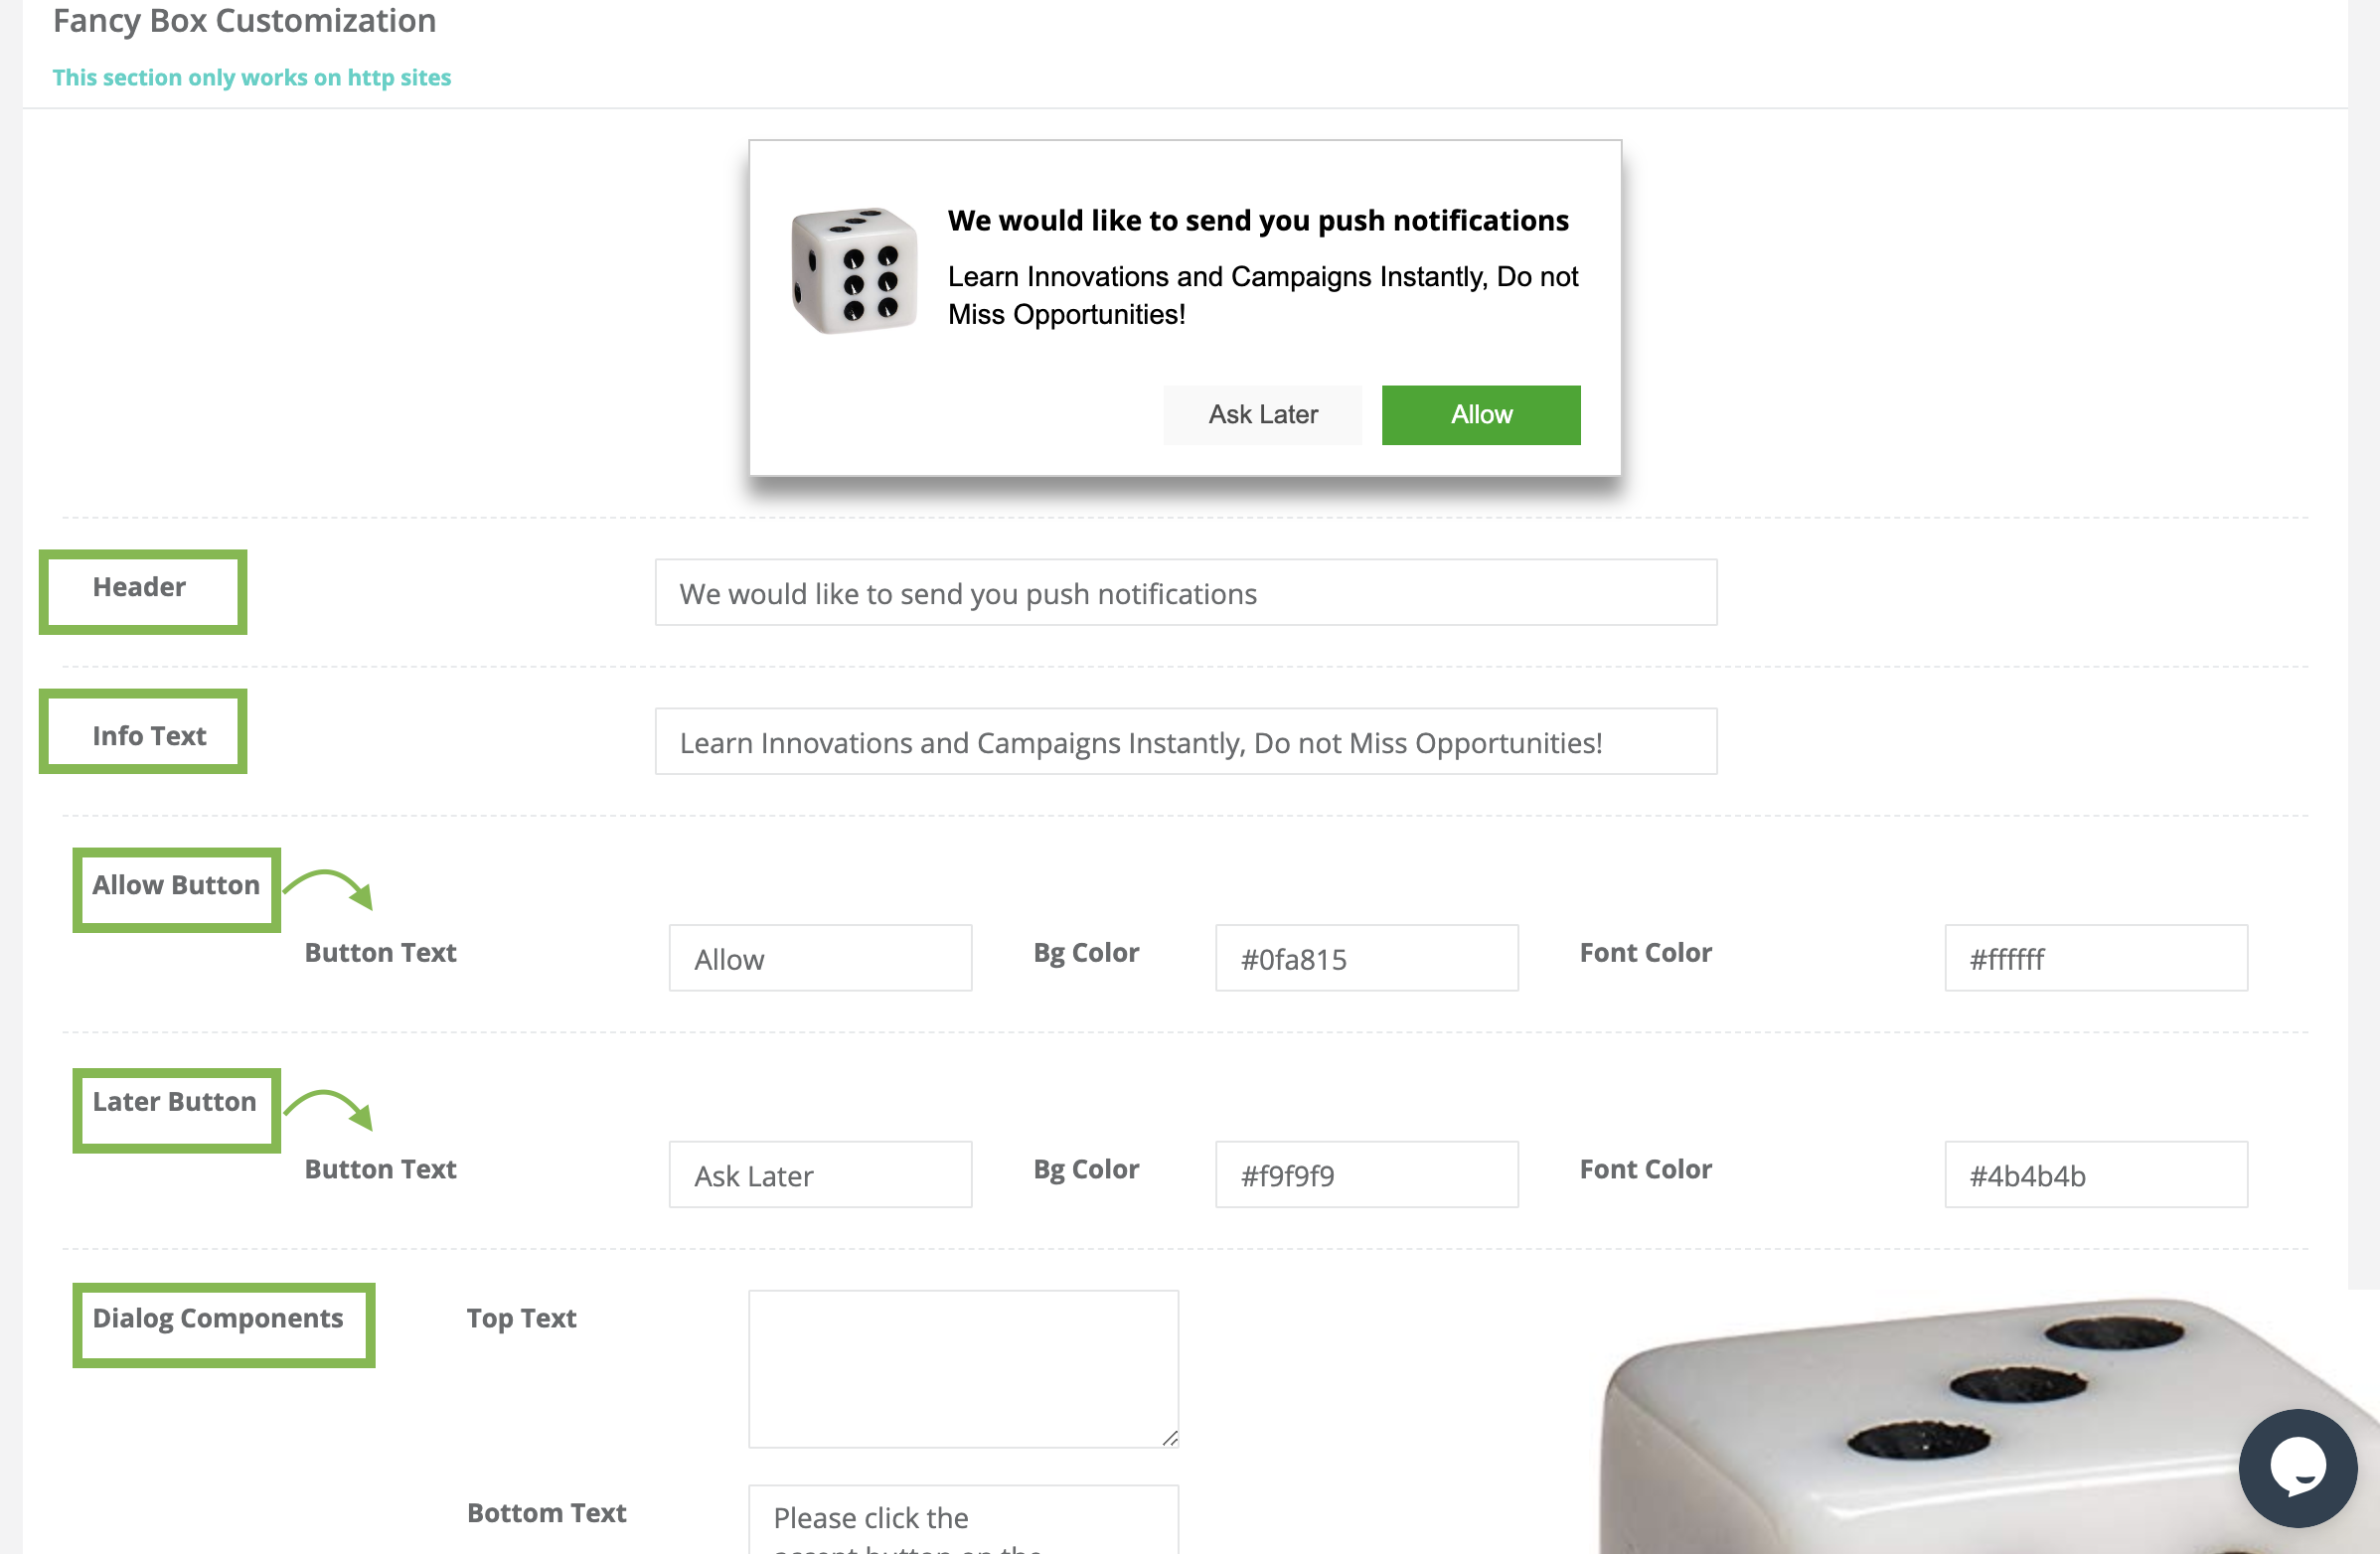
- Fancy Box Customization section is designed by a fancy box. Selections made at the bottom are shown at the top.
- In the Header section, a title for Fancybox and the message content in the Info Text field are determined.
- In the Allow Button field; Text button color and font color to be included in the "allow" button are determined.
- In the Later Button area; The text button color and font to be included in the "after" button are determined.
¶ App Tracker
- With App Tracker, marketing strategies are developed by checking the existence of certain applications on users' devices.
- The aim is to control the applications that the user has on his phone and to determine strategies for new push submissions.
- The aim is to check the applications that the user has on his phone and to determine strategies for new push sends.
- Some applications can be controlled in the Track App list on the App Tracker page. When the desired application is selected and the add button is clicked, the application is added to the applications to be tracked. The application can be removed from the Tracked Apps area with the Remove button.
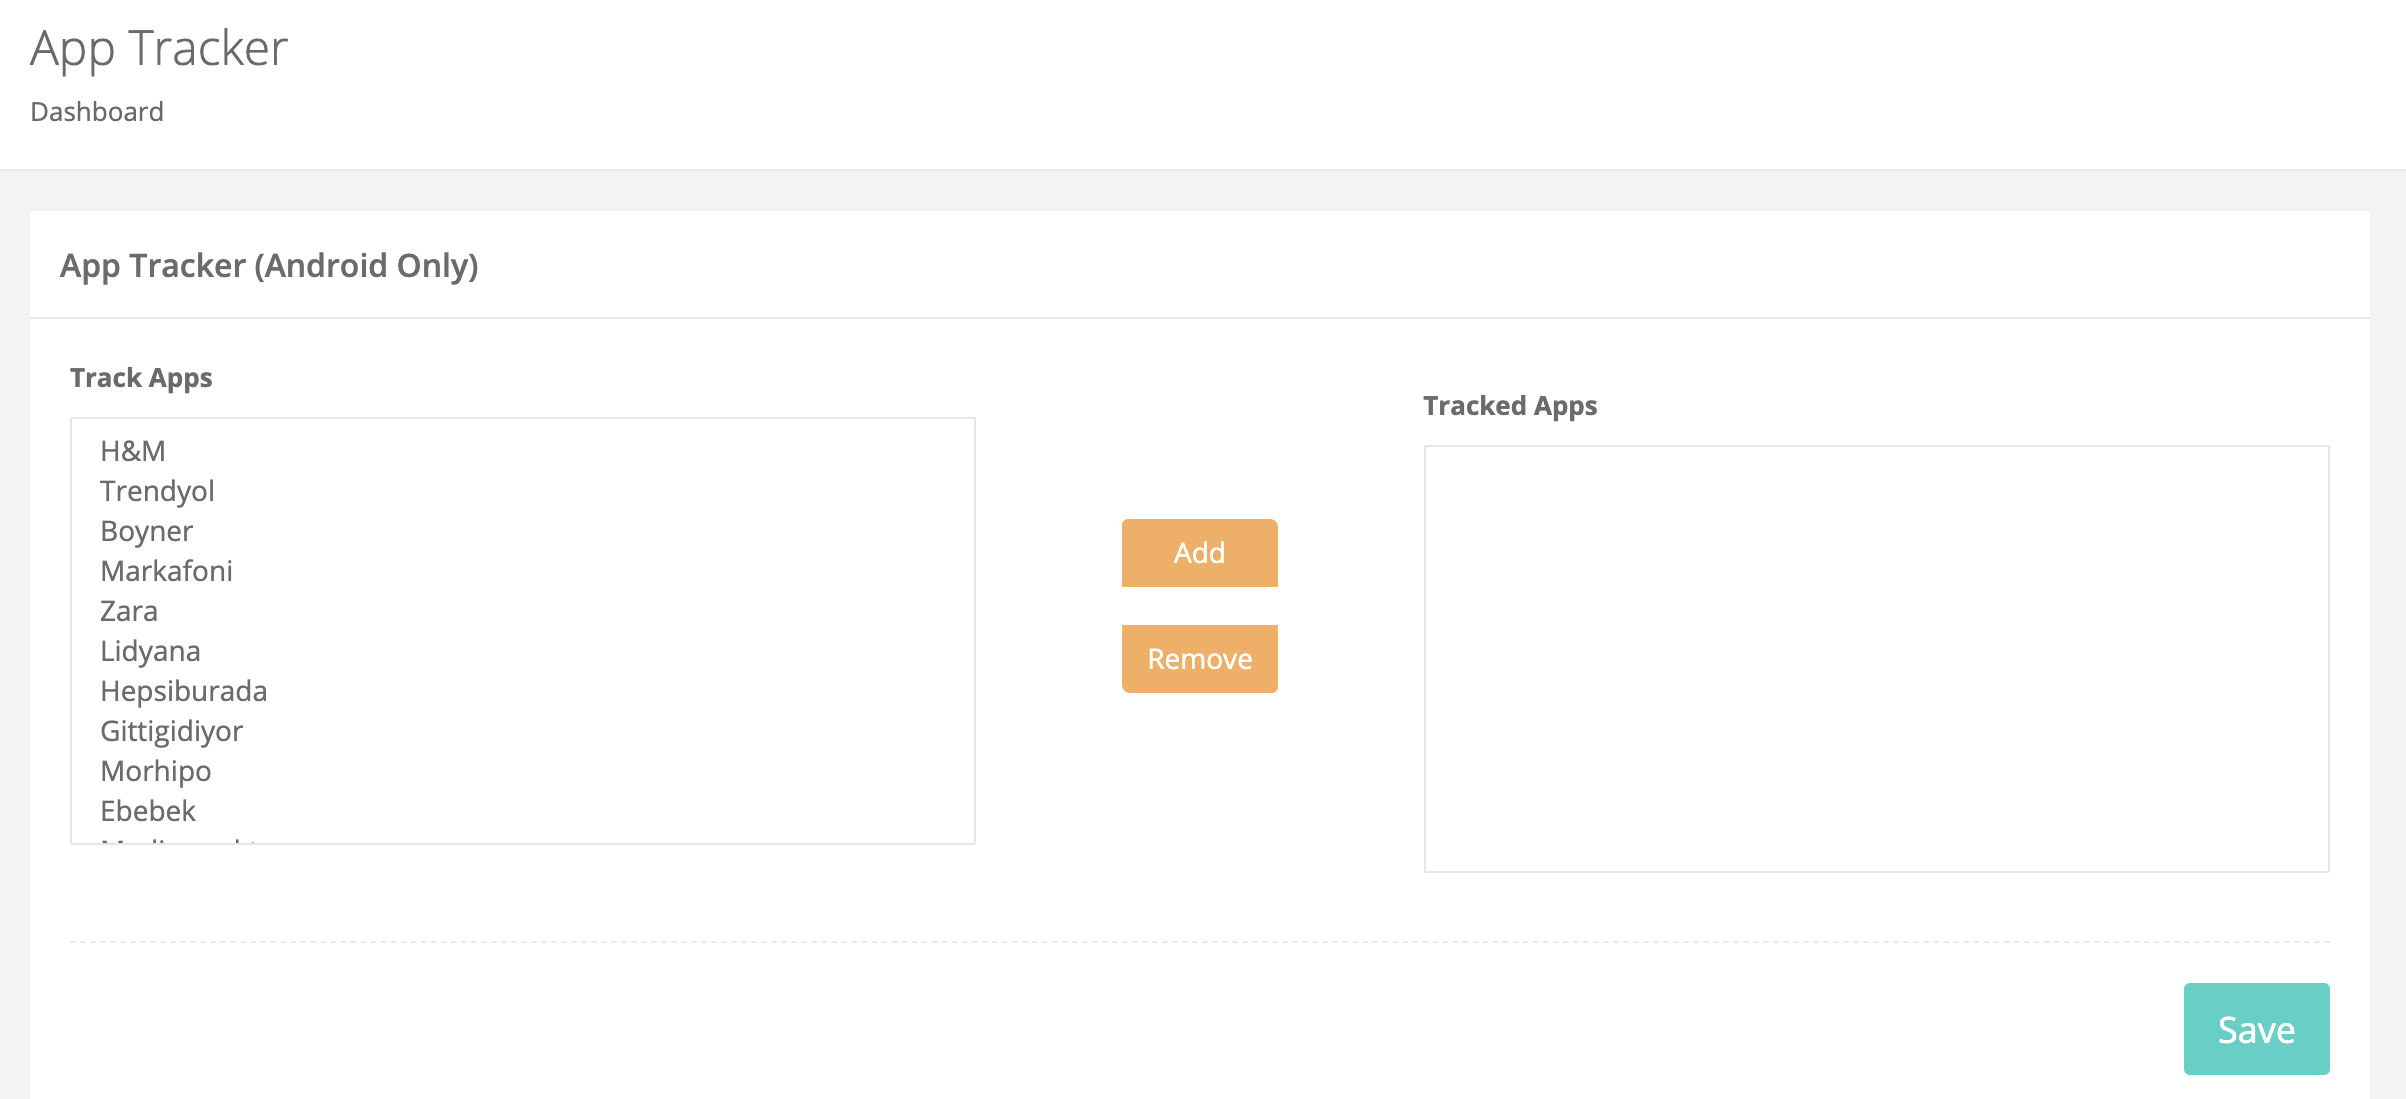
App Tracking feature is only available for Android devices.
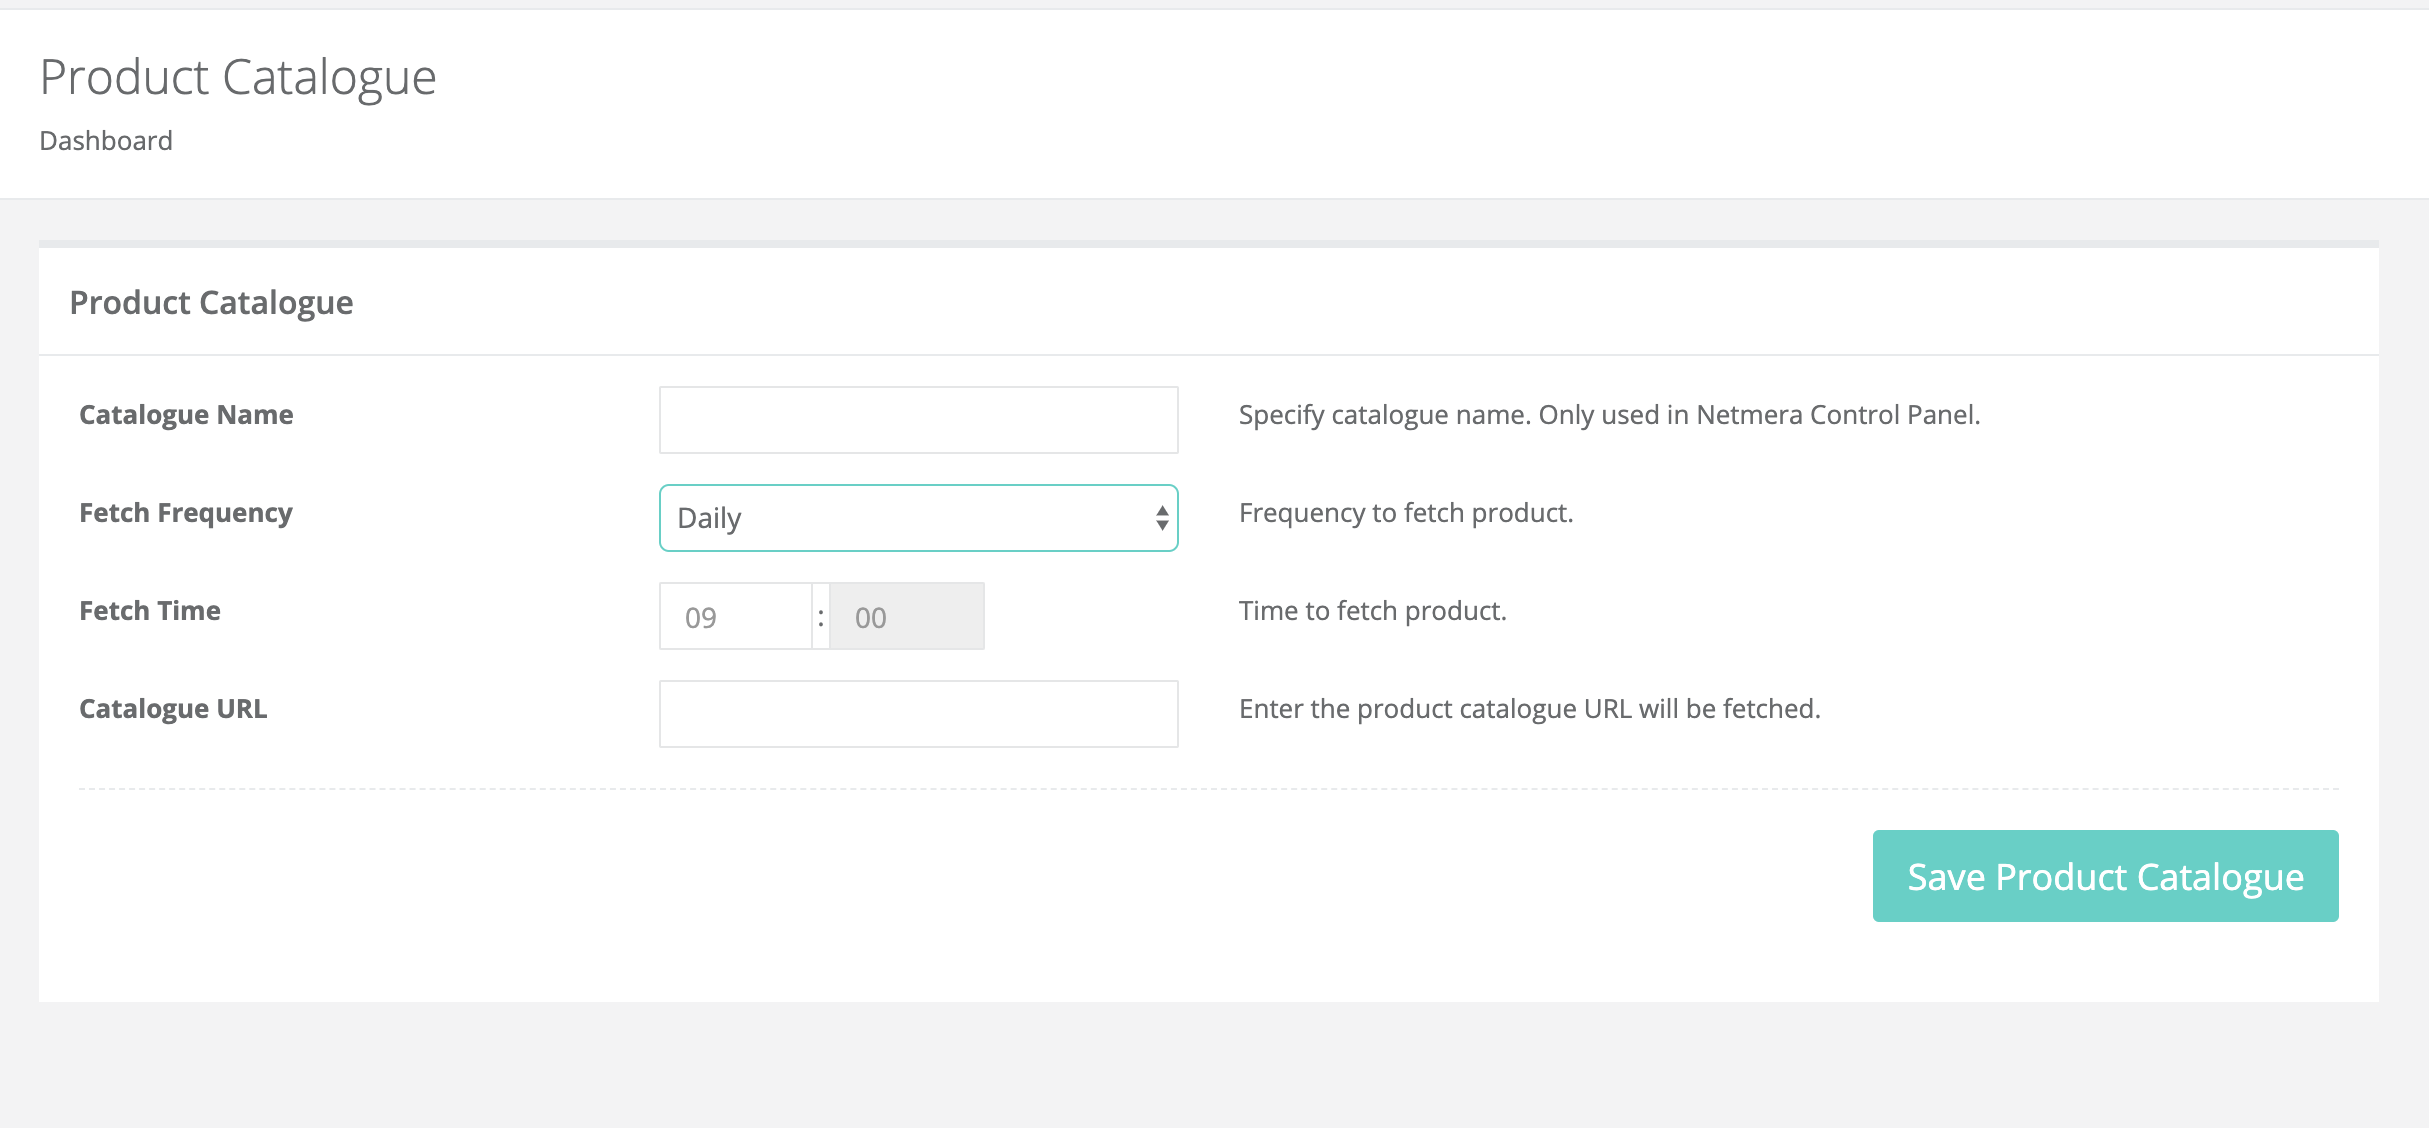
¶ Product Catalogue
- It is the place where product catalogs are created to facilitate the transactions with the products.
- Through the created Product Catalogues, it is possible to easily access the products and contents in campaigns such as the carousel.
- Also, the Product ID that will be entered with the Product Push option on the new campaign creation screen is saved in the system by-product catalogs.
- Catalogue Name: A name is determined for the product catalog to be created.
- Fetch Time: Product IDs can be constantly changed or new products can be added, so the information in the product lists should be updated by looking for a new product or a product whose ID is changed in the Catalogue URL. In the Fetch Time field, it is decided when to list the product lists on the panel.
- Fetch Frequency: It is determined at which time intervals the product lists will be updated. One of the daily, weekly or monthly options can be selected.
- Catalogue URL: Catalogues with the Google Product URL in this field can be added to the panel. If Google Product URL is not available, an endpoint should be opened and XMLs should be loaded in the format below. This endpoint should then be entered in the Catalogue URL field.
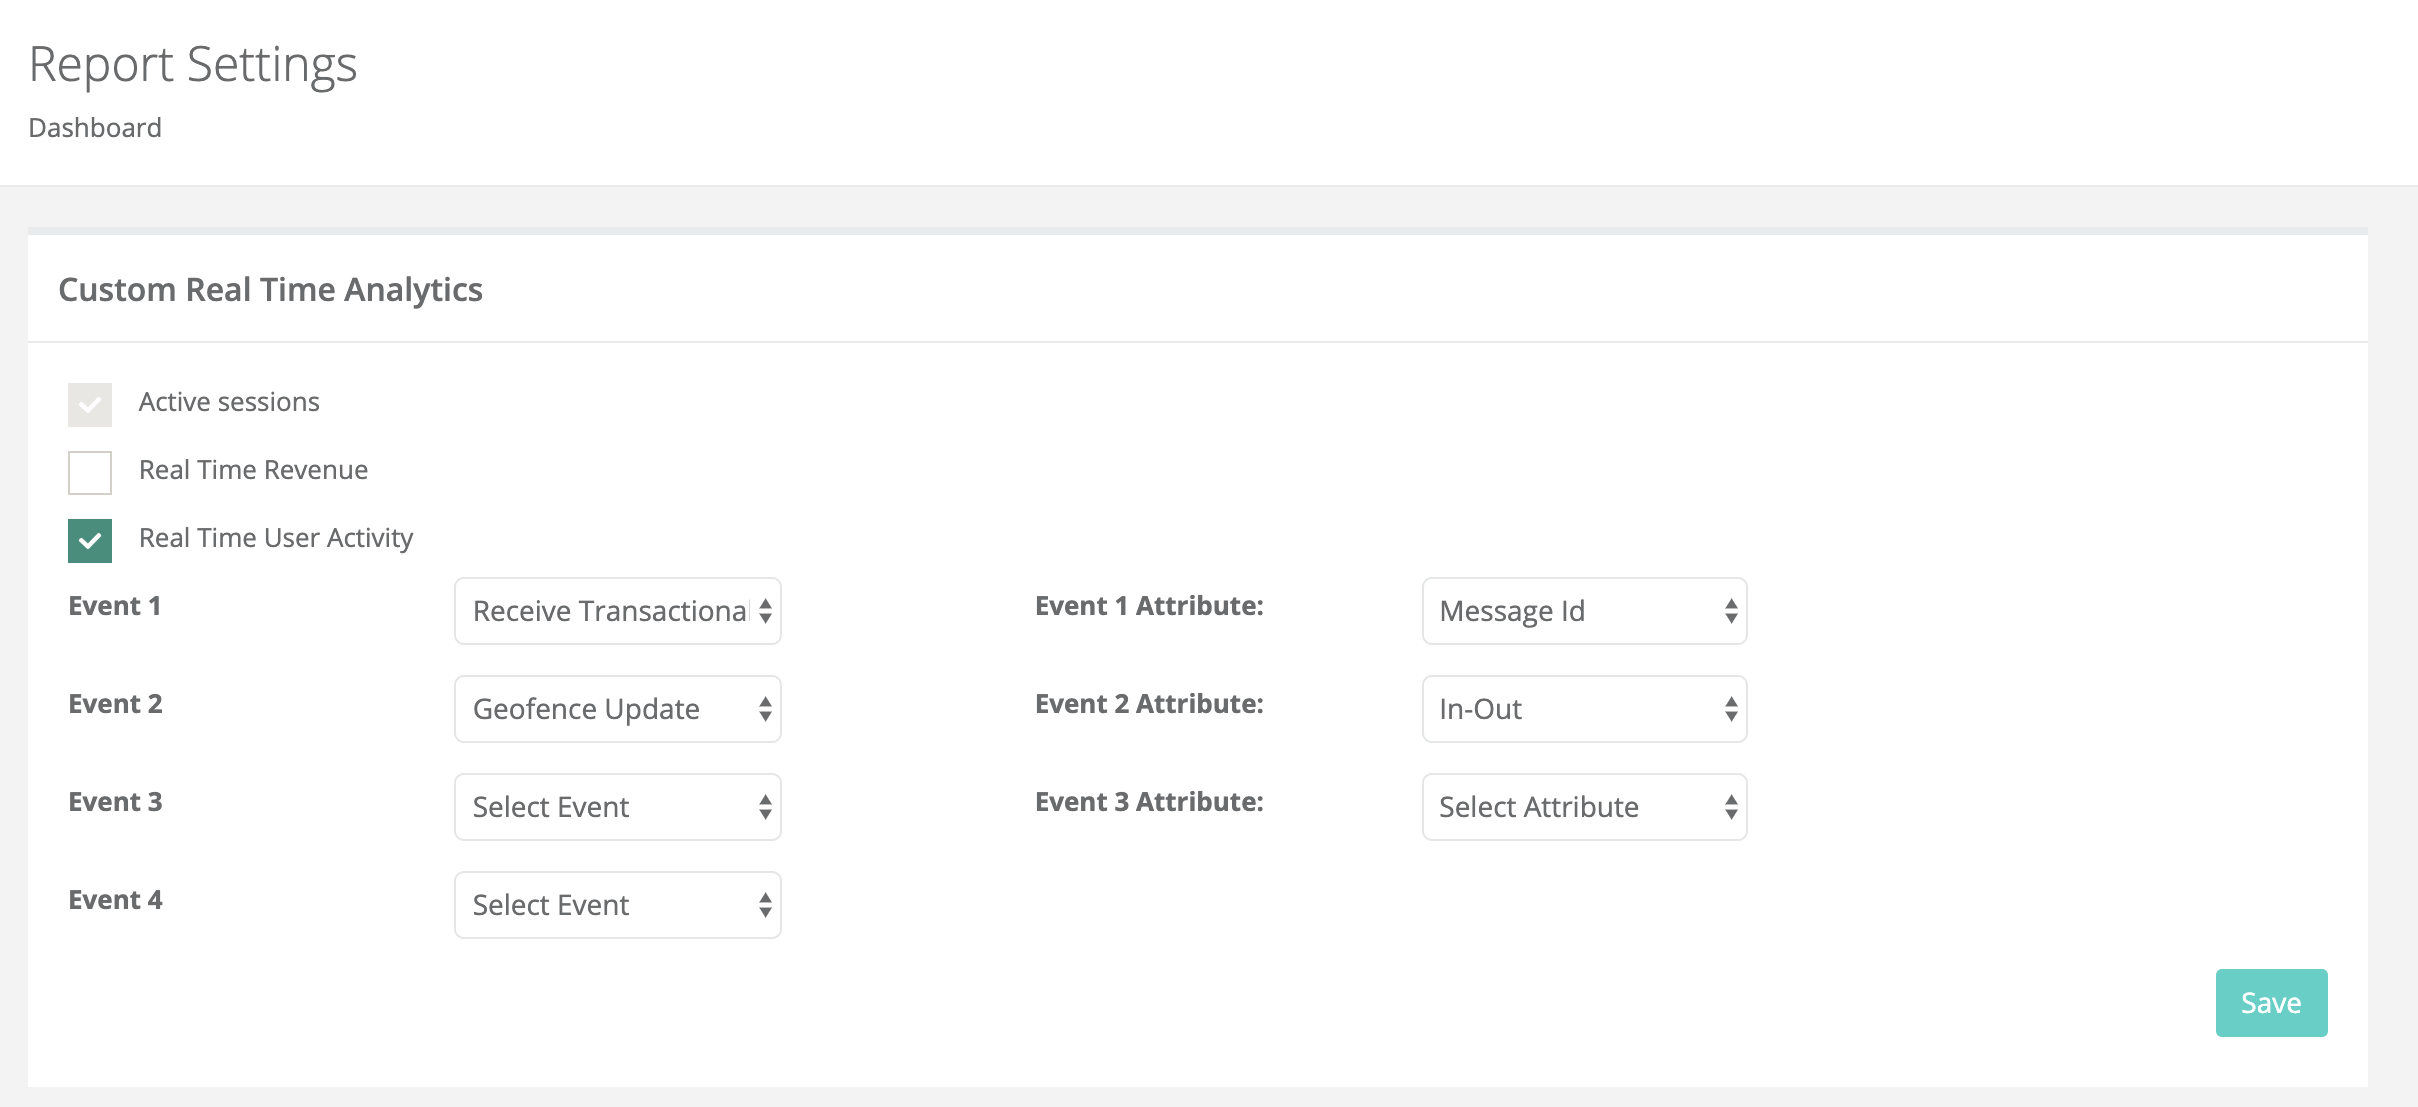
¶ Reports
- On this screen, in the Real-Time Analytics section on the App Dashboard page, what data is shown is set.
- Real-Time Revenue and Real-Time User Activity tables can be added to the dashboard. And in these tables it is determined which events are shown with which attributes.
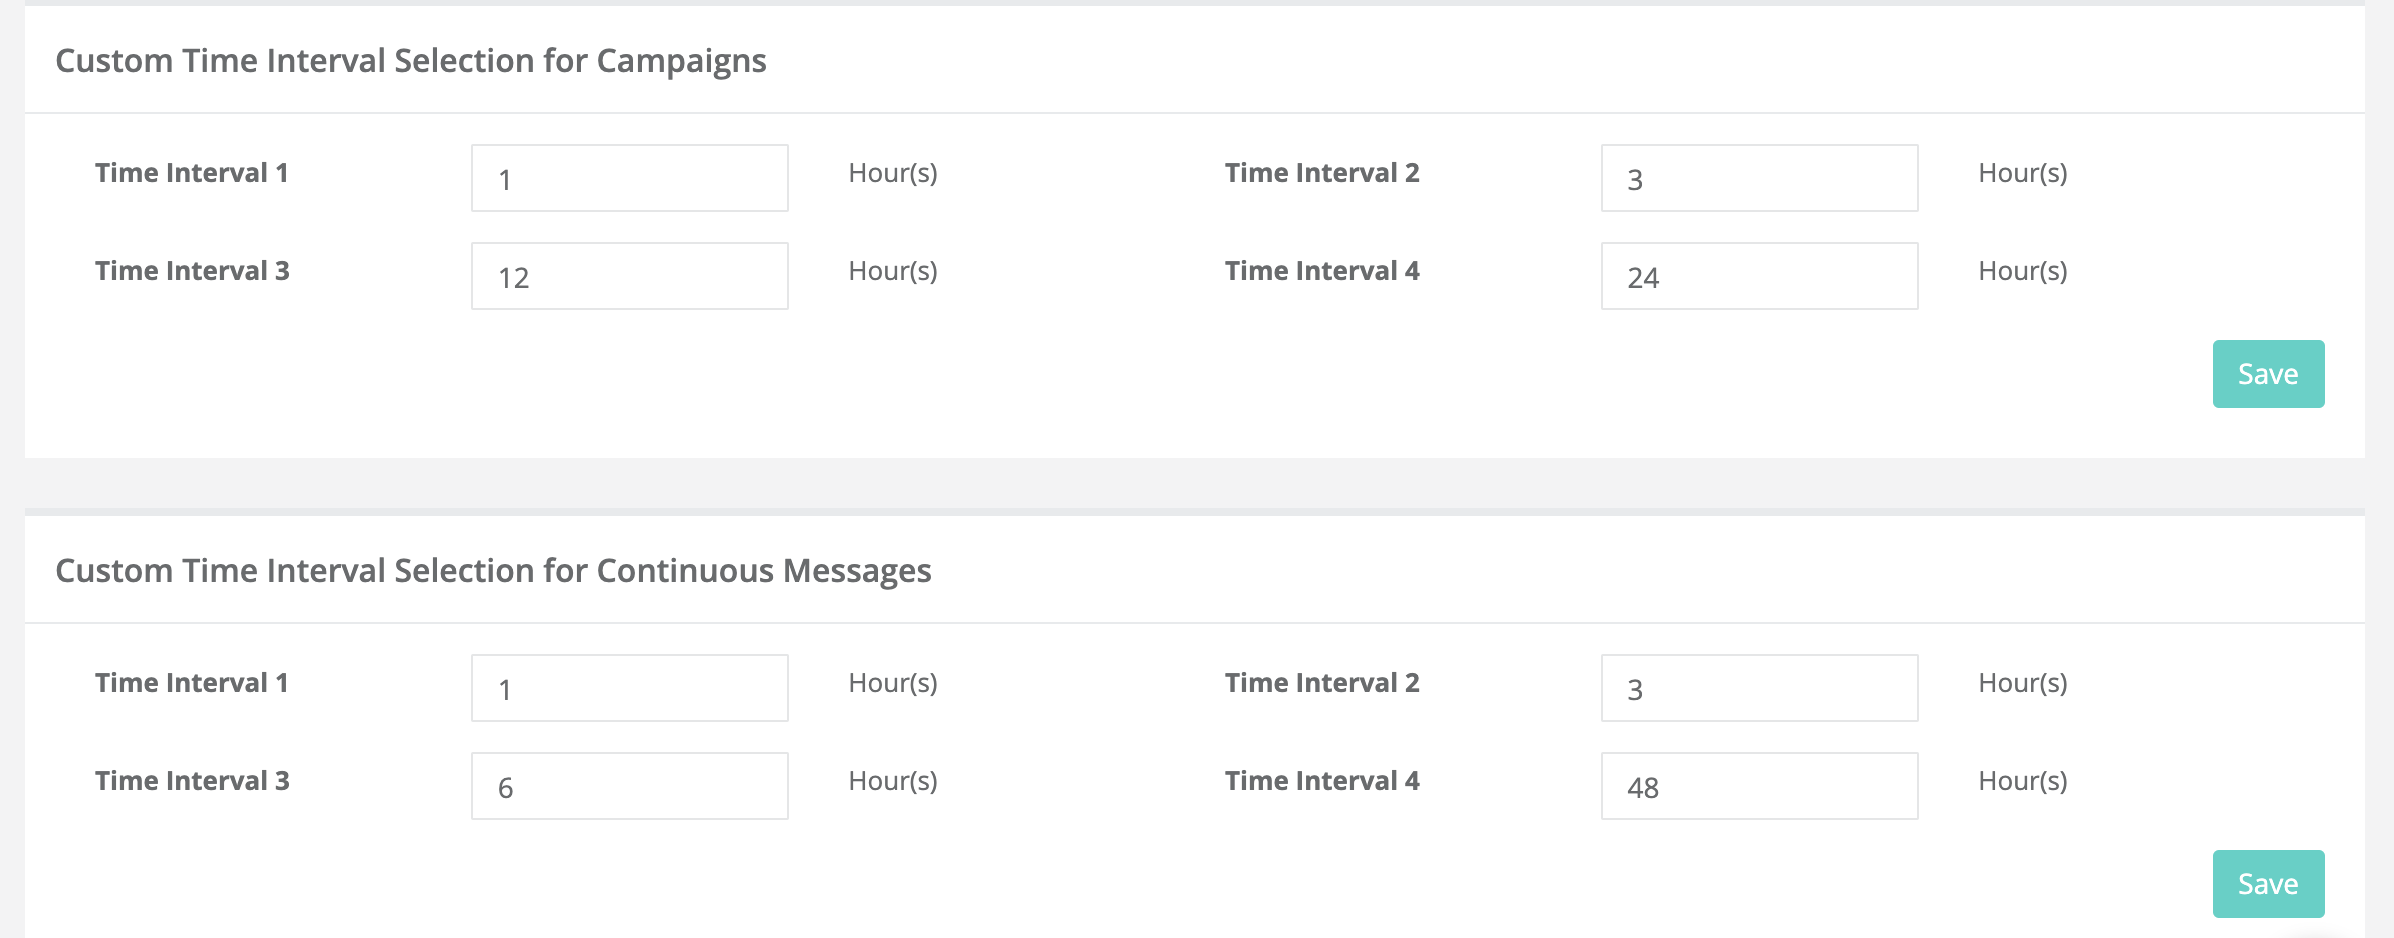
- Also, for conversion and revenue values in the reports of ongoing messages such as campaign and geofence, the time intervals to be examined can be determined from this page.
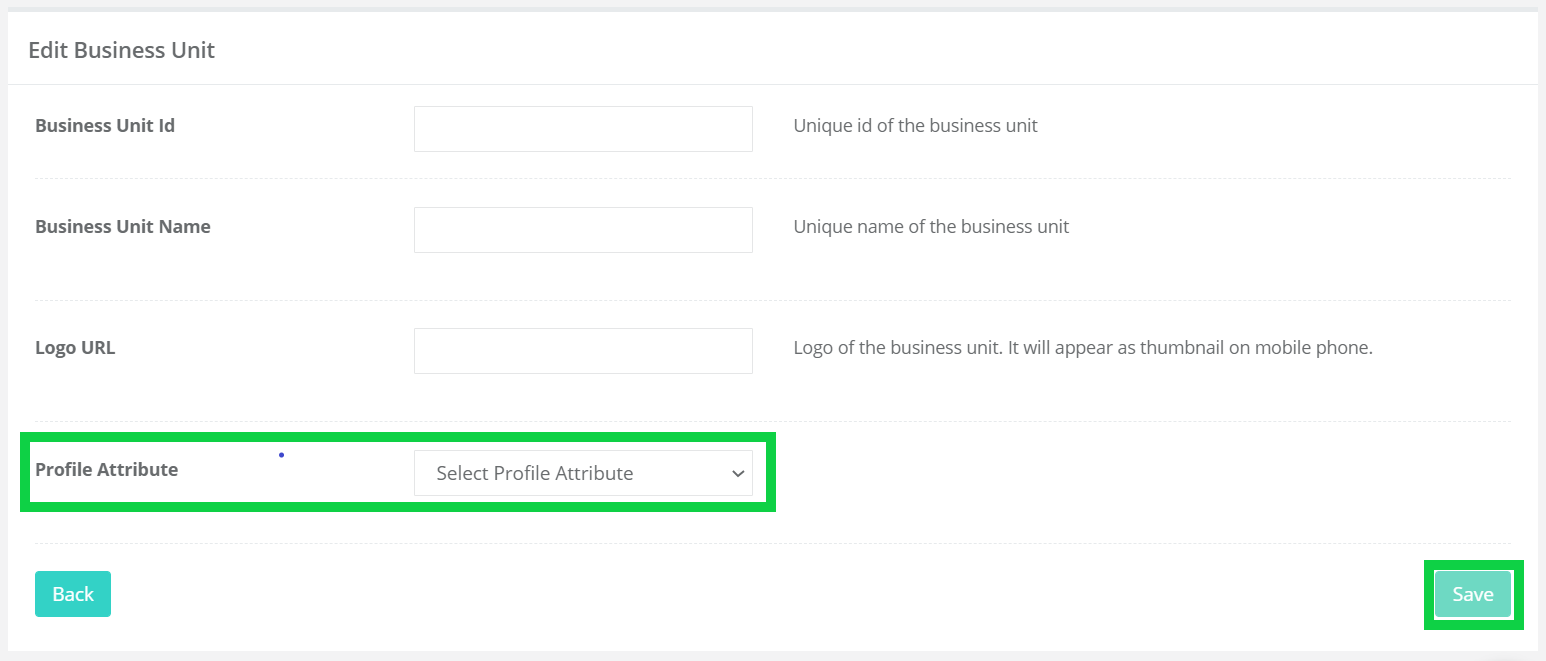
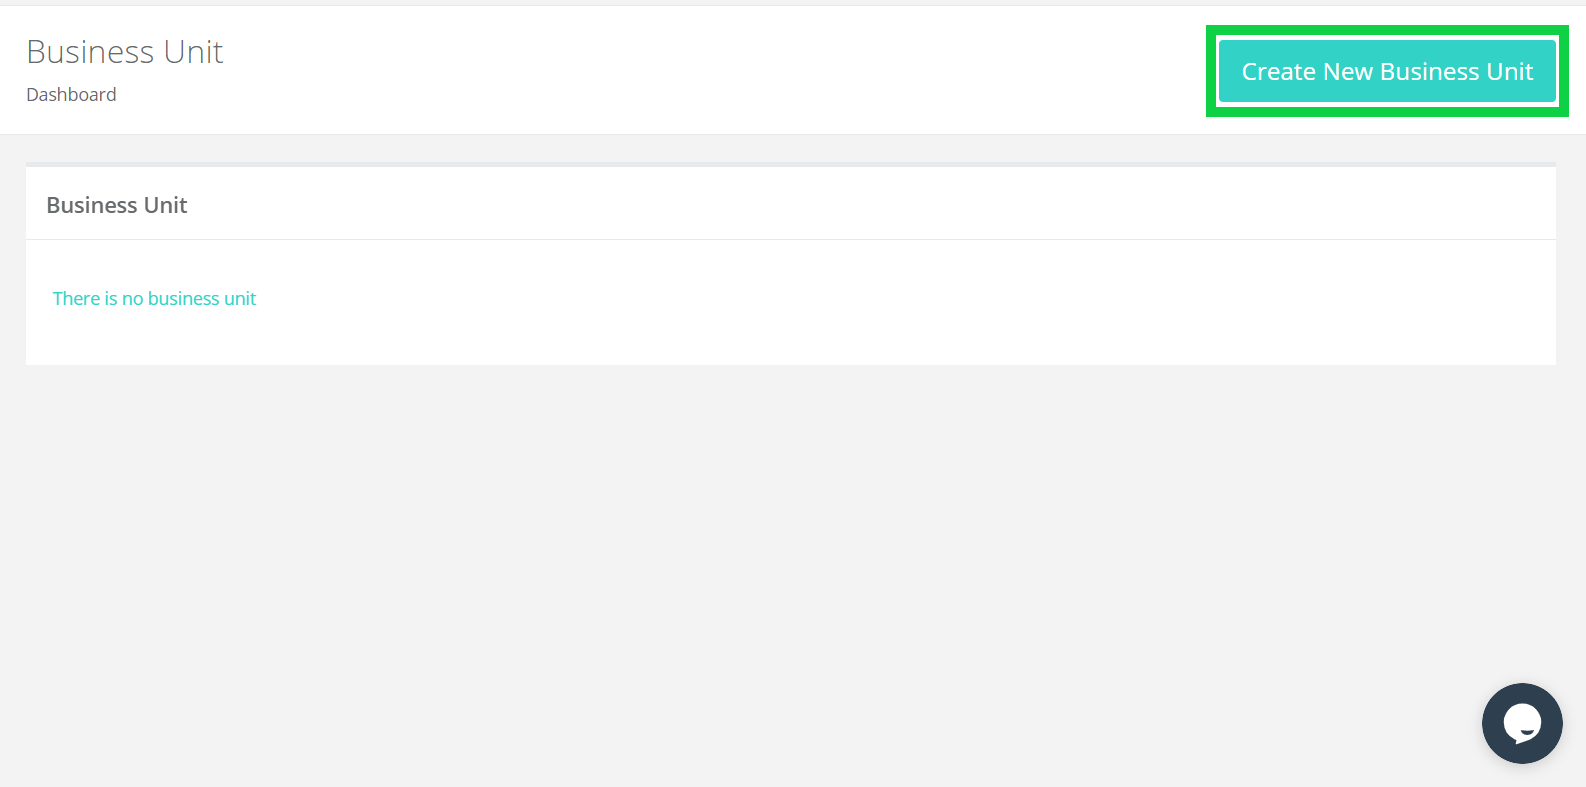
¶ Business Unit
- Business unit feature allows a single mobile application to be managed by different business teams from different panels. For example, for a mobile application serving in different countries, a panel to be used separately for each country can be created. Thus, campaigns made by different teams do not interfere with each other and each team can access their own reports and analytical data.
- A new Business Unit can be created by clicking on Create New Business Unit.
- Business Unit ID: It is the section where a unique ID of the Business Unit to be created is entered.
- Business Unit Name: This is the section where the name to be distinguished for the Business Unit to be created is written.
- Logo URL: This is the section where the URL of the Logo to be used for the Business Unit is entered.
- Profile Attribute: It is the section where the profile attribute is selected and used to separate the panels from each other. For example, by selecting the Country option as Profile Attribute, the panels of organizations operating in different countries and belonging to the same brand can be separated in this way.